fbpx

Video Marketing Strategies for Lawyers: Short-Form vs. Long-Form Explained

Is your firm using video to build trust and establish authority?

If not, you are missing out on LOTS of potential clients!

In today’s competitive legal landscape, video marketing has emerged as one of the most effective tools to achieve these goals. Whether you’re answering FAQs, educating clients, showcasing your expertise, or creating a personal connection, both short-form and long-form video formats have their place in a law firm’s marketing strategy.

This guide will explore the unique advantages of each video type, their specific use cases, and how your firm can strategically leverage both to grow your practice.

What Is Short-Form Video Content?

Short-form videos are normally under two minutes long and designed to deliver concise, impactful messages. They do well on platforms like Instagram Reels, TikTok, YouTube Shorts, and LinkedIn, where users scroll through content quickly and make snap judgments about what to watch.

Advantages of Short-Form Videos for Law Firms

  1. High Engagement Rates
    • Short videos align with the modern audience’s preference for quick, digestible content. A study by Wyzowl found that 73% of people prefer to watch a short video to learn about a product or service rather than read text or view images (Wyzowl, 2023).
  2. Budget-Friendly Production
    • Producing a 60-second clip about “3 Tips to Prepare for Divorce Mediation” is less resource-intensive than creating a lengthy video. Even attorneys with minimal equipment can create professional-looking videos with a smartphone and simple editing tools (HubSpot, 2024).
  3. Boosted Brand Awareness
    • Short-form videos are more likely to be shared across social media, increasing your law firm’s visibility. In fact, social media algorithms prioritize short, engaging content to keep users on the platform longer (Sprout Social, 2023).

Short-Form Video Ideas for Law Firms

  • FAQs: Address commonly Googled questions like “What should I do after being served with divorce papers?” or “How does bankruptcy affect my credit?”
  • Client Testimonials: Showcase real clients describing their positive experiences working with your firm. Happy clients are normally more than willing to help you out with these.
  • Behind-the-Scenes Clips: Give viewers a glimpse of your office culture or the preparation that goes into a trial.
  • Lawyer Introduction: Give people the chance to get to know you with a quick introductory video to you, your practice and give them a small glimpse into your life.  People want to hire an attorney that they can connect with.

For 18 examples of posts and clips you could create, check out our article on Social Media Marketing for Law Firms | Top 18 Social Post Ideas 

What Is Long-Form Video Content?

Long-form videos are over 5-10 minutes long and ideal for providing detailed explanations or storytelling. They work best on platforms like YouTube, your website, or during live webinars, where viewers are more likely to invest time in watching.

Advantages of Long-Form Videos for Law Firms

  1. Showcasing Expertise
    • Long videos allow attorneys to delve deeper into complex legal topics, which helps establish credibility. For instance, a 20-minute video explaining “The Legal Process of Estate Planning in 2024” demonstrates thorough knowledge and builds trust with potential clients (Forbes, 2023).
  2. Enhanced SEO
    • Search engines prioritize detailed, valuable content. A 15-minute YouTube video titled “Everything You Need to Know About Wrongful Termination Lawsuits” can rank higher on Google, directing more organic traffic to your website (Moz, 2023).
  3. Trust Building
    • Detailed videos create a sense of transparency. A potential client who spends 10 minutes watching your video on “How to Prepare for a Deposition” is more likely to trust you than a competitor with only surface-level content (Search Engine Journal, 2023).

Long-Form Video Ideas for Law Firms

  • Educational Webinars: Host webinars on timely topics, such as “Navigating New Tax Laws for Small Businesses.”
  • Case Studies: Walk viewers through the steps of a past case (while maintaining confidentiality) to showcase how you’ve helped clients achieve favorable outcomes.  This will help them picture what it’s like to work with you and your firm.
  • Deep Dive Explainers: Create detailed tutorials or “how-to” guides, like “The Step-by-Step Guide to Filing for Divorce in [Your State].”

Short-Form vs. Long-Form Video: How to Choose

When to Use Short-Form Videos

  • On Social Media: Instagram, LinkedIn, and TikTok favor short-form content.
  • To Capture Attention Quickly: Use short-form videos to grab interest and direct viewers to longer resources, such as a blog post or a webinar.
  • For Retargeting Campaigns: A quick video reminding past website visitors about your firm can re-engage them effectively (Neil Patel, 2023).

When to Use Long-Form Videos

  • For Educational Purposes: Long-form content is perfect for addressing complex legal topics that require more depth.
  • During Live Events: Webinars or live Q&A sessions can showcase your firm’s knowledge and allow for real-time audience interaction.
  • On Your Website: Adding long-form videos to landing pages can boost credibility and conversion rates (HubSpot, 2024).

Real World Example: Combining Short and Long-Form Videos

Short-Form Video: The Hook

A small family law firm creates a 60-second video titled “5 Signs You Need a Divorce Lawyer,” which they share on Instagram and TikTok. The video includes a call-to-action (CTA) encouraging viewers to visit their website for a more comprehensive guide.

Long-Form Video: The Value

On their website, the firm has a 15-minute video explaining the entire divorce process, what clients can expect during mediation, and how the firm supports clients at every step.

The Results

  • The short video captures attention and drives traffic.
  • The long-form video builds trust and converts viewers into potential clients.

Best Practices for Video Marketing in the Legal Industry

  1. Maintain Professionalism

Your videos reflect your firm’s brand. While short-form videos can be creative and engaging, they should remain professional and align with the gravity of your services.

  1. Leverage Analytics

Use analytics tools to track engagement metrics. For example:

  • Short-Form Metrics: Measure likes, shares, and views on platforms like Instagram.
  • Long-Form Metrics: Analyze watch time and viewer retention on YouTube or your website (Sprout Social, 2023).
  1. Invest in Quality

Good lighting, clear audio, and proper editing significantly impact how viewers perceive your videos (Vidyard, 2024).

  1. Use Calls-to-Action (CTAs)

Each video should end with a clear CTA. Examples:

  • “Contact us today for a free consultation.”
  • “Download our free guide on estate planning essentials.”
  • “Subscribe to our channel for more legal tips.”

Putting It All Together

Video marketing offers law firms a powerful way to connect with potential clients, demonstrate expertise, and build trust. By leveraging both short-form and long-form content, your firm can engage audiences at every stage of their journey—whether they’re scrolling through social media or researching solutions to complex legal problems.

The key is balance. Short-form videos capture attention, while long-form videos provide the depth and detail needed to convert that attention into meaningful client relationships.

Now is the time to make video marketing a cornerstone of your firm’s growth strategy. Start small, experiment, and watch as your video content transforms your online presence and drives measurable results.

Want to Boost Your Law Firm's Marketing with Expert Video Content?

While many attorneys recognize the power of video marketing to grow their practice and attract clients, common obstacles like time constraints and uncertainty about where to begin often hold them back.

That’s where we come in!

Our specialized video marketing services for law firms take the hassle out of content creation. We’ll help you produce months’ worth of professional short-form and long-form videos designed to engage your audience, build trust, and showcase your expertise—all with minimal effort on your part.

Imagine having all of your marketing done for a quarter of the year in 90 minutes, which is exactly what we do – Give us a call at 412.715.6266 to find out more.

Learn more about our video marketing services and start transforming your firm’s digital presence today.


6 Software Tools That IFTS is Grateful for in 2024

As a marketing team, we rely on innovative tools to streamline our workflows, enhance creativity, and drive results. This year, we’re reflecting on the software solutions that have been instrumental in our success. From simplifying design to managing finances and client interactions, these tools have become essential to our operations. 

In this blog, we’ll share six software tools that we are particularly thankful for in 2024, highlighting how they’ve made our work more efficient, impactful, and enjoyable.


Canva: A Game-Changer for Design and Video Editing

Canva has become an essential tool in our daily operations, revolutionizing how we create and share visuals. Its intuitive platform makes professional-grade design accessible to everyone, offering drag-and-drop simplicity for everything from social media graphics to blog headers and presentations. But Canva isn’t just about static images—it’s also a powerhouse for video editing, and that’s one of the key reasons we’re so grateful for it.

Canva’s video editing tools allow us to create dynamic video content without the steep learning curve of more complex software. Whether we’re crafting engaging reels, animated ads, or promotional videos, Canva provides pre-made templates, smooth transitions, and easy-to-use text overlays to help us create polished videos quickly. The ability to add music, trim clips, and adjust visuals all within the same platform saves us time and ensures our videos are always on-brand.

Another reason we’re thankful for Canva is its collaborative features. Team members can work together in real-time, giving feedback or making edits seamlessly. Plus, Canva’s cloud-based storage keeps all our designs and videos in one place, so we can easily access and update them as needed.

Canva empowers us to bring our creative ideas to life—whether through stunning visuals or engaging video content—while saving time and effort. It’s a tool we truly couldn’t do without.


Post Planner: Simplifying Social Media Strategy

Managing multiple social media accounts across various platforms can be overwhelming, but Post Planner simplifies the chaos. This tool is like having a personal assistant for social media strategy, helping us stay organized, consistent, and effective.

One of the reasons we’re thankful for Post Planner is its ability to schedule content with ease using its innovative bucket system. This feature allows us to organize content into categories, or “buckets,” such as promotions, tips, or testimonials. By creating these predefined categories, we can ensure our social media calendar is balanced and diverse, delivering a well-rounded mix of content to engage our audience.

What makes the bucket system truly powerful is how it streamlines scheduling. Once our buckets are set up, we simply assign posts to the appropriate categories, and Post Planner takes care of the rest. This eliminates the guesswork from scheduling, making it easy to maintain a consistent presence across all platforms without feeling overwhelmed.

We’re also grateful for the time-saving automation that Post Planner provides. Instead of manually scheduling each post, we can load up our buckets with content in advance and trust that it will go out on time, according to the schedule we’ve set. This frees us up to focus on crafting high-quality content and engaging with our audience, rather than getting bogged down in the logistics.

Post Planner’s bucket system has transformed how we manage social media, making it one of the tools we’re most thankful for in our day-to-day operations.


GoHighLevel: The All-in-One Powerhouse for Agency Owners

As an agency owner, managing the wide array of tools needed to run a successful business can be overwhelming—not to mention expensive. This is where GoHighLevel (GHL) has been a complete game-changer. It consolidates multiple software tools into one powerful platform, saving agencies like ours thousands of dollars each year. Instead of juggling subscriptions for tools like Mailchimp, ClickFunnels, Calendly, and even review management platforms, GHL handles it all seamlessly. It simplifies our workflows and allows us to focus on delivering results for our clients, rather than managing disparate systems.

What truly sets GHL apart is that it’s not just a tool we use internally—it’s a platform we can offer directly to our clients. With GoHighLevel, we provide clients access to features like automated CRM workflows, email marketing, and appointment scheduling, all under one roof. This creates added value for them and allows us to generate additional revenue streams. It’s a win-win scenario that enhances client satisfaction and strengthens our business model.

One of my favorite features of GHL is its robust review management functionality. The ability to collect, manage, and showcase reviews is essential for any business. GoHighLevel takes this a step further with its AI-powered autoresponders, which handle review replies efficiently and professionally. The platform also includes widgets for seamlessly displaying reviews on websites, as well as automation options for posting positive reviews to social media. These tools not only make managing reviews easy but also help boost credibility and attract more leads for both us and our clients. GHL is truly a one-stop shop that continues to impress me with its versatility and value.

Adobe Premiere Pro: The Ultimate Video Editing Tool

When Canva’s simplicity isn’t enough to meet our creative demands, Adobe Premiere Pro is there to fill the gap. As much as I love Canva for quick, polished content creation, it lacks the depth and precision required for professional video editing. Premiere Pro stands out as the gold standard, offering unmatched flexibility and advanced features that allow us to elevate our video content to the next level.

One standout feature of Premiere Pro is its green screen removal capabilities. This tool makes creating dynamic, professional-looking videos possible, even when filming in less-than-ideal settings. Whether it’s replacing a bland backdrop with something engaging or achieving a polished cinematic look, Premiere Pro ensures we can bring our creative vision to life with ease.

Beyond visuals, Premiere Pro excels in audio editing. The ability to remove background noise, adjust audio levels, and fine-tune soundtracks ensures our videos not only look great but also sound professional. Another feature I find invaluable is the lighting adjustments. With Premiere Pro, we can correct and enhance lighting in post-production, fixing issues that would otherwise require a reshoot. These advanced editing options give us creative control over every aspect of our projects, enabling us to deliver content that stands out.

While Canva remains an essential tool in our arsenal, Adobe Premiere Pro fills a critical gap for those moments when we need to go beyond the basics. It’s an investment that has more than paid off, helping us produce high-quality, impactful videos that engage and impress our audience.


WHMCS: The Ultimate Billing Solution for Web Design and Hosting Agencies

As a business owner in the web design and hosting space, managing billing and client support can account for a sizable part of my work week. That’s where WHMCS comes in. This robust billing software is specifically designed with web design and hosting agencies in mind, making it an indispensable tool in my workflow. One of the things I love most about WHMCS is the sheer number of integrations available, many of which are completely free and officially supported. Whether it’s connecting with popular payment gateways (think PayPal and Stripe), hosting providers, or domain registrars, WHMCS makes the entire process seamless. This means I can streamline my billing process, automate recurring payments, and manage client interactions all within one platform.

Another feature that stands out to me is the inclusion of a fully integrated support ticketing system. As someone who values customer service, I appreciate how this system allows me to manage client inquiries efficiently. Clients can submit tickets, and I can track and resolve issues in an organized way, all while ensuring no communication falls through the cracks. It’s a complete package that simplifies both the business side and the client interaction side of running a hosting or web design agency.

When it comes to customer support, WHMCS also delivers. I’ve experienced incredibly quick and helpful responses from their support team, which has been a lifesaver on more than one occasion. Whether I’m troubleshooting an issue or need clarification on a feature, WHMCS support is there to assist swiftly and thoroughly regardless of the difference in time zones. Knowing that I have such reliable assistance when needed gives me confidence in using the software long-term. In an industry where time is money, having a billing solution like WHMCS means less time spent on administrative tasks and more time dedicated to growing my business.


Rightworks Transaction Pro: The Perfect Partner for QuickBooks Desktop Pro

When it comes to managing my finances, I’ve always been a loyal user of Intuit QuickBooks Desktop Pro. But like many others, I’ve found myself working with an older, unsupported version of the software. This could have meant a real headache, especially with the constant need for compatibility with newer systems, applications and bank feeds. That’s where Rightworks Transaction Pro comes in and completely changes the game. This easy-to-use software allows me to seamlessly import all my financial data—whether it’s invoices, payments, credit card charges, payroll or bill payments—directly into my QuickBooks Desktop Pro instance with minimal effort. It’s a relief to know I don’t need to upgrade to a newer QuickBooks edition just to get the functionality I need, especially as many believe Intuit may be phasing out their desktop product in the coming years.

What really sets Rightworks Transaction Pro apart is how effortlessly it works. The user interface is intuitive, which means I can import transactions (as a CSV, an Excel file, etc) without having to spend hours learning complicated systems or dealing with technical issues. It’s a simple plug-and-play solution that makes a huge difference in my day-to-day operations. Since implementing Rightworks Transaction Pro, I’ve been able to keep my books up-to-date throughout the year, instead of scrambling to get everything in order right before tax season. This has taken a huge load off my shoulders, as it ensures I stay on top of my finances all year long.

One of the greatest benefits of Rightworks Transaction Pro is the consistency and reliability it brings to my accounting workflow. There’s no need to manually input transactions or waste time reconciling errors, and that peace of mind is invaluable. It allows me to focus on running my business, knowing that my financial records are being handled accurately and efficiently. Whether it’s small business or personal use, Rightworks Transaction Pro has proven itself to be a trustworthy tool that keeps me organized, saves me time, and makes my QuickBooks Desktop Pro work even harder for me.

Looking Towards 2025

As we look back on 2024, it’s clear that the right tools can make all the difference. Each of these six software solutions—whether for design, video editing, billing, or social media management—has empowered us to achieve more with less effort. They’ve helped us stay creative, organized, and connected, both internally and with our clients. As we head into another year, we remain grateful for these game-changing tools and excited about the possibilities they’ll unlock in the future. 

Let us know if you need help setting up any of these tools.

Here’s to continued growth, innovation, and gratitude in 2025!


Is Your Business Ready for 2021 – 8 Simple Steps to Take to Make 2021 Your Best Year Yet

Is Your Business Ready for 2021 - 8 Simple Steps to Take to Make 2021 Your Best Year Yet

Are you a small business owner ready to say “Bye Felicia” to 2020?

I think that we all are!

However, if there was one thing that 2020 taught us, it was that your online presence is now more important than ever…and this doesn’t just mean your website.  Your online presence consists of many pieces, like your website, your Google My Business Profile, your social media spaces and so much more.

Want 2021 to be your best year yet?  In this article, we are going to cover 8 simple steps that you can take in January (2 per week) to help your business get ahead of the game!

Week One will cover choosing the best keywords for your business and improving your onsite SEO.

Week Two will take you through everything that you need to do in order to improve your Google My Business profile and start getting leads through Google Local Search.

Week Three covers EVERYTHING that you need to do to create content for the whole year and how to save time and money while doing it.

Finally, Week Four forces you to up your video game and start using the second largest search engine in the world.

Are you ready?  Let’s get started!

Week One – Up Your Onsite SEO Game and Be Found More Easily In the Search Results

STEP 1 – Figure Out What Keywords Are Best For You

Is your website working for you as well as it should be?  Are people finding your business online?  If not, your search engine optimization, or SEO, may be to blame.

To improve your SEO, the first step is to create a list of popular keywords or phrases that you want to rank for.  To create this list, I recommend a combination of brainstorming, asking your current clients what they typed in to find you and an online keyword research tool called SEMrush.  You can use the free version to find the information that you need.

Take thirty minutes and brainstorm the keywords that you think your ideal clients would type into Google or Bing.  When this is done, send an email to a few of your best clients and ask what they would type in to find you.  It’s always great to get into their minds.

As an example, one of our clients is a personal injury firm in Greensburg, PA.  Their brainstorming list included the following:

  • Personal injury law firm in Greensburg PA
  • Personal injury attorneys Westmoreland County
  • Greensburg Personal Injury Attorneys
  • Personal Injury Attorneys

However, when they asked a few of their clients what they typed in Google to find them, they received a slightly different list:

  • Personal injury lawyer
  • Personal injury lawyer near me
  • Personal injury lawyer Greensburg
  • Greensburg lawyer personal injury

They found out that while they were calling themselves attorneys on their website, more of their clients were typing in lawyer!  They also discovered that none of their clients even thought to use the county that they were located in.

Want to know what keywords you are currently ranking for as well?  Be sure to add them to your list!  IFTS can send you a free report with that information.  Enter your information below.  You should receive your report within 10-15 minutes.

Once you have your list, you are ready to use SEMrush!  This tool will help you figure out what the most popular phrases are on your list.

First, sign up for your free account here: https://www.semrush.com/signup/?src=header

Then, after you have created your account and are signed in, you are ready to start using this tool.  Enter the first keyword phrase from your list into the search bar.

In this example, we will use the phrase “Personal injury lawyer Greensburg”.  The following results are returned to us:

This tells us that the number of times that this phrase is searched monthly on Google in the United States is 30 times (the VOLUME).  The keyword difficulty (or how hard it is to rank organically for this phrase) is 54%.  Anything under 60% is normally a great keyword to rank for quickly.

The other important results to look at are the “Keyword Variations” and the “Related Keywords”.  The keyword variations will show you common variations on your searched phrase.  The related keywords list shows you phrases similar to the one that you searched.  This is a great way to find phrases that you may not have thought about.

Repeat this process with all of your keywords from your list.  If the “Related Keywords” list has any good suggestions, add them to your list as well.  We recommend creating a spreadsheet that looks like the one below:

Once you have the data for your whole list, go through and highlight the keywords that are searched often and have a lower keyword difficulty.  These will be perfect keywords to target across your online presence.

Keep this list for the rest of the steps in this process.  It is the basis of everything else!

STEP 2 – Incorporate Popular Keywords and Locations into Your Page Titles and Headers

Now that you have your list of popular keyword phrases, you will need to use them in your website.  You will want to choose one or two keyword phrases to be the main focus for each page of your website.

The first important place to use keywords is your page title. The page title is the text in the browser tab.  It is also the text that shows as the title in the Google search results.

A good rule of thumb for a page title is to use the following convention:

“Keyword 1 – keyword 2 | Name_of_Company Location_of_Company”

So, for our example, a good homepage title for our law firm may be “Personal Injury Lawyers – Accident Attorneys | Law Firm Name Greensburg, PA”.  This lets Google know exactly what your page is about and who your company is.

Create new page titles for each page of your website.  In WordPress, you can do this using the Yoast plugin.  If your website is in SquareSpace, you can change this in the general page settings.  If you have a website developer, just let them know the text that you want to use.

After you have changed your page titles, you will want to be sure that each page of your website has one <h1> header on it and that it contains one of your important keywords in it.  This header is the most important and it is another sign to Google that tells them what your page is about.


Week Two – Quickly Improve Your Google Local Presence

STEP 3 – Perfect Your Google My Business Profile

If your business depends on people finding you locally, your Google My Business profile is a great advertisement.  If you have not claimed your business profile yet, go through that process described here by Google: https://support.google.com/business/answer/2911778?co=GENIE.Platform%3DDesktop&hl=en

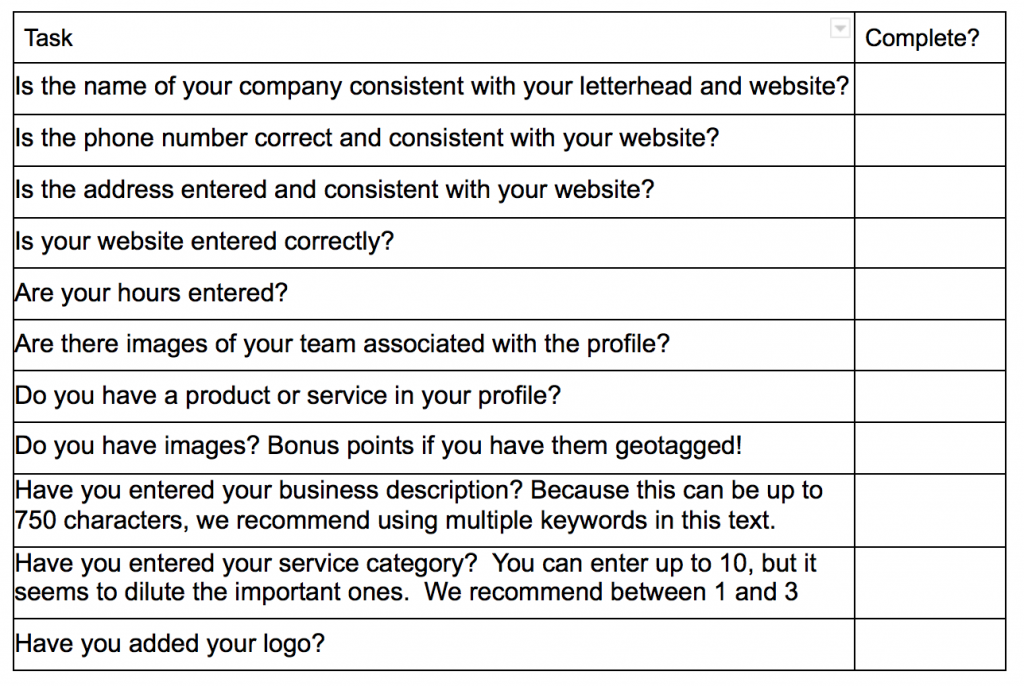
Once your profile is claimed, there are 11 things to complete to make sure that your profile is optimized.  We have listed them below in an easy to use checklist:

For more in depth information on filling out your profile, check out this article: https://blog.iftsdesign.com/introducing-google-my-business/

STEP 4 – Get More Reviews (and Answer Them)

When Google is deciding whose business to show in the Google Local area (also known as the map pack or 3 pack), they look at a multitude of factors.  One main factor is the proximity of the person to your business location.  Unfortunately, you can’t do anything to affect this.  Another factor that Google will look at is the number of reviews and your overall rating, which is where you can shine!

Google’s number one priority is to be helpful to their end user (the searcher).  So, they want to show people the best option for their query.  It is up to you to prove that you are that option!

Create a system for requesting reviews from your satisfied clients.  If you have one-time clients, ask them for a review via email or text at the end of their purchase cycle.  This also gives you an opportunity to have one last touch point.

If you have clients that have a renewal cycle, ask them for a review at the end of that process.  This is a nice way to end the renewal and get you credit for doing a great job!

A common objection that we hear is that people don’t know what to say.  Make it easy on your clients! Send them an email with a direct link to leave a review on Google as well as a suggested list of questions to answer for the review.  This also allows you to “sneak” keywords into your questions…and hopefully, they will repeat those keywords in their answers!

The most important thing to remember about reviews – when you receive a review, reply to it!

This works in a positive manner for your business in multiple ways.  First of all, the person that left the review feels appreciated because you took the time to thank them.  Prospects who are looking at your profile will see that you read/reply reviews and care about your clients.  Finally, it helps with your local SEO because you and your clients are using keywords and phrases in the review and reply.

Need help getting more reviews?  Check out our article on “10 Proven Ways to Get More Online Reviews for Your Business.”

Week Three – Make Posting to Social Media A Breeze

It’s hard to have a consistent social media presence without a plan and the right tools to do it!  Week 3 is where this is addressed.  You should be able to spend less than 4 hours per month to create and post all of your content!

STEP 5 – Sign up for a OneUpApp Account

There are multiple social media scheduling apps available.  The one that we recommend is OneUpApp.  One of the main reasons is because it connects and posts to LinkedIn, Facebook, Instagram, Twitter and most importantly, Google My Business.

Google has said that starting in 2021, they will be looking to see who is utilizing their GMB profile updates.  These updates will start to be shown on Google Maps.  So, if you have recent, consistent updates, your profile is sure to stand out!

To sign up for an account, go here: https://www.oneupapp.io/register

There is a small cost associated with OneUpApp, but because it connects to all of the profiles that you need, it’s worth it!  Most free scheduling apps do not connect to Google My Business.

Take a few minutes and connect your social media profiles to finish the account set up. You will now be able to schedule posts to all of your social media accounts at one time!  This will save you a huge amount of time and make your business look professional while doing so.

STEP 6 – Create a Schedule for the First Half of the Year (and repeat for the second half) 

Now that your social media scheduler is set up, you need to create some content to post.  To create this content, start with another list.

Write down every question that you receive from your clients on a regular basis.  Most companies can come up with at least 10 or 20.  Make sure to include questions, even if you think that the answer is obvious because it may not be obvious to your client.

Aim for 24 questions, which allows you to address one question every week for 6 months.

Why questions, you may ask?  As we mentioned before, Google wants to be as helpful as possible for their end users.  They want to answer their questions, which is what your content will be doing.

Can’t think of 24 questions?  Again, we will turn to SEMrush and your keyword list!

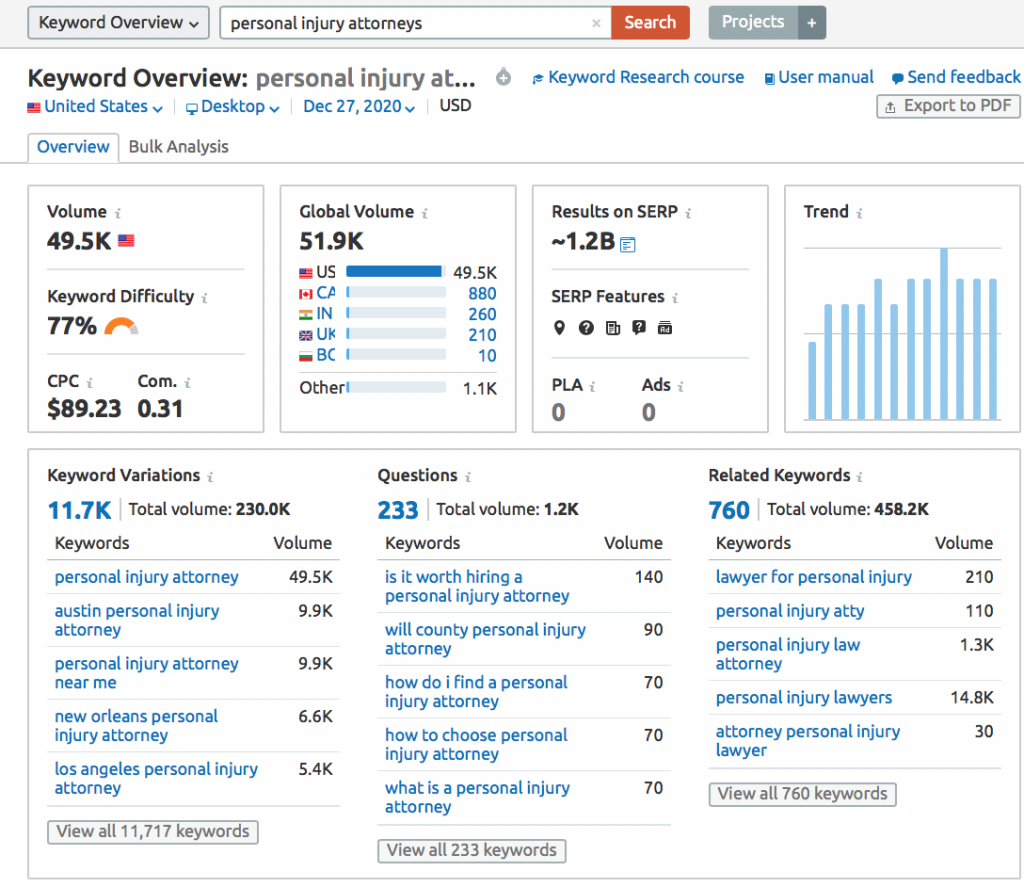
Let’s use the term “Personal Injury Attorneys” as an example.  The results for the term are below:

Look at the section titled “Questions”.  This gives you frequently searched phrases that pertain to your keyword phrase.  So, one question that an attorney should put on their list is:

“Is it worth hiring a personal injury attorney?”

Once you have your list of 24 questions, put them in an order that makes sense.  Typically, I suggest putting them into main categories if possible and addressing one main category per month.

As an example, let’s say that the personal injury firm mainly handles cases that revolve around auto accidents, medical device defects, trucking accidents and workplace injuries.  These would be great main categories and each one could have 6 questions associated with it.

Assign a week to each question in your list.

There are 2 ways to create the actual content itself.  The one that you pick depends on your personality.

Option 1 – Write down the answer to the question.  Then, once you have your answer written, record yourself reading the answer as a video.

Option 2 – Record yourself answering the question in video format.  Try to keep your answers within 60 seconds.  Then, use a free transcription service like otter.ai to create the text.

Once you have the text, post it to your blog and schedule it to release the Monday of the week that it is assigned.  Make sure that the page title contains the main keyword in the question.  Be sure that your <h1> is the question itself.

Next, edit the video if you want.  There are multiple video editing software apps out there that make editing a breeze.  

Upload the finished product to YouTube and schedule it to release the Tuesday of the week that it is assigned.  Again, be sure to make the title of the video the question itself.  The description should have the question repeated in it plus a small summary of the answer.  Bonus points if you have incorporated keywords into your answer!

Now, here is a posting schedule to get a week’s worth of content from one question:

Monday: Post the link to your blog

Tuesday: Post the link to the YouTube video

Wednesday: Pull out one helpful sentence from the text and create a quick “quote” post.  This can be done using the free version of Canva in less than 2 minutes.

Thursday: Post an additional fact that goes along with the question.  You can do this with plain text or you can create another “quote” post. 

Friday: Post a link to the video from the week before with the label “In case you missed it” (Obviously, this cannot be done the first week, but it works for every other week)

You get bonus points for using hashtags!

Once you know what you want to post, sign into OneUpApp and schedule the posts.  To learn how to schedule posts, check out their video here: https://www.oneupapp.io

I’d recommend scheduling at least one month at a time.  This way, you can take a small amount of time from your day and get all of your social media for the month done in less than 2 hours!

Once you get through the first 6 months, you can just repeat your content. The average life of an online post is less than one month, so don’t worry about people seeing repeats.  I promise, they will not remember.

Week Four – Take Advantage of Offsite SEO Opportunities


STEP 7 – Optimize (and Create if Needed) Your YouTube Channel

If you don’t already have a YouTube channel, you are missing out on a traffic opportunity.  YouTube is the second most popular search engine and it’s owned by Google!

Create your YouTube channel for your business if it doesn’t exist already.  Need help with this task?  Follow these instructions from YouTube: https://support.google.com/youtube/answer/1646861?hl=en

Once you have signed in, you can start optimizing your company’s channel!  Try using the following tricks:

  1. If you can, use a keyword in your channel’s name.  This can help your channel show up for organic searches.  For example, an easy way to do this for a law firm would be to name the channel “[COMPANY NAME] – Your Personal Injury Law Firm in Greensburg, PA”.
  2. Make sure to completely fill out the “About Us” section.  Be sure to include relevant keywords.
  3. Include a link back to your website.  If people want to learn more about your company, make it easy for them to do so.  It also helps with your SEO rankings.
  4. Fill out your channel keyword tags.  This tells the search engines what your channel is about and who you are.
  5. Create a “trailer” video for your channel, if one does not already exist.  Typically, this should be a 30-60 video that introduces you, your business and lets people know what they should expect to learn about in your videos.  
  6. People typically decide whether to watch a video within the first 15 seconds, so make that time count!  Try to grab your audience’s attention with a big motion, a relevant prop or a question that makes them say “I want to learn more about that!”  Bonus points if you can include a major keyword phrase in this time as well.
  7. Do you have videos that would group well together?  Create a playlist with them and send your viewers on a journey through your material.  Try to create at least 2 playlists.

STEP 8 – Check Out Your Current Backlinks (and Create a Plan to Get More)

A backlink is a link from another website to your own site.  Most businesses will have backlinks from a multitude of places, such as:

  • Local chamber of commerce
  • BBB
  • Social Media Profiles
  • Local News Story
  • Company that you collaborated with
  • etc

One major factor that Google looks at when it comes to deciding who shows up first in search results is the number of backlinks that a page has.  Now, when the Google algorithm was first invented, it would only look at the volume of links.  This paved the way for link farms and other dishonest means of creating backlinks.  However, this is no longer the case.

Google now looks at the number of links that you have along with the authority score of those sites.  Authority score is basically a measure of trustworthiness.  So, more links is not necessarily a good thing.  They have to be links from a reputable source.

To see the backlinks that you currently have, go back to SEMrush.  Enter your domain name into the search.

The results will show you the number of backlinks that you have as well as the number of referring domains.  The referring domains are the websites that contain links to your website.

In the example below, you can see that there are 498 backlinks from 35 domains.

If you click on the backlink number, it will show you some of the links and referring domains.  With a paid plan, you can actually see all of the links and the referring domains.

Now that you have your baseline, you are ready to start building links.

One way to build links is to make sure that you are in all of the top local business directories.  IFTS offers a list of the top 25 places to get a free business citation here: https://blog.iftsdesign.com/local-citation-pdf/

Another way to build links is to look at your competitors.  Make a list of your top ten competitors and enter their domains into SEMrush.  How many backlinks do they have?  You should have a goal to have more backlinks than them.

You can also look to see who is linking to them by clicking on their backlink number.  Check out the referring domains.  Go down the list and look at each backlink.  Is it a niche directory that you hadn’t heard of?  Submit your listing there.  Is it a local business group?  Enter your name as well.  Is it an organization that accepts articles from people in your area?  Send them a link to yours!

Backlink building is tough and requires you to stay on top of the task.  Choose a ten minute time period each week and start working on this.  Aim to gain 1-3 new backlinks per month.

Congratulations!  You Made It Through All 8 Tasks!

This is just the beginning, but by jumpstarting January 2021, you’ll be setting yourself and your business up for success in the new year.

Have any questions or need help with any of the tasks listed above?  Send me (Stacey Ivol) an email at si@iftsdesign.com or give IFTS, Inc. a call 412.715.6266 for a FREE consultation.