fbpx

In Case You Missed It – The Most Popular Marketing Articles from IFTS From 2021

Every type of business requires its own set of marketing methods. Whether your painting company is just getting started or is ramping up to meet ambitious growth targets, you’ll need a comprehensive marketing approach to get you there. Your painting company’s growth may become stagnant if you don’t have one, which isn’t where you want to be!

In this article, we are going to recap our top five most popular blog posts from 2021. For more information on any of these topics, be sure to check out the full article or corresponding YouTube video for each topic!

As a painting company, it’s critical that all of your customers, particularly those in your immediate neighborhood, are aware of your existence and can locate you if they need your services. This is referred to as local marketing.

A painting firm can advertise directly to the specific location where it operates through local marketing.

Painting companies who use local marketing methods can attest to the increase in business that comes with it. Here are a few of the advantages you can’t afford to overlook:

  1. Target customers based on their interests
  2. Low-cost
  3. Your business will appear in local search
  4. Lasting business relations
  5. Branding and brand control
  6. Scaling your business
  7. Accessible booking
  8. Keeping track of marketing efforts

Implementing a well-thought-out local marketing plan may help any painting company develop significantly.

Read the full article on this topic where we dive into these 8 benefits of local marketing for painting companies and why you should start implementing these strategies today.

If you want your business to stand out from your competition and you want to dominate local search, you need to focus on developing a system that will generate a consistent stream of positive online reviews for your company.

When someone in your neighborhood searches for a company like yours, you need to appear first in the organic search results and be the obvious pick. 

Google considers internet reviews when determining organic ranking. Quantity, quality, frequency of delivery, and product/service keywords will all be taken into consideration. Then they’ll look at the same thing for your competitors. To appear higher in the rankings, it is critical that your company outperforms its competition in each of these areas.

Here are 10 ways to get more reviews, improve your local search visibility, and boost your company’s online presence.

  1. Create a “Review Generation Strategy” to get reviews on all of the sites that matter to your clients.
  2. Ask your 5-Star Reviewers for referrals
  3. Train your employees to ask for reviews 
  4. Use feedback forms proactively to stop negative online reviews and comments 
  5. Respond to every review to build trust with future prospects and increase your online authority 
  6. Request online reviews from your happiest customers
  7. Ask your 5-Star Reviewers to leave reviews on multiple platforms (or on video) 
  8. Make collecting customer emails part of your onboarding process 
  9. Use SMS texts to request reviews 
  10. You can use incentives, but be cautious with the rules

The value of internet reviews and keeping track of your online reputation is critical to your company’s success.

To read more about these 10 ways to get more online reviews, visit our full article where we dive into the details on how to consistently get multiple positive reviews while improving your visibility online.

Did you know that on mobile alone, YouTube reaches more people in the 18-49 demographic than any American cable television network?

Here are three easy steps to set up your YouTube channel for your painting business!

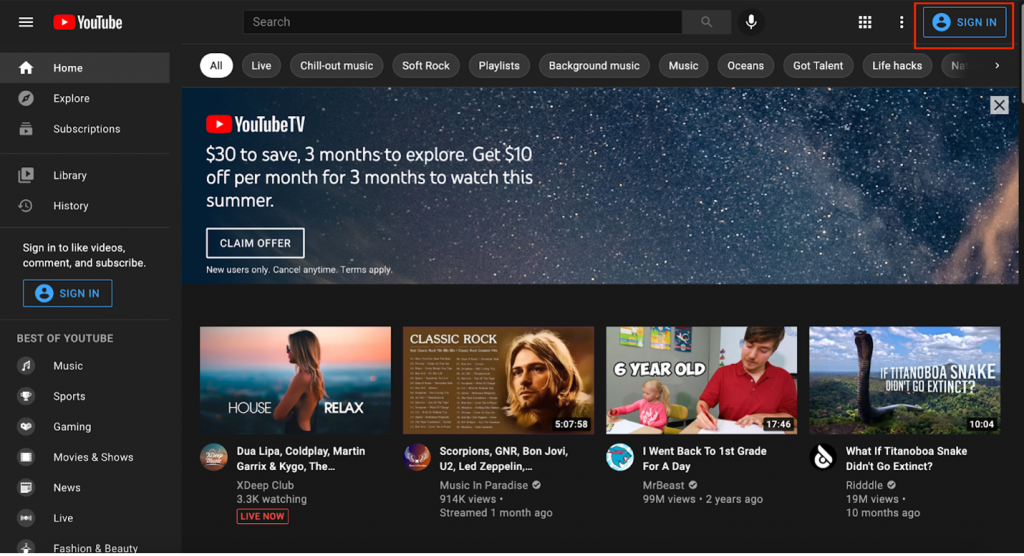
1. Sign in to YouTube

Go to YouTube.com and sign in using the sign in button in the upper right corner. If you already have a Google account, sign in with that email address and password.

Signing in to YouTube

2. Create Your Channel

In the top right corner of the screen, you will see your profile icon. Click on the circle icon and select “Create a Channel”.

How to create a YouTube channel

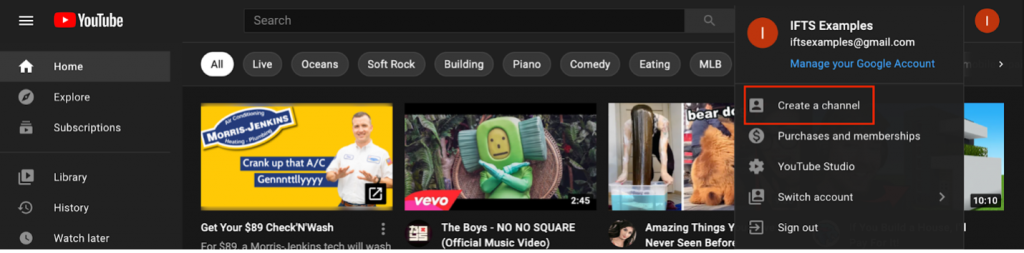
From this step, you will be prompted to choose your channel name and profile picture.

3. Customize Your Channel

In this step of creating your YouTube channel, you will focus on making your channel welcoming to visitors. This will also help with your SEO.

Visit the customization tab in YouTube studio.

Customize YouTube channel

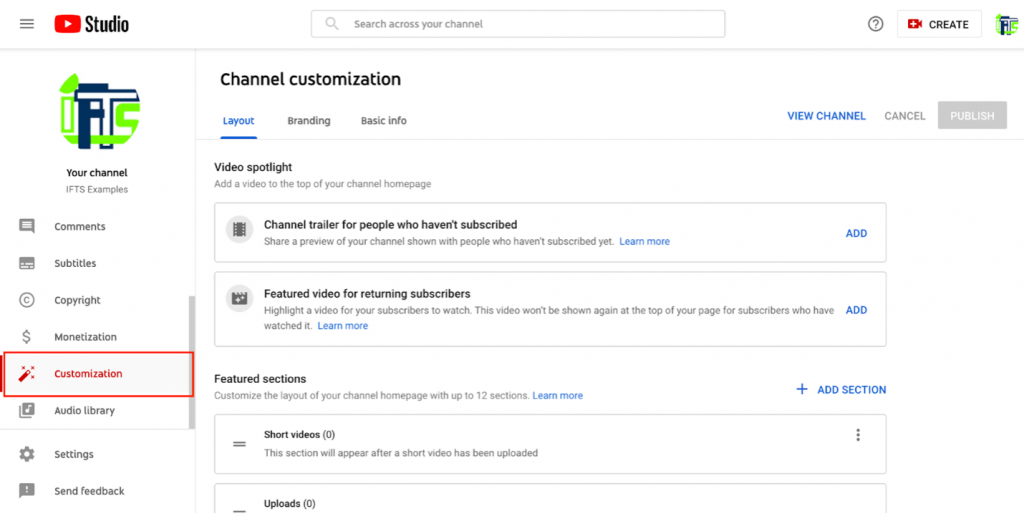
Here, you will see three tabs – layout, branding and basic info.

Layout

Under this tab, you may choose and manage what people will see when they visit your channel. When someone visits your channel, the main video they will see is the video spotlight. You can include a channel trailer for individuals who haven’t yet subscribed to your channel. This is just a short video showcasing what you do and what viewers may anticipate from your channel.

Branding

Under this tab, you can edit elements such as your profile picture and banner image. If you know what a Facebook cover photo is, a YouTube banner image is very similar. When someone views your YouTube channel, this banner will show at the top of the page.

Basic Info

You may update your channel name and description under the basic info tab, as well as add translations in other languages, links to sites you wish to share with your viewers (such as your company’s website), and contact information if you want people to email you with inquiries. Make sure to provide a link back to your business.

After making changes to any of these tabs, always be sure to hit the “publish” button to make your edits live on your channel.

To continue reading about how video marketing benefits your painting company, check out the full article here.

Do you find it difficult to find new customers online? If so, social media is your answer!

Painting companies have always depended heavily on word of mouth to gain new clients. While this is still a very relevant – and constructive – method of marketing, technology is allowing modern-day digital advertising to gain momentum. The Internet provides businesses with a variety of options for reaching a larger audience and maintaining control over their reputation. Social media is one such tool.

Social media platforms are more than places for business pages and profiles to be housed. They serve as hubs for individuals to interact, share their thoughts, make suggestions, and express their likes and dislikes – doesn’t that sound a lot like word-of-mouth marketing to you?

Let’s check out the top 5 social media platforms for painting businesses!

1. YouTube

This video-based platform offers areas for sharing photographs, going live with an audience when launching videos, and building a community. Do you want to demonstrate your painting abilities? Maybe you could provide a how-to video on how to paint like a pro? YouTube is your best bet if you want to go the video route.

2. Facebook

For all types of businesses, creating a Facebook Business Page is a top choice. It may be used to develop a range of content geared on attracting, nurturing, and retaining customers. You may use Facebook to publish text, images, videos, contests, and events, as well as create an ecommerce page where you can sell products/services or schedule appointments.

3. Instagram

Instagram has swiftly evolved into the easiest platform to advertise services to a younger target audience, as it attracts a younger demographic than Facebook. Who said that young people aren’t homeowners or that they don’t require painting services? Many individuals, especially DIYers, prefer to spend time on Instagram looking for new ways to spice up their homes.

This site supports photographs and short videos; utilizing the proper hashtags while uploading these will help you gain more followers than you think! The site also has a number of features that allow you to conduct surveys and polls, make lengthier videos, and share interesting content from within the platform.

4. Twitter

Twitter is a wonderful alternative if you’re searching for a formal way to interact with your audience. On Twitter, text material is restricted to 280 characters. As a result, if you need to send a lengthier message, you can start a thread or utilize alternative platforms.

5. LinkedIn

LinkedIn takes the cake when it comes to professionalism. It’s the only social networking site where formality reigns supreme. On LinkedIn, however, you won’t find many active business pages; rather, it’s the business owners and their staff that are more actively and continually seeking connections. On LinkedIn, B2B networking is a major deal.

To learn more about using these platforms and finding the right fit for your business, check out our full article for more information.

Has the Apple iOS update affected your Facebook advertising this year? Now that Apple has implemented new privacy updates to iOS 14.3, users are actually able to see how each app uses their data. 

The most major change is that instead of asking customers to opt-out of having their data monitored, Apple will instead need them to opt-in to having their data tracked.

Facebook has been attempting to counter Apple’s claim that it will harm small companies. They took out newspaper ads, ran Facebook ads against it, and looked at other possibilities, but the rollout has already been in effect for a year. 

What happens when people opt out of being tracked?

When people opt out of being tracked, what does this mean for your Facebook ads?

You won’t be able to track online conversions from mobile users the same way you used to, and your retargeting audiences will shift or be missing iOS users.

What happens when they opt into being tracked?

Facebook has estimated that 10–15 percent of individuals will opt-in to being tracked. What does this mean for your Facebook Ads?

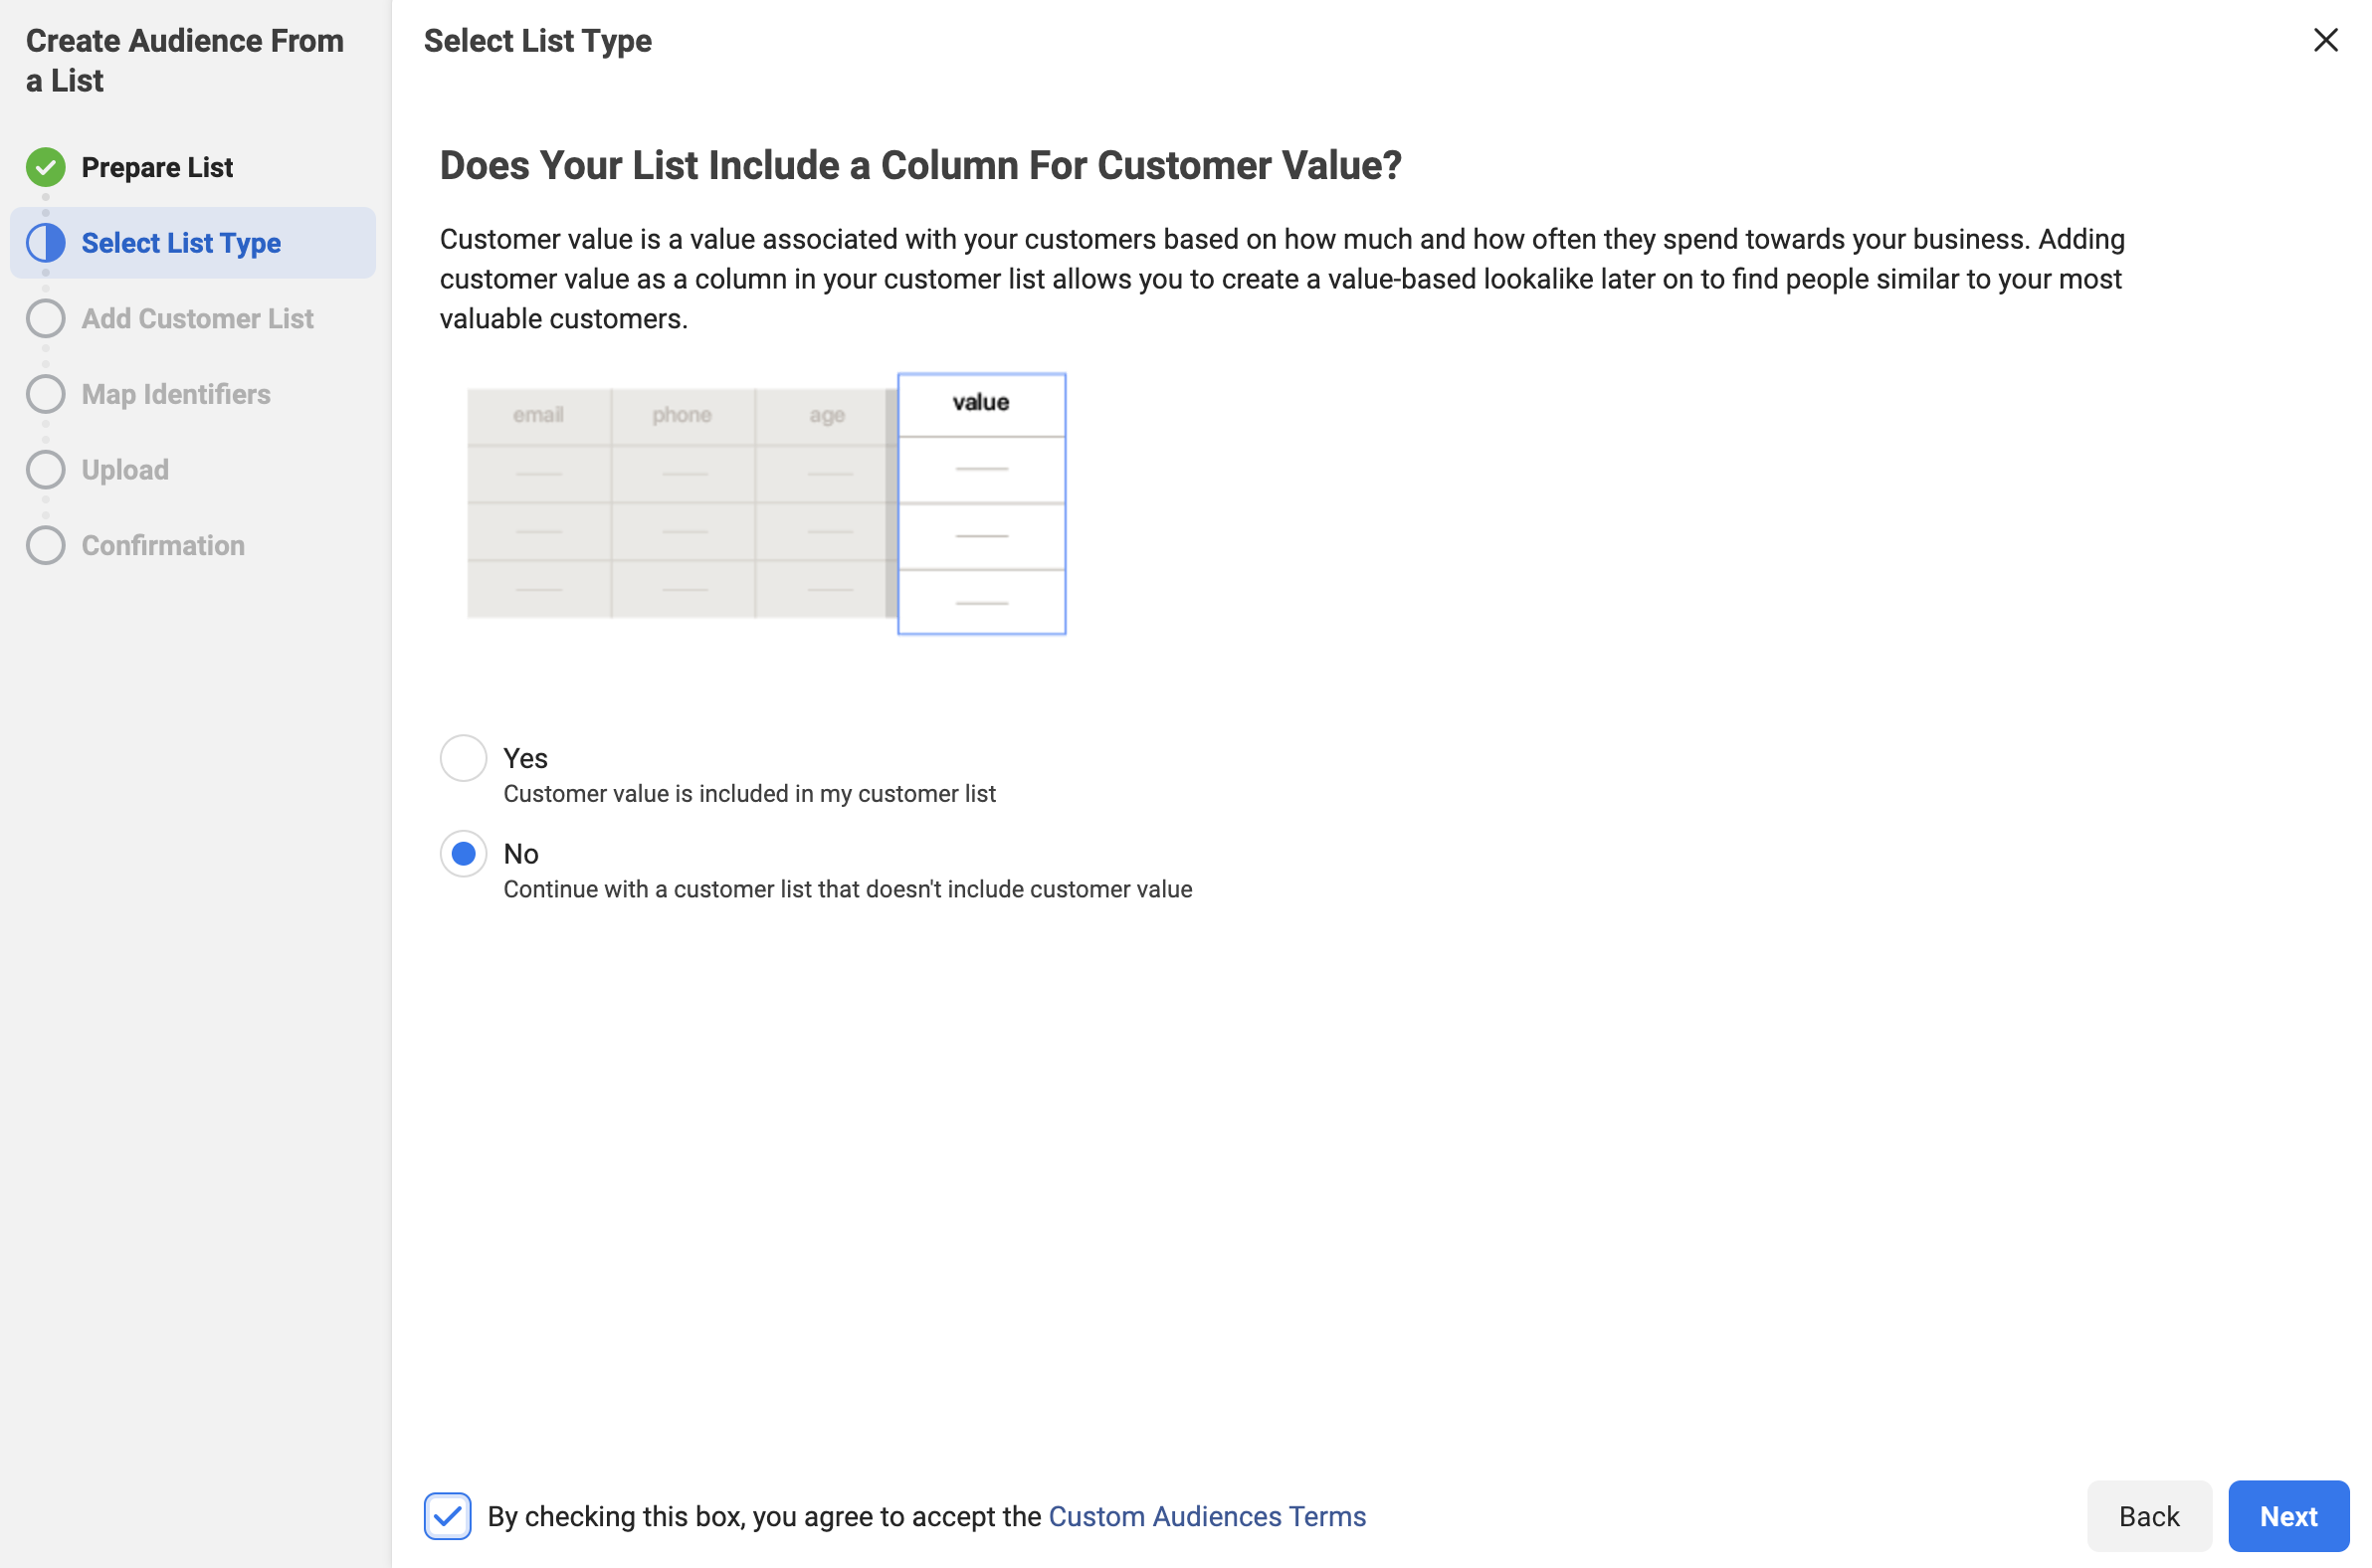
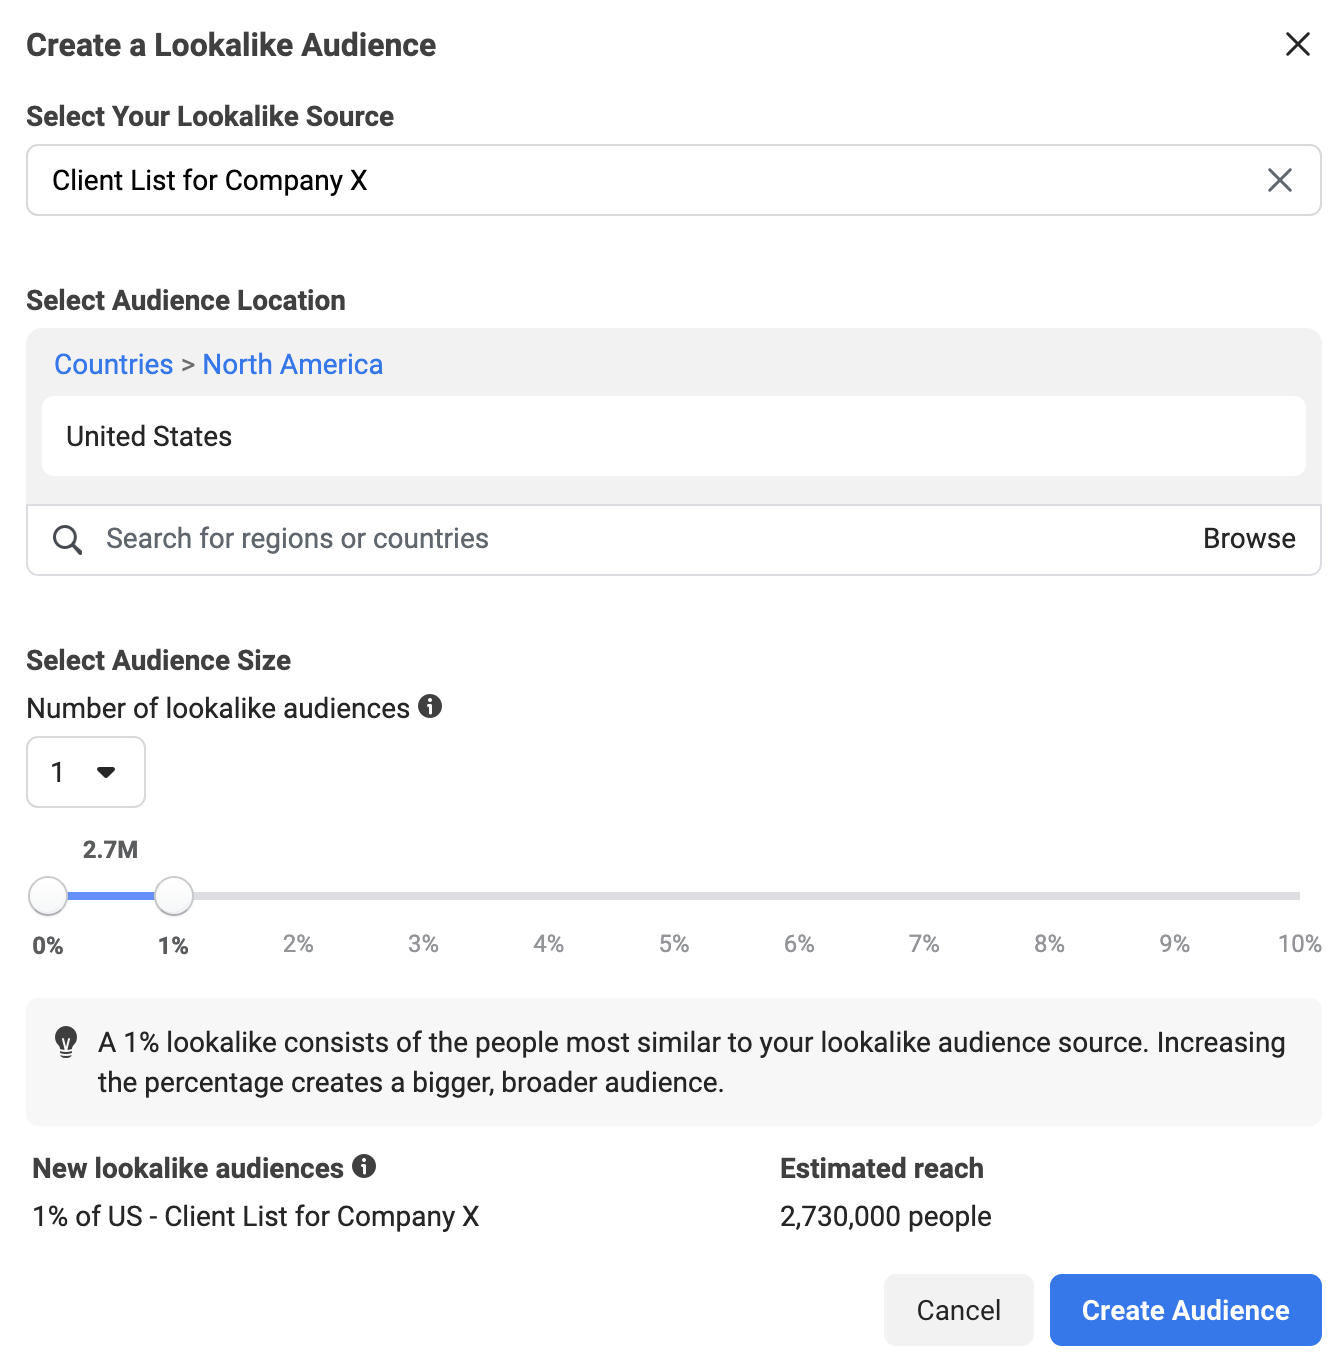
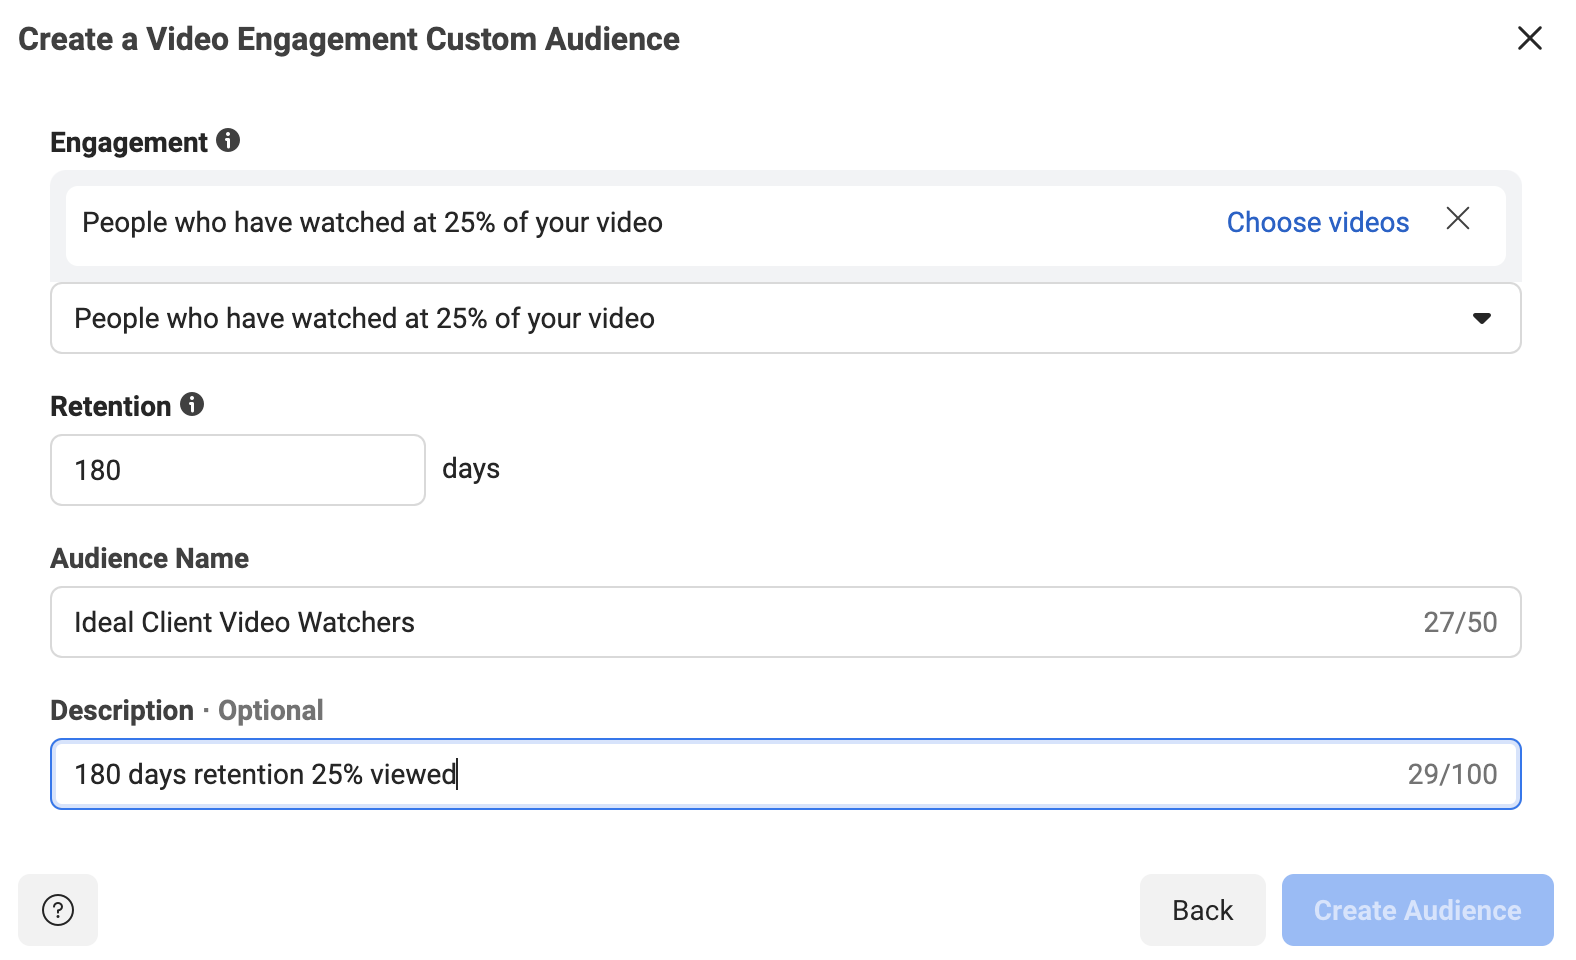
  • You won’t be able to retarget iOS website visitors anymore
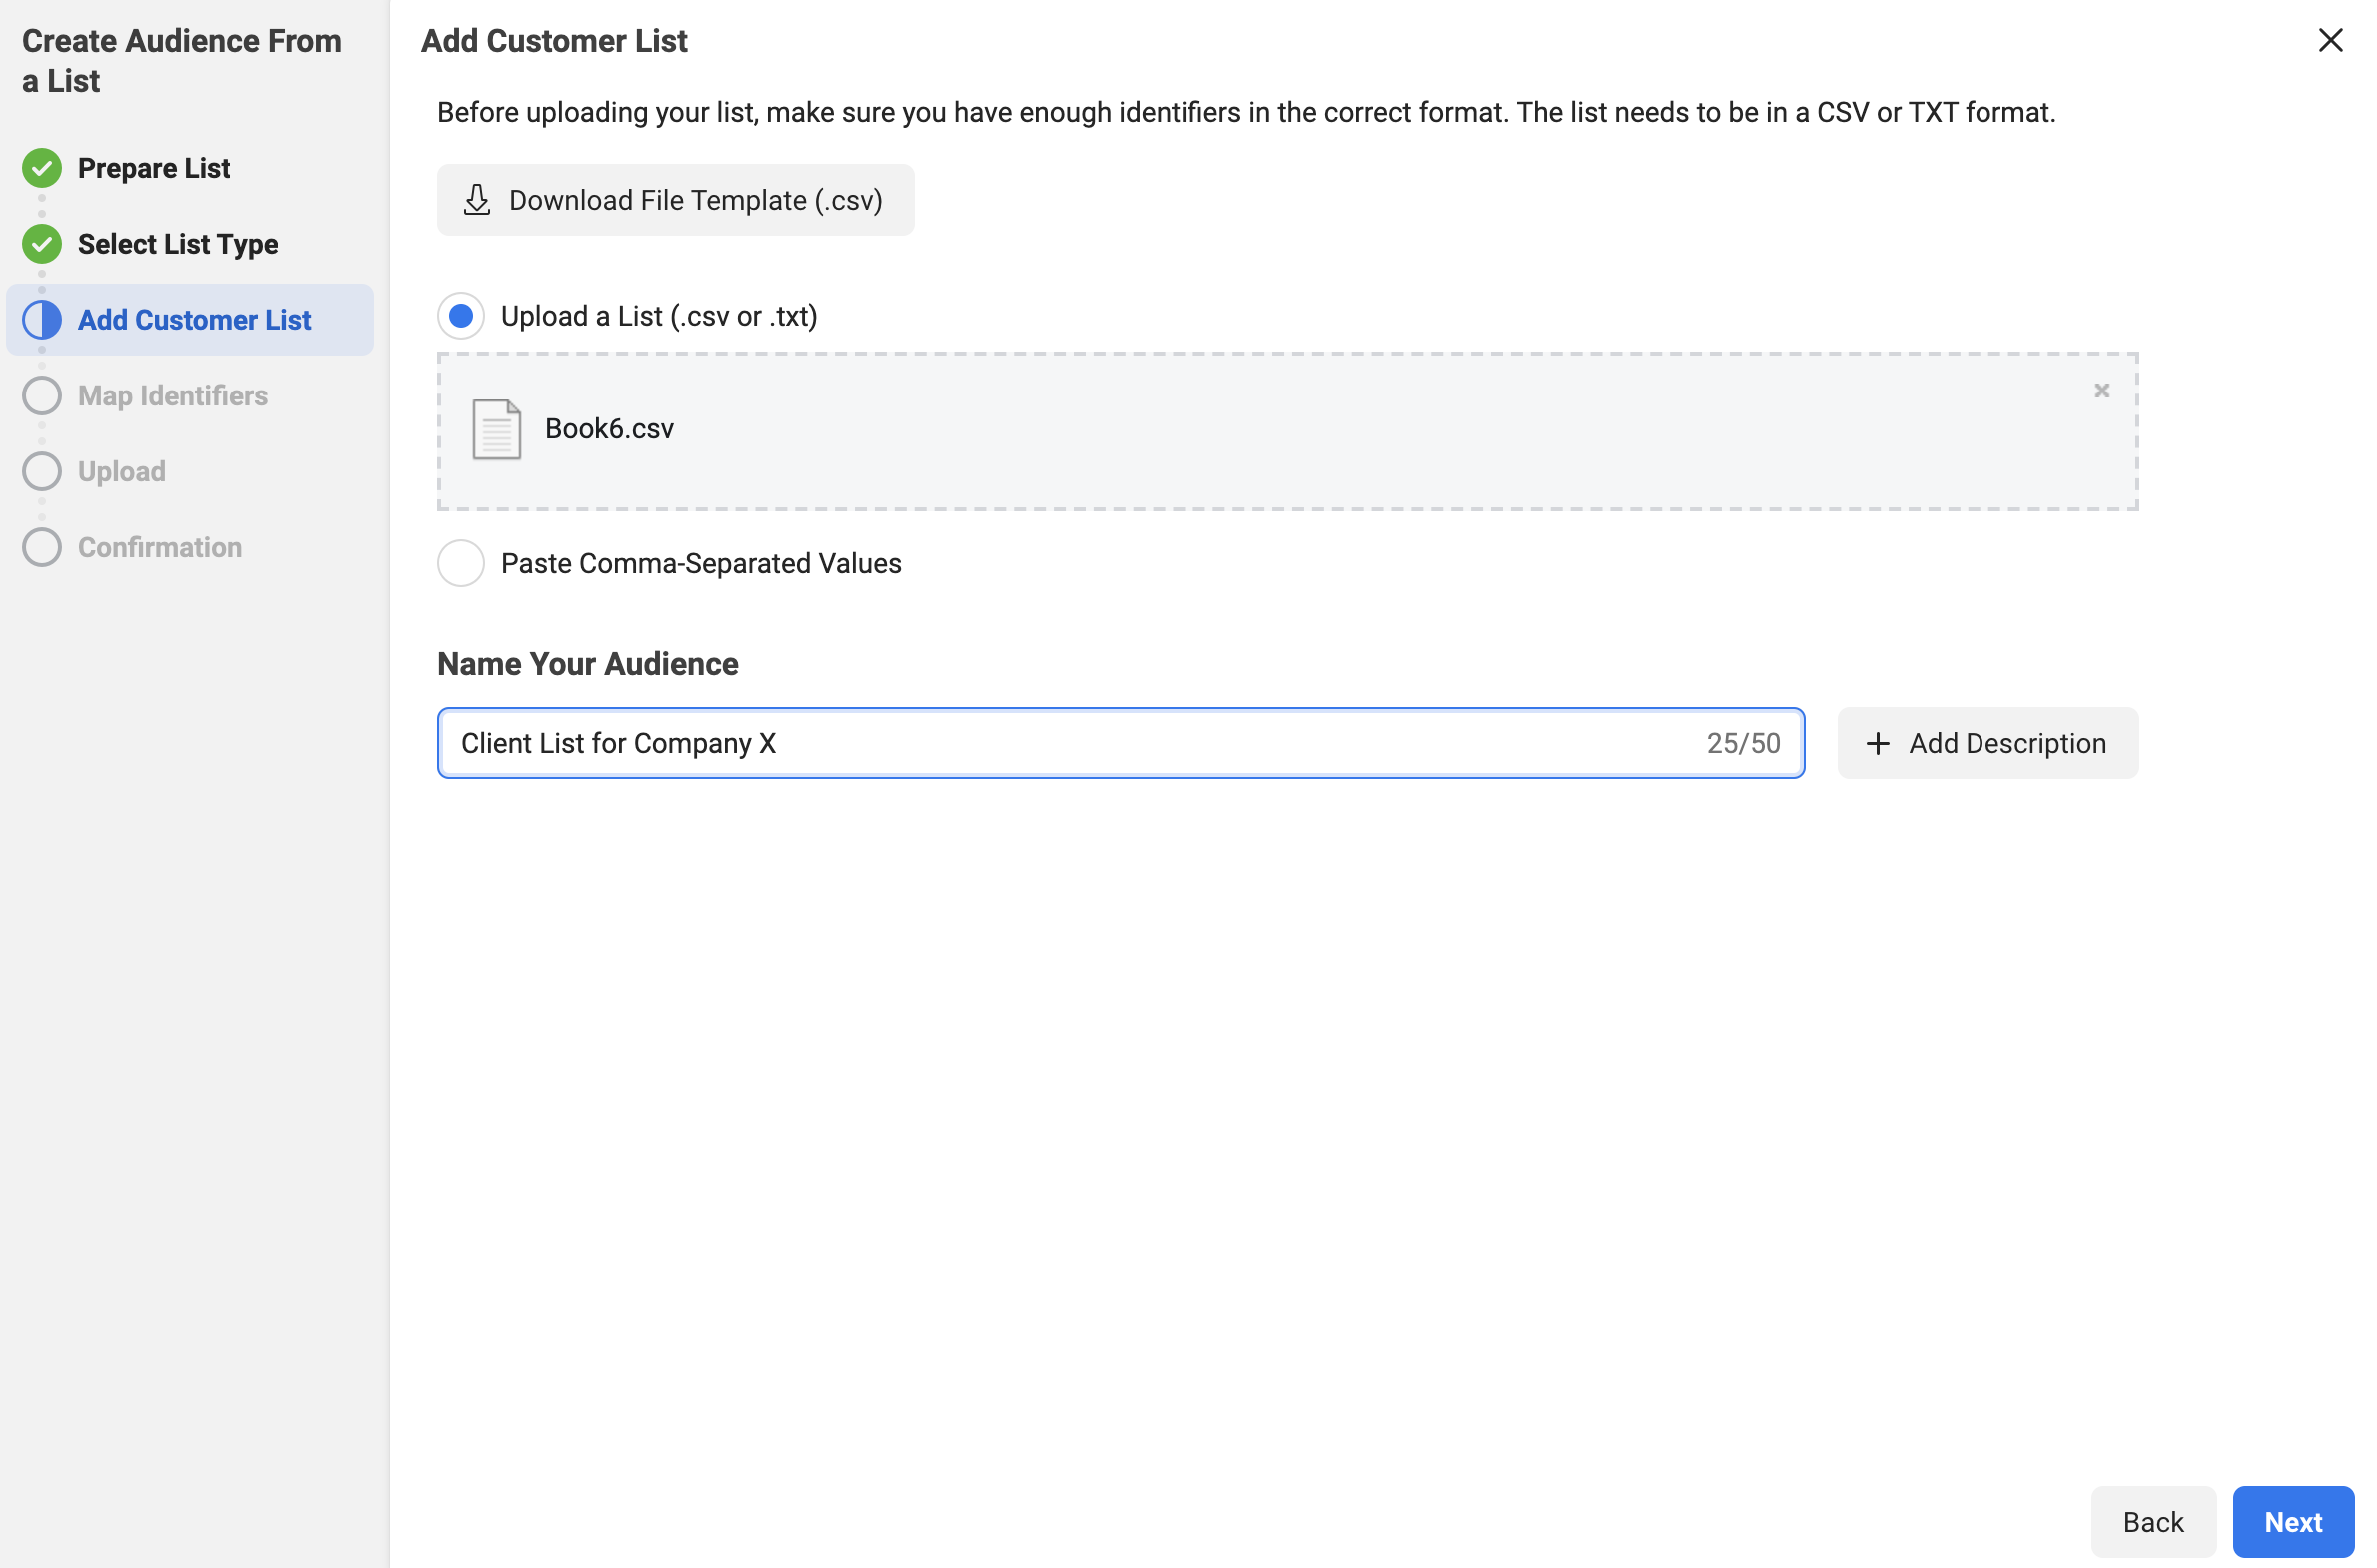
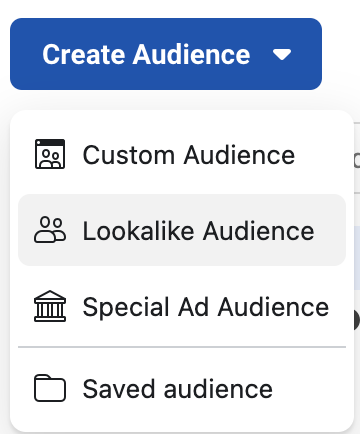
  • You won’t be able to use the “Audiences” function to prevent your current clients from seeing your ads
  • Your conversion tracking numbers will become skewed

So, what can you do to limit the impact of this change?

In our full article, we cover steps that you can take to mitigate the damage to your Facebook ads caused by the iOS 14.3 change and how to overcome the main issues that result from limited tracking from the Facebook app.

Do You Need Help Marketing Your Painting Business?

Implementing a well-thought-out local marketing plan may help any painting company develop significantly. IFTS has helped a lot of companies boost their sales using the tactics mentioned in this article. Let us help you too!  Call 412.715.6266 or email si@iftsdesign.com to get started!

How To Create A Custom Audience On Facebook…And The 7 Audiences Every Business Needs To Create In 2022

Do you want to start using Facebook Ads more efficiently?  Are you utilizing the available data to advertise to your ideal clients?

If so, Facebook Custom Audiences are for you!  So, what exactly is a “Custom Audience”?

Well, Facebook defines a Custom Audience as: 

An ad targeting option that lets you find your existing audiences among people who are on Facebook.

You can use sources like customer lists, website or app traffic, or engagement on Facebook, to create Custom Audiences of people who already know your business.

As of December 2021, you can create up to 500 of these audiences per account.

Once you create a custom audience, they can be used as the targets in Facebook Ads.  Think about how great it would be to remind your clients of a special deal that your company has going on without sending repetitive emails each time.  

These audiences will give your company a multi-pronged approach to your marketing plan.

In this article, we are going to cover seven audiences that every business will need when they use Facebook Ads in 2022.

Facebook Audience One – Your Clients

Obviously, the best set of people to advertise to in any business is your current clients.  They already know, like and trust you.  This makes any sale easier.
In fact, it costs five times as much to attract a new customer than keep an old one, so treat them like gold!

Step 1 – Create your list

To create this audience, your first step is to create a list of your current clients with their names, emails, and phone numbers (if available).  Save this list in a .csv file.  This list should contain at least 100 people.

You shouldn’t have to create this list by hand.  Most CRMs and mail automation programs have this exact step as an option.

Step 2 – Open The Facebook Audience Tool

Once you have your list created, go to business.facebook.com.  In the menu, go to “All Tools” and select the “Audiences” option.

Once you click on “Audiences”, it will open the “Audience” tool in a new tab on your browser.  This will display any audiences that you have created already.

Step 3 – Audience Creation Wizard

Click the “Create Audience” button on the left to get started.

Audience-Home-Page

In the drop-down, select the “Custom Audience” option.

Create-Audience-Dropdown

Once “Custom Audience” is selected, this will open a new dialog box.  This box will allow you to choose the source of the custom audience.  In this case, you’ll select “Customer List” and click “Next”.

Chose-Custom-Audience

The next screen is a helpful explanation from Facebook that tells you exactly what information they will look for in your list.

Prepare-Customer-List

Click “Next” when you are done reading it.

The next screen will ask if you are using a “Custom Value” column.  This is a more advanced technique that we will be covering in future blogs.  For now, we recommend selecting “No”, accepting the terms from Facebook and clicking “Next”.

No-Customer-Value

In the next step, you can either upload the .csv file that you created of your clients, or you can copy and paste it in for Facebook.

In the example below, we uploaded our .csv file.  The file had four rows: email, first name, last name, phone number.  

Once the list is uploaded, you’ll want to name the audience something descriptive.  In the image, we named this audience “Client List for Company X”.

Upload-Audience-and-Name

Side Note: There is a button “+ Description” that you can use as well.  This gives you an additional 100 characters to describe your audience if you’d like.  We would recommend using these descriptions once you start creating a lot of audiences and need more information to keep everything organized.

Click “Next” once you have completed both steps.

Facebook will review the data and attempt to identify the columns that you entered in the .csv file (or the pasted data).  If they can identify the column, they will show the information on the “Mapped” tab.  It normally can distinguish the email and phone number easily.  If it can’t tell what the data is, it will place the information on the “Action Needed” tab.  Then, you’ll need to go to that tab and ID the columns for Facebook.

Once the columns that you want the data from are mapped, click on the “Import and Create” button.

Map-identifiers

This creates the list and gives you confirmation, as seen below:

Client-List-Created

Click “Done” and it returns you to the main audience page.

You now have a custom audience of your clients to use when running Facebook Ads.

You can also watch our step-by-step video on how to create this audience.

Facebook Audience Two – Your Prospects

The second most valuable list that your company owns is your list of prospects.  This is the list of people that you have interacted with before but haven’t quite been able to convert them to clients.  They could also be clients that you lost, but think that you could win back.

Wouldn’t it be nice to get your helpful information in front of them in a casual way?  

Facebook Ads help you put social proof and videos that show off your knowledge depth right in the feed of your prospects!

To make an informed purchase choice, your potential customers often need to see and hear from you many times.  In fact, a 2011 study from Google found that a buyer needs 7 hours of interaction across 11 touch points in 4 locations.  Advertising to your prospects with engaging video ads is a great way to accomplish this.

To create this custom audience, you will follow the exact same steps that you took in the “Facebook Audience One – Your Clients” section with two exceptions – instead of creating a .csv file of your clients, you will create a .csv file of your prospects.  Again, remember that this list needs to have at least 100 people.

The other difference is that you’ll need to name this audience “Prospect List for Company X” (or something similar.

Again, depending upon your CRM and/or mail automation program, you should be able to easily export this information.

Facebook Audience Three – Your Clients “Lookalike”

You’ve now made an audience that contains your clients and an audience that contains your prospects.  Wouldn’t it be great if you could find other people to advertise to who are similar to your current consumers?

You can now with a “Lookalike Audience” from Facebook.

So, what is a Lookalike Audience?

Facebook defines it as:

A lookalike audience uses an existing Custom Audience you select for its source audience. To create a lookalike audience, our system leverages information such as demographics, interests and behaviors from your source audience to find new people who share similar qualities. When you use a lookalike audience, your ad is delivered to that audience of people who are similar to (or “look like”) your existing customers.

When you create your lookalike audience, you can use a percent range to choose how closely you want your new audience to match your source audience. The size you choose depends on your goals. Smaller percentages more closely match your source audience, but larger percentages create a bigger, broader audience.

Now, let’s create a lookalike audience for your clients.

Step 1 – Open The Facebook Audience Tool

Go to business.facebook.com for your company.  In the menu, go to “All Tools” and select the “Audiences” option.

Facebook-Audiences-Option

Once you click on “Audiences”, it will open the “Audience” tool in a new tab on your browser.  This will display the 2 audiences that you have created already.

Step 2 – Select the Lookalike Audience

Click the “Create Audience” button on the left to get started.

Audience-Home-Page

In the drop-down, select the “Lookalike Audience” option.

Lookalike-Audience-Selected

Step 3 – Create the Lookalike Audience

It will ask you to select your lookalike audience.  This is where you will choose the “Client List for Company X” that you just created.

Then, you will need to choose a location for the audience.  You will want to enter the country that you are targeting.

We recommend keeping the percentage at one, as you get a more honed-in audience that is similar to your clients.

Finally, click “Create Audience” to complete the process.

Lookalike-Audience-Create

Facebook Audience Four – Your Prospects “Lookalike”

Wouldn’t it be great if you could find other people to advertise to who are similar to your current prospects as well?

Again, you can do this using the “Lookalike Audience” functionality offered by Facebook.

To create this lookalike audience, you will follow the exact same steps that you took in the “Facebook Audience Three – Your Clients Lookalike” section, with one exception – instead of selecting the “Client List for Company X”, you will select the “Prospect List for Company X”.

Following this process will give you a set of people to advertise to that are similar in many ways to your prospects! Start by getting them to know, like and trust you with videos and other helpful information.

Facebook Audience Five – People That Have Engaged With Your Page

Engagement is a key factor when you look at any paid ad or organic post on Facebook.  “Engaging” actions can include a like, a reaction, a comment and more.  It’s basically the label for when someone takes an action with your post or ad.  

It stands to reason that if someone has taken the time to engage with your content, it would make sense to put more of your paid content (with calls to action) in front of them, right?  

This is where Audience Five, the people who have engaged with your page, comes in. 

Let’s create this audience!

Step 1 – Open The Facebook Audience Tool

Go to business.facebook.com for your company.  In the menu, go to “All Tools” and select the “Audiences” option.

Facebook-Audiences-Option

Once you click on “Audiences”, it will open the “Audience” tool in a new tab on your browser.  This will display the audiences that you have created already. 

Step 2 – Select the Custom Audience Type

Click the “Create Audience” button on the left to get started.

Audience-Home-Page

In the drop-down, select the “Custom Audience” option.

Create-Audience-Dropdown

Once “Custom Audience” is selected, this will open a new dialog box.  This box will allow you to choose the source of the custom audience.  In this case, you’ll select “Facebook Page” and click “Next”.

Step 3 – Select the Criteria

Make sure that your Facebook page is selected, as shown below.

Then, choose the option “Everyone who engaged with your Page” with a retention of 180 days.  Some companies will recommend a year, but 180 days is the maximum that we recommend. 

Add a descriptive name for this audience, like “People who have engaged with my page”.  Facebook also gives you a “Description” field if you want to expand on the title.  You may want to put the retention amount in here for reference.

Create-Audience-Engage

Once all your fields are filled out, click on the “Create Audience” button.

Facebook will create the audience, then give you a confirmation message.  Click “Done” and you’ll be returned to the main “Audience” page.

Facebook Audience Six – People That Have Been On Your Website Via The Facebook Pixel

Showing ads to people that have been on your website already is the core tenet of what marketers call “Remarketing”.  This is essential for a successful marketing plan.

In fact, studies show that only 3% of buyers are ready to act at any given time.  This is why remarketing is so important.  It allows you to put your business in front of potential buyers multiple times so you can progress the relationship by building trust.

One way to know who has visited your website is via the Facebook Pixel.  This is a tracking cookie provided by Facebook.  If you don’t have your Facebook Pixel installed, follow these instructions from Facebook to successfully set it up.

Now, there are a few exceptions to this rule.  

Due to a privacy debate between Apple and Facebook,  the people typically not tracked are on iOS devices.  They actually have to opt-in to being tracked via the app.  Less than 10% of these users have done so.

The other exception is that a person could have assorted browser privacy settings on, which would disallow tracking on their computer.  

Despite these exceptions, you can still have a decently sized audience based on the data from the Facebook Pixel.

Let’s create this audience!

Step 1 – Open The Facebook Audience Tool

Go to business.facebook.com for your company.  In the menu, go to “All Tools” and select the “Audiences” option.

Facebook-Audiences-Option

Once you click on “Audiences”, it will open the “Audience” tool in a new tab on your browser.  This will display the audiences that you have created already.

Step 2 – Select the Custom Audience Type

Click the “Create Audience” button on the left to get started.

Audience-Home-Page

In the drop-down, select the “Custom Audience” option.

Create-Audience-Dropdown

Once “Custom Audience” is selected, this will open a new dialog box.  This box will allow you to choose the source of the custom audience.  In this case, you’ll select “Website” and click “Next”.

Create-Pixel-audience-select-website

Step 3 – Select the Custom Audience Pixel Criteria

You’ll be given a selection of the Pixels that you have access to.  Choose the Pixel that is installed on your website.

Under “Events”, you have a few choices.  You can choose people that have been on any page of your website.  You can also specify exact pages or URLs that contain certain words.  Another option is selecting users by time spent.

In this example, we are just going to target anyone that has visited our website before.

Again, you can select the “Retention”, which is how far back in time you want the list to remember people.  We recommend anywhere between 30-180 days, depending upon what your business does.  With higher-priced items and services, a longer retention may help you convince the people that take a while to research.

Obviously, we can get more detailed in the targeting by adding more criteria with the “Include More People” button, but we will cover that in future articles.

Fill in your “Audience Name” and the “Description”, then click the “Create Audience” button.

Create-Pixel-Audience-Select-Criteria

Facebook will create the audience and give you a confirmation message.  Click “Done” to complete the process.

Facebook Audience Seven – People That Have Watched Specific Facebook Videos

This audience will help you pick up some of the people that you lost to the iOS security updates.  Because you can’t track them with the Pixel, you need to have a way to track them on Facebook.

“Video Watches” is the perfect stat for this!  Facebook tracks who watches every video that you advertise and for how long they watch.

Create a video, or set of videos, that ONLY your ideal client would watch.  Make it very specific to the problems/pain points that they have, then advertise it with a goal of “Video Views” to a broad audience in your service area.  We suggest running these ads at $5-$10 per day.  At the end of 2 weeks, you should have an excellent set of people to retarget.

Let’s create the last audience!

Step 1 – Open The Facebook Audience Tool

Go to business.facebook.com for your company.  In the menu, go to “All Tools” and select the “Audiences” option.

Facebook-Audiences-Option

Once you click on “Audiences”, it will open the “Audience” tool in a new tab on your browser.  This will display the audiences that you have created already. 

Step 2 – Select the Custom Audience Type

Click the “Create Audience” button on the left to get started.

Audience-Home-Page

In the drop-down, select the “Custom Audience” option.

Create-Audience-Dropdown

Once “Custom Audience” is selected, this will open a new dialog box.  This box will allow you to choose the source of the custom audience.  In this case, you’ll select “Video” and click “Next”.

Create-Pixel-audience-select-video

Step 3 – Select the Custom Audience Criteria

In this next step, you’ll need to choose what percentage or length of time people must spend watching your video.  25% tends to be a good metric to choose.  No one is going to watch over one-fourth of a video about something that they aren’t really interested in.  

So, in the dropdown, select the “People who have watched 25% of your video” option.  Again, we recommend the Retention between 30-180 days.  

Add the “Audience Name” and “Description” as well.

Create-Video-Watcher-Audience

The last step is to choose the video (or set of videos) that you used to target your ideal client.  Click the “Choose videos” link.

You can select videos from your Facebook page or your Facebook ads.  To see all of your videos, you will need to change the “Video Source” dropdown in the upper left.

Select the videos that you used to target your ideal client.  They should show in the right side-column once selected.

Choose-Videos

Once you have your videos chosen, click “Confirm”.

This takes you back to the “Create Video Engagement Custom Audience” screen, where you have filled out everything else.  Click the “Create Audience” button.

Facebook will create the audience, then give you a confirmation message.  Click “Done” and you’ll be returned to the main “Audience” page.

Go Get Started Creating Your New Facebook Audiences For 2022

You now have everything you need in this guide to create the best audiences for your business to advertise to in 2022!  Don’t settle for less than stellar Facebook Ads results.

Want some help?

If you have any questions about the information in this blog or need help getting started, contact IFTS today for a free consultation.  Call 412-715-6266 or send an email to si@iftsdesign.com.