
Do you want to start using Facebook Ads more efficiently? Are you utilizing the available data to advertise to your ideal clients?
If so, Facebook Custom Audiences are for you! So, what exactly is a “Custom Audience”?
Well, Facebook defines a Custom Audience as:
An ad targeting option that lets you find your existing audiences among people who are on Facebook.
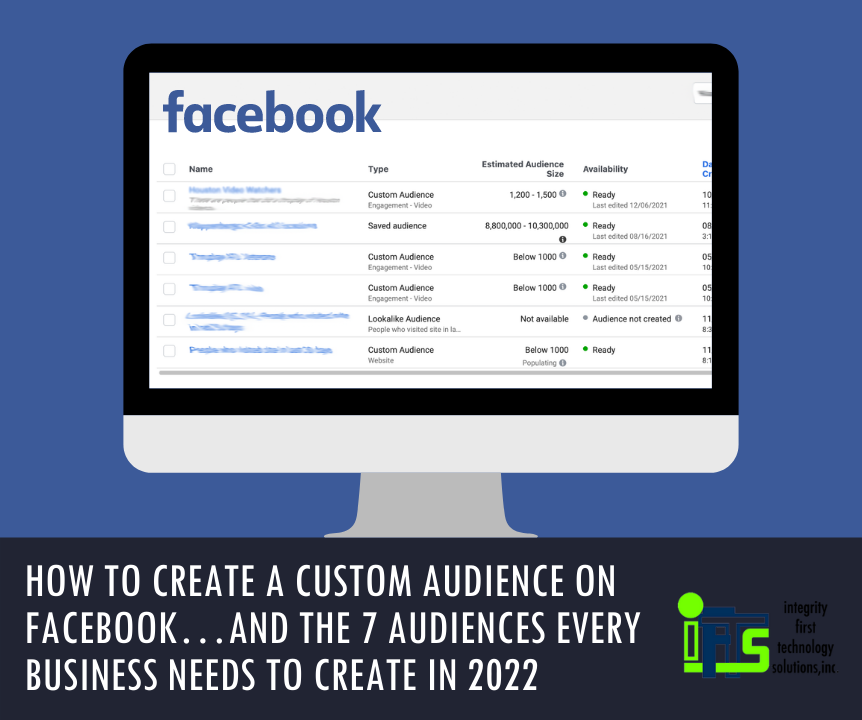
As of December 2021, you can create up to 500 of these audiences per account.
Once you create a custom audience, they can be used as the targets in Facebook Ads. Think about how great it would be to remind your clients of a special deal that your company has going on without sending repetitive emails each time.
These audiences will give your company a multi-pronged approach to your marketing plan.
In this article, we are going to cover seven audiences that every business will need when they use Facebook Ads in 2022.
Facebook Audience One – Your Clients
Obviously, the best set of people to advertise to in any business is your current clients. They already know, like and trust you. This makes any sale easier.
In fact, it costs five times as much to attract a new customer than keep an old one, so treat them like gold!
Step 1 – Create your list
To create this audience, your first step is to create a list of your current clients with their names, emails, and phone numbers (if available). Save this list in a .csv file. This list should contain at least 100 people.
You shouldn’t have to create this list by hand. Most CRMs and mail automation programs have this exact step as an option.
Step 2 – Open The Facebook Audience Tool
Once you have your list created, go to business.facebook.com. In the menu, go to “All Tools” and select the “Audiences” option.
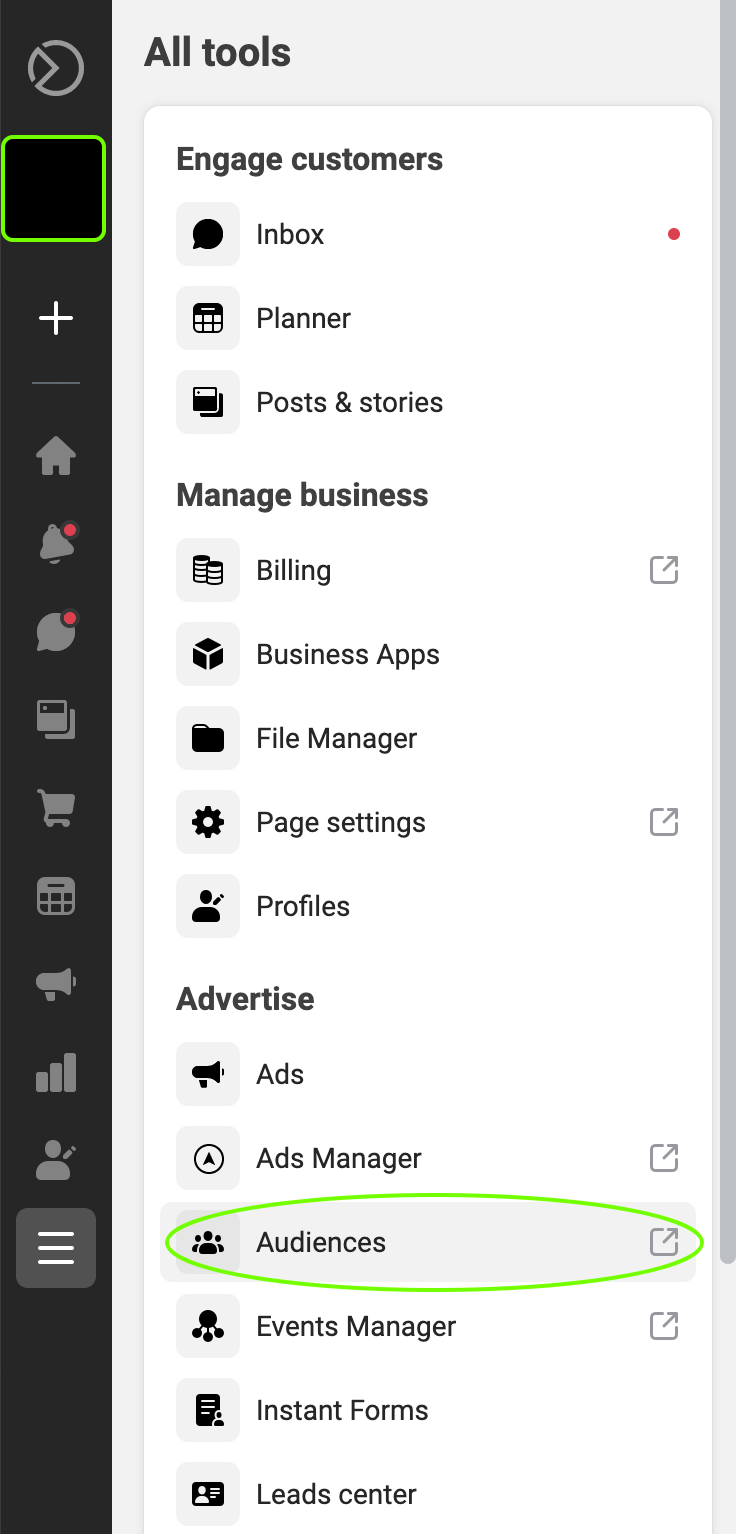
Once you click on “Audiences”, it will open the “Audience” tool in a new tab on your browser. This will display any audiences that you have created already.
Step 3 – Audience Creation Wizard
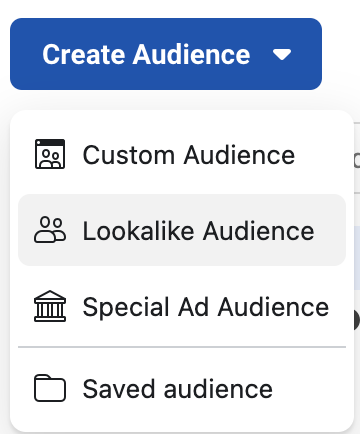
Click the “Create Audience” button on the left to get started.

In the drop-down, select the “Custom Audience” option.

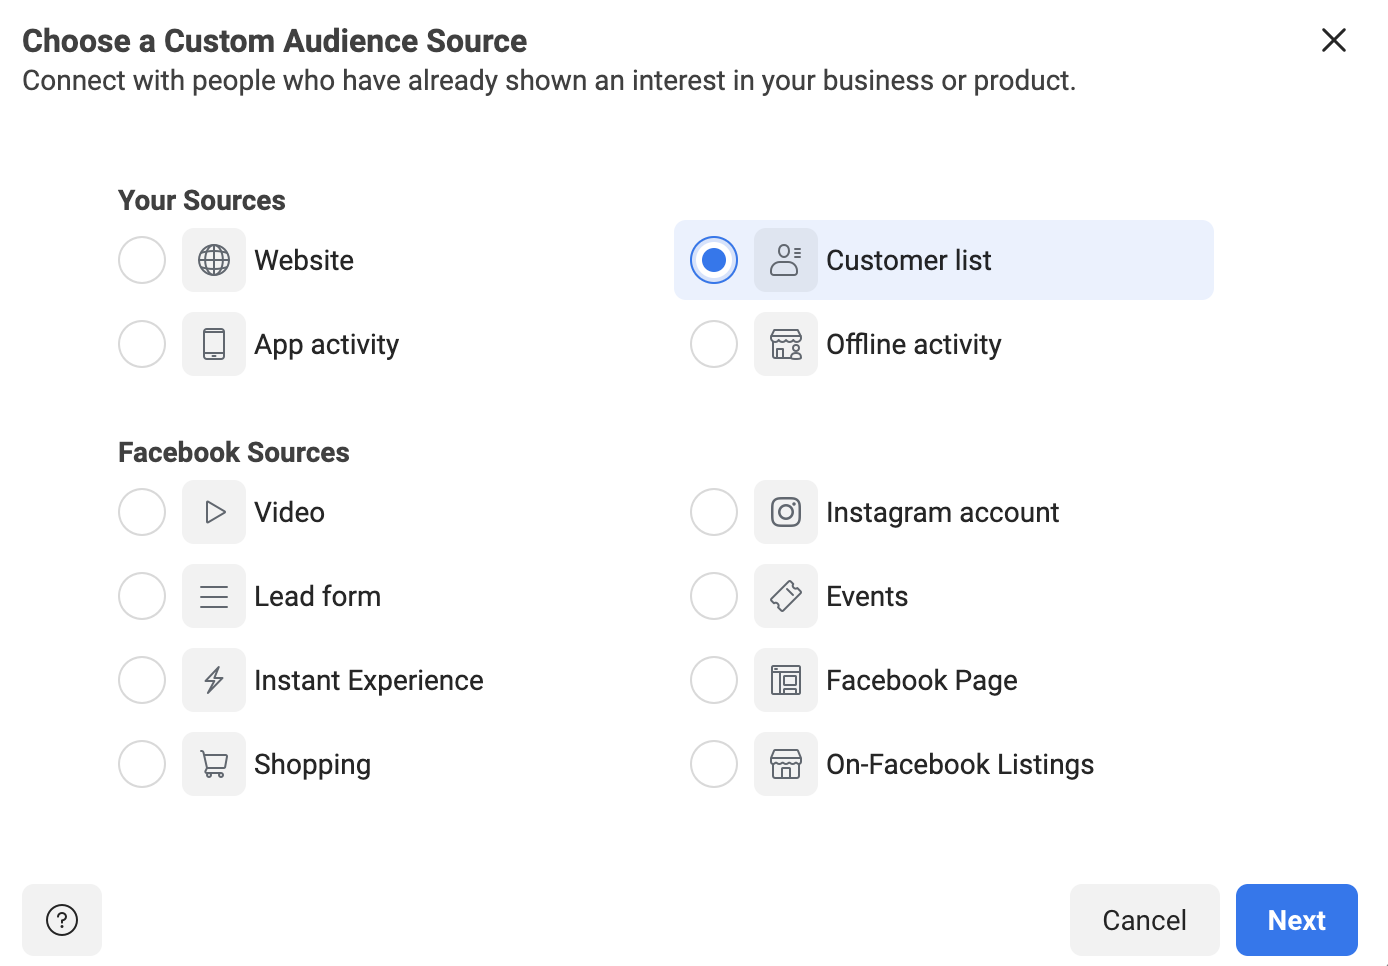
Once “Custom Audience” is selected, this will open a new dialog box. This box will allow you to choose the source of the custom audience. In this case, you’ll select “Customer List” and click “Next”.
The next screen is a helpful explanation from Facebook that tells you exactly what information they will look for in your list.
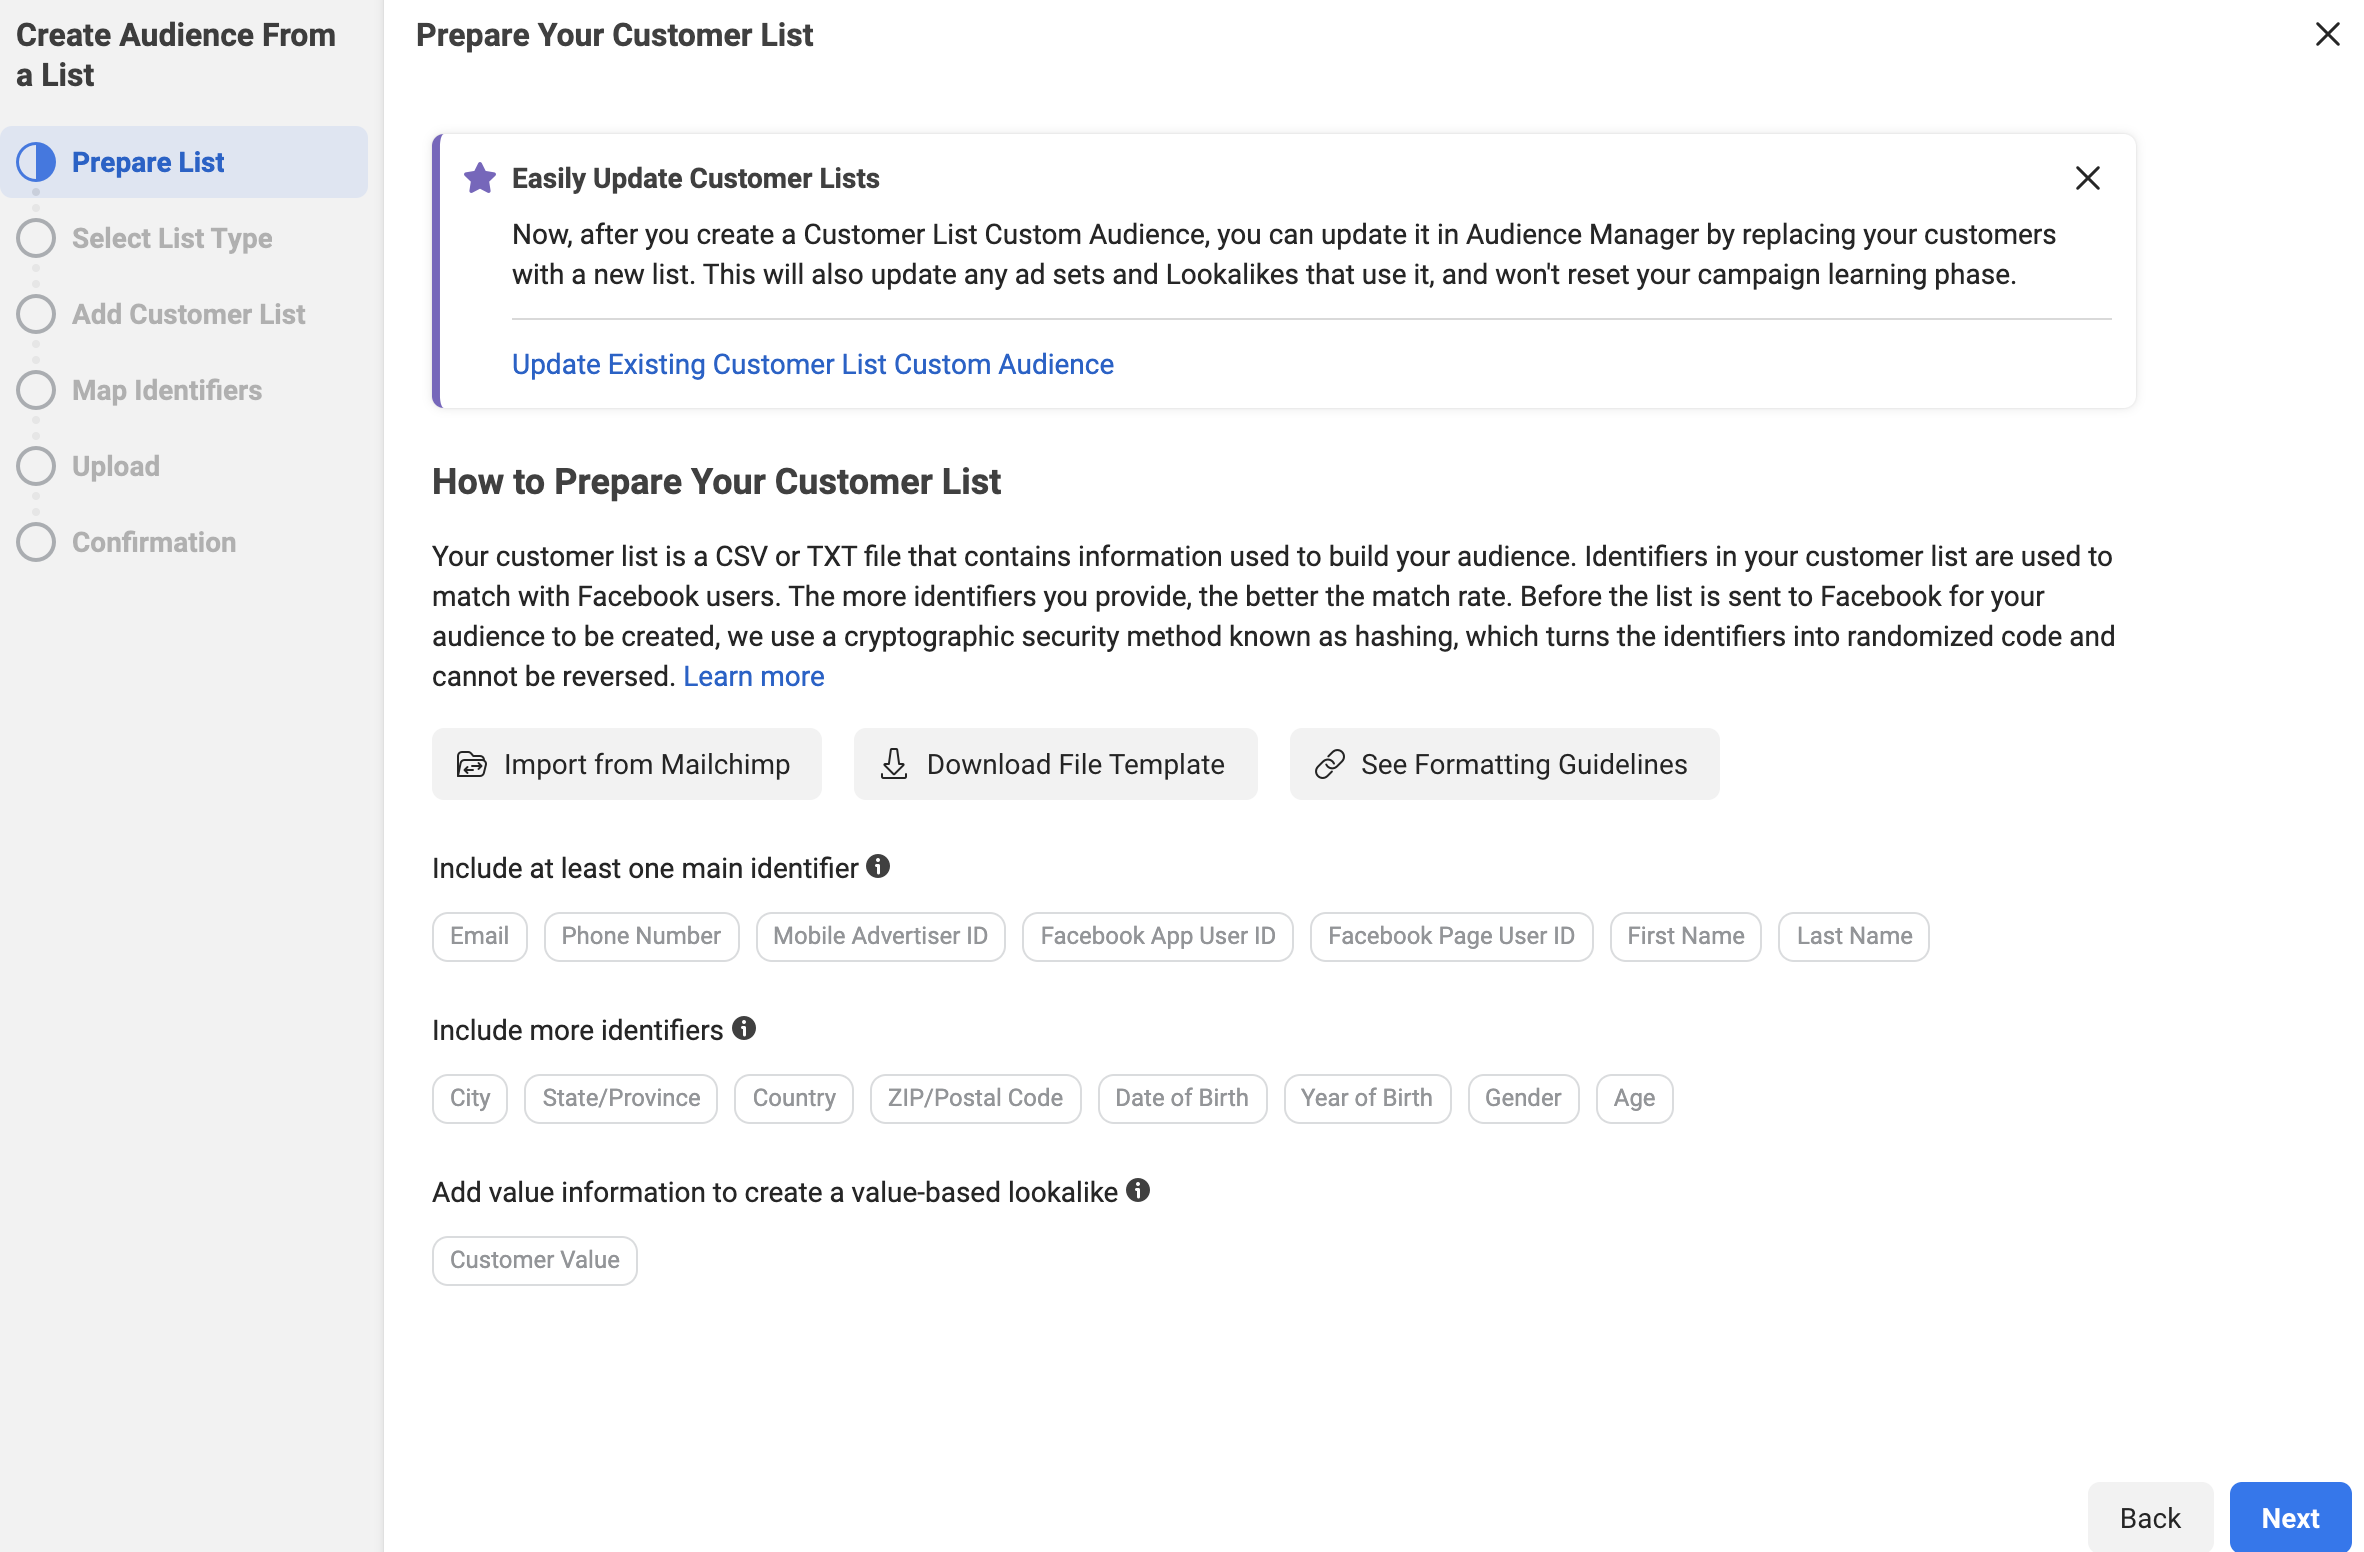
Click “Next” when you are done reading it.
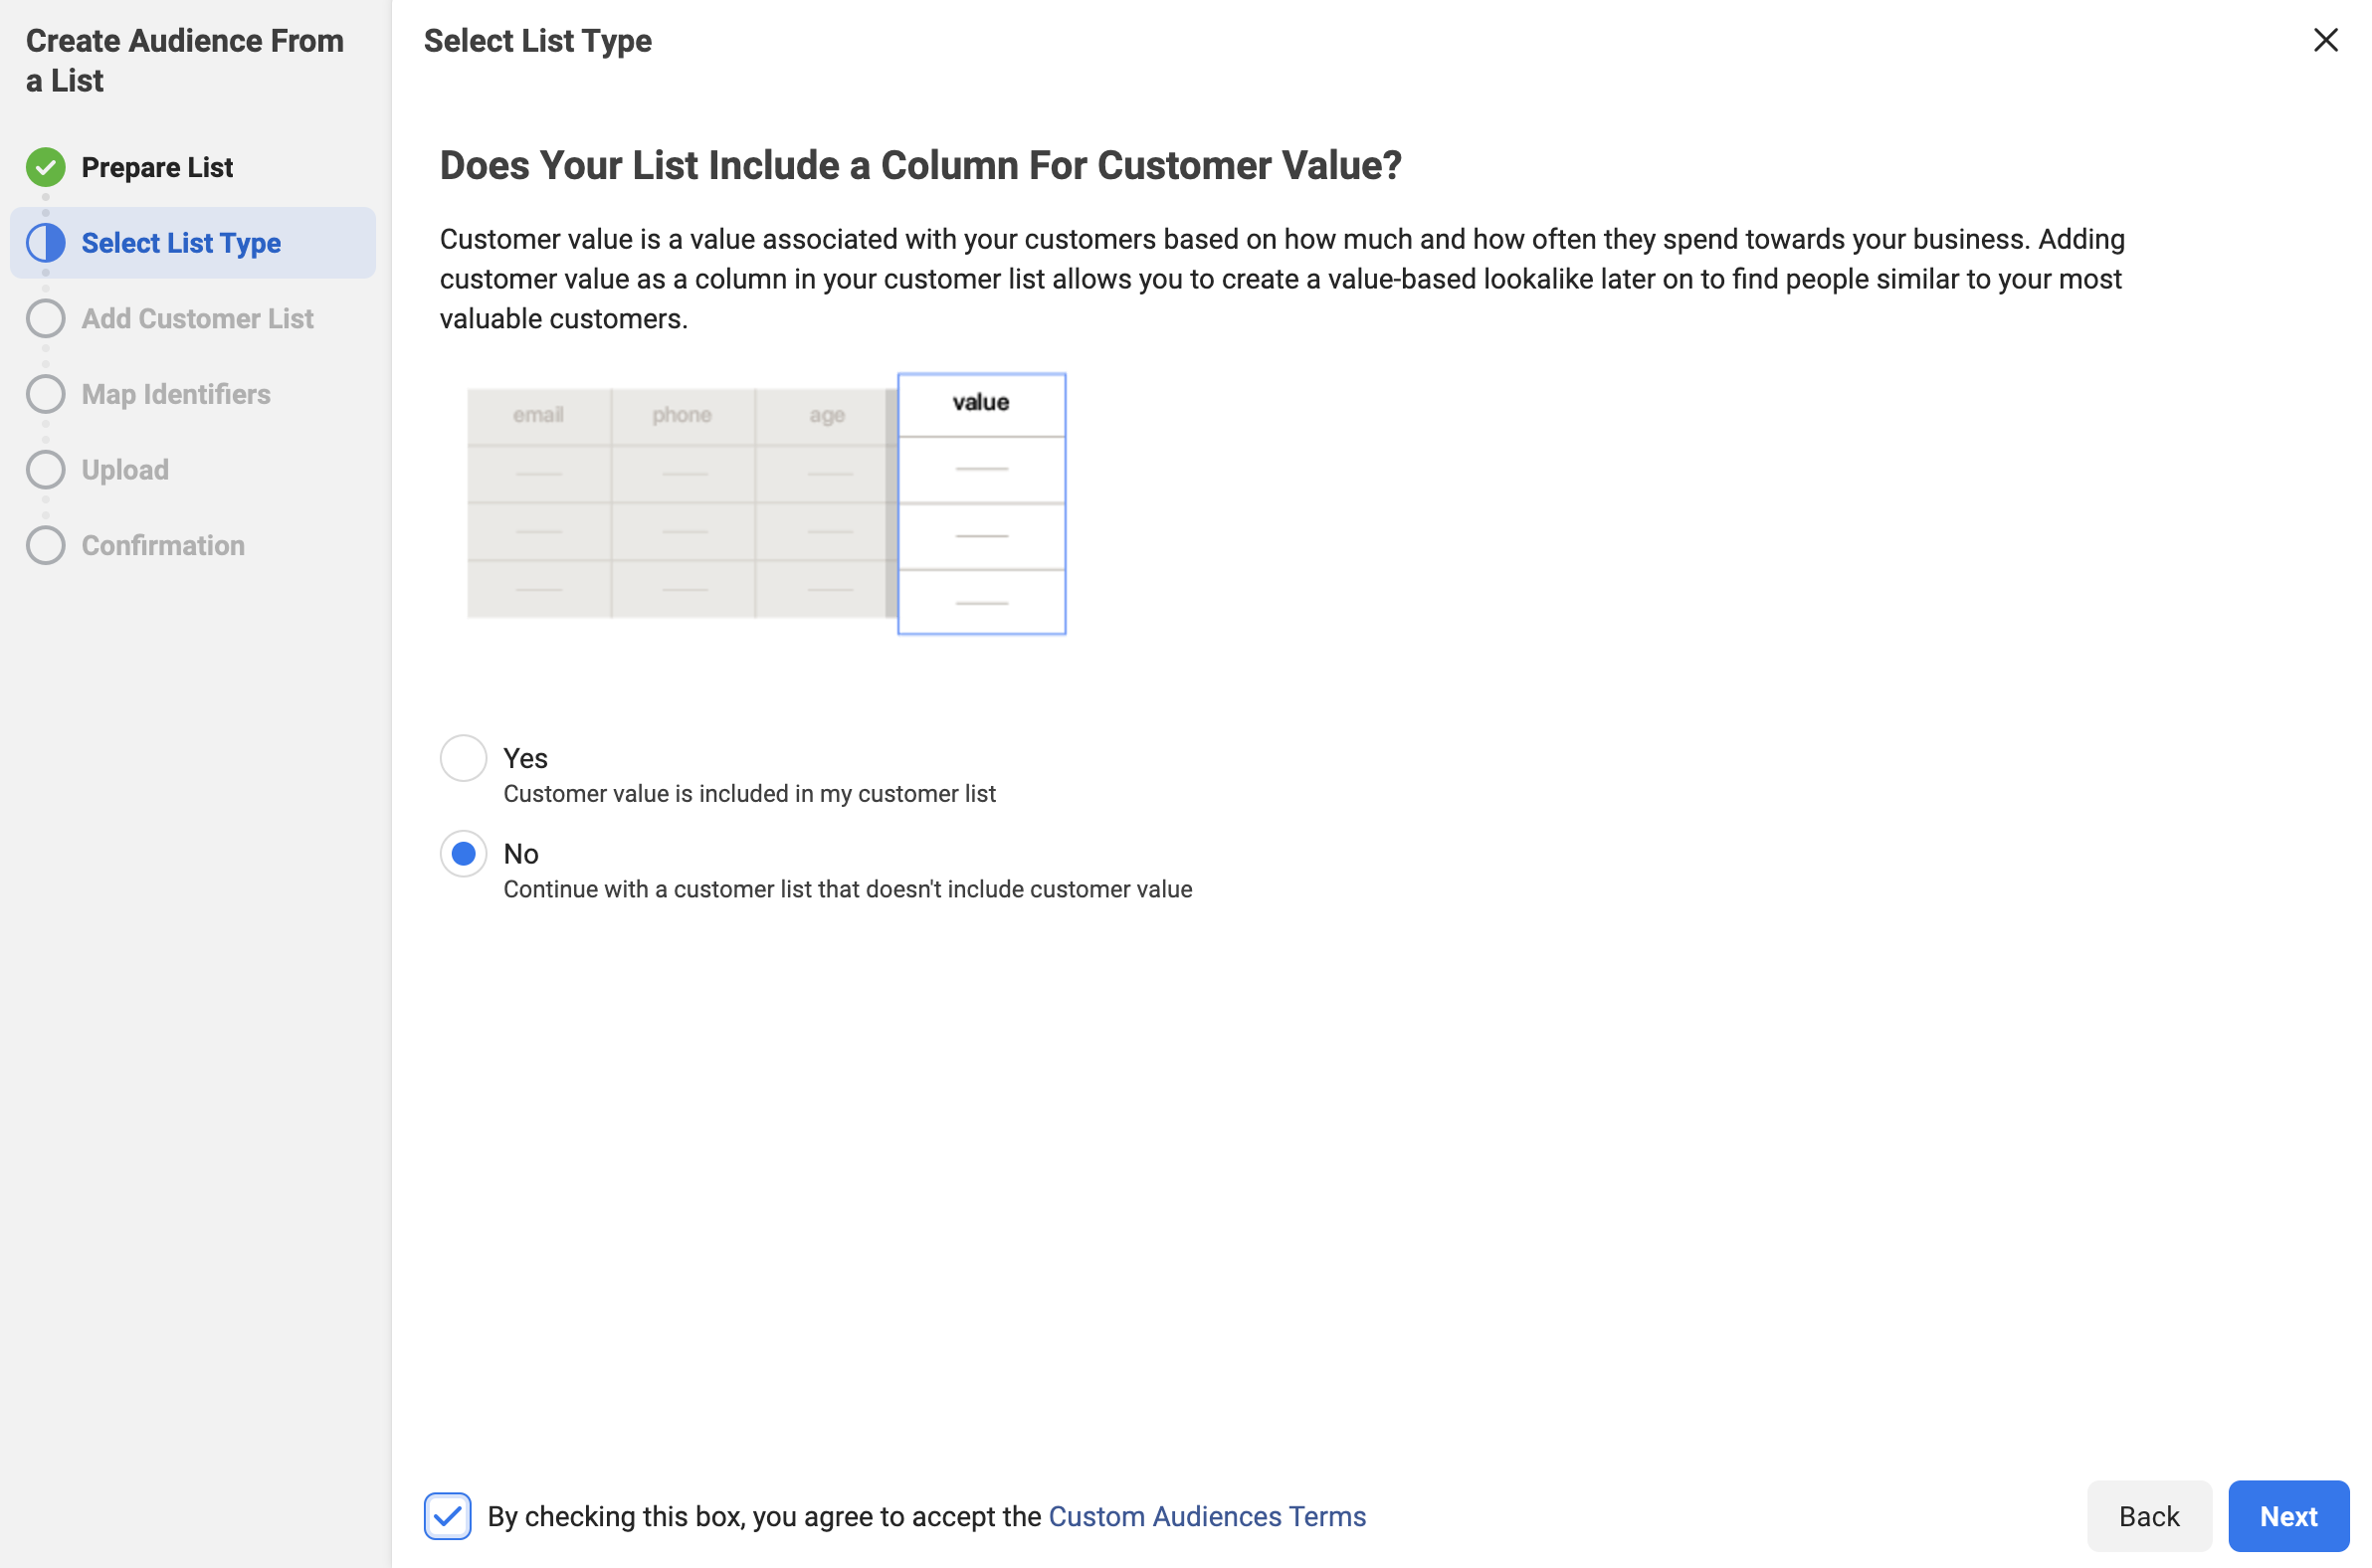
The next screen will ask if you are using a “Custom Value” column. This is a more advanced technique that we will be covering in future blogs. For now, we recommend selecting “No”, accepting the terms from Facebook and clicking “Next”.
In the next step, you can either upload the .csv file that you created of your clients, or you can copy and paste it in for Facebook.
In the example below, we uploaded our .csv file. The file had four rows: email, first name, last name, phone number.
Once the list is uploaded, you’ll want to name the audience something descriptive. In the image, we named this audience “Client List for Company X”.
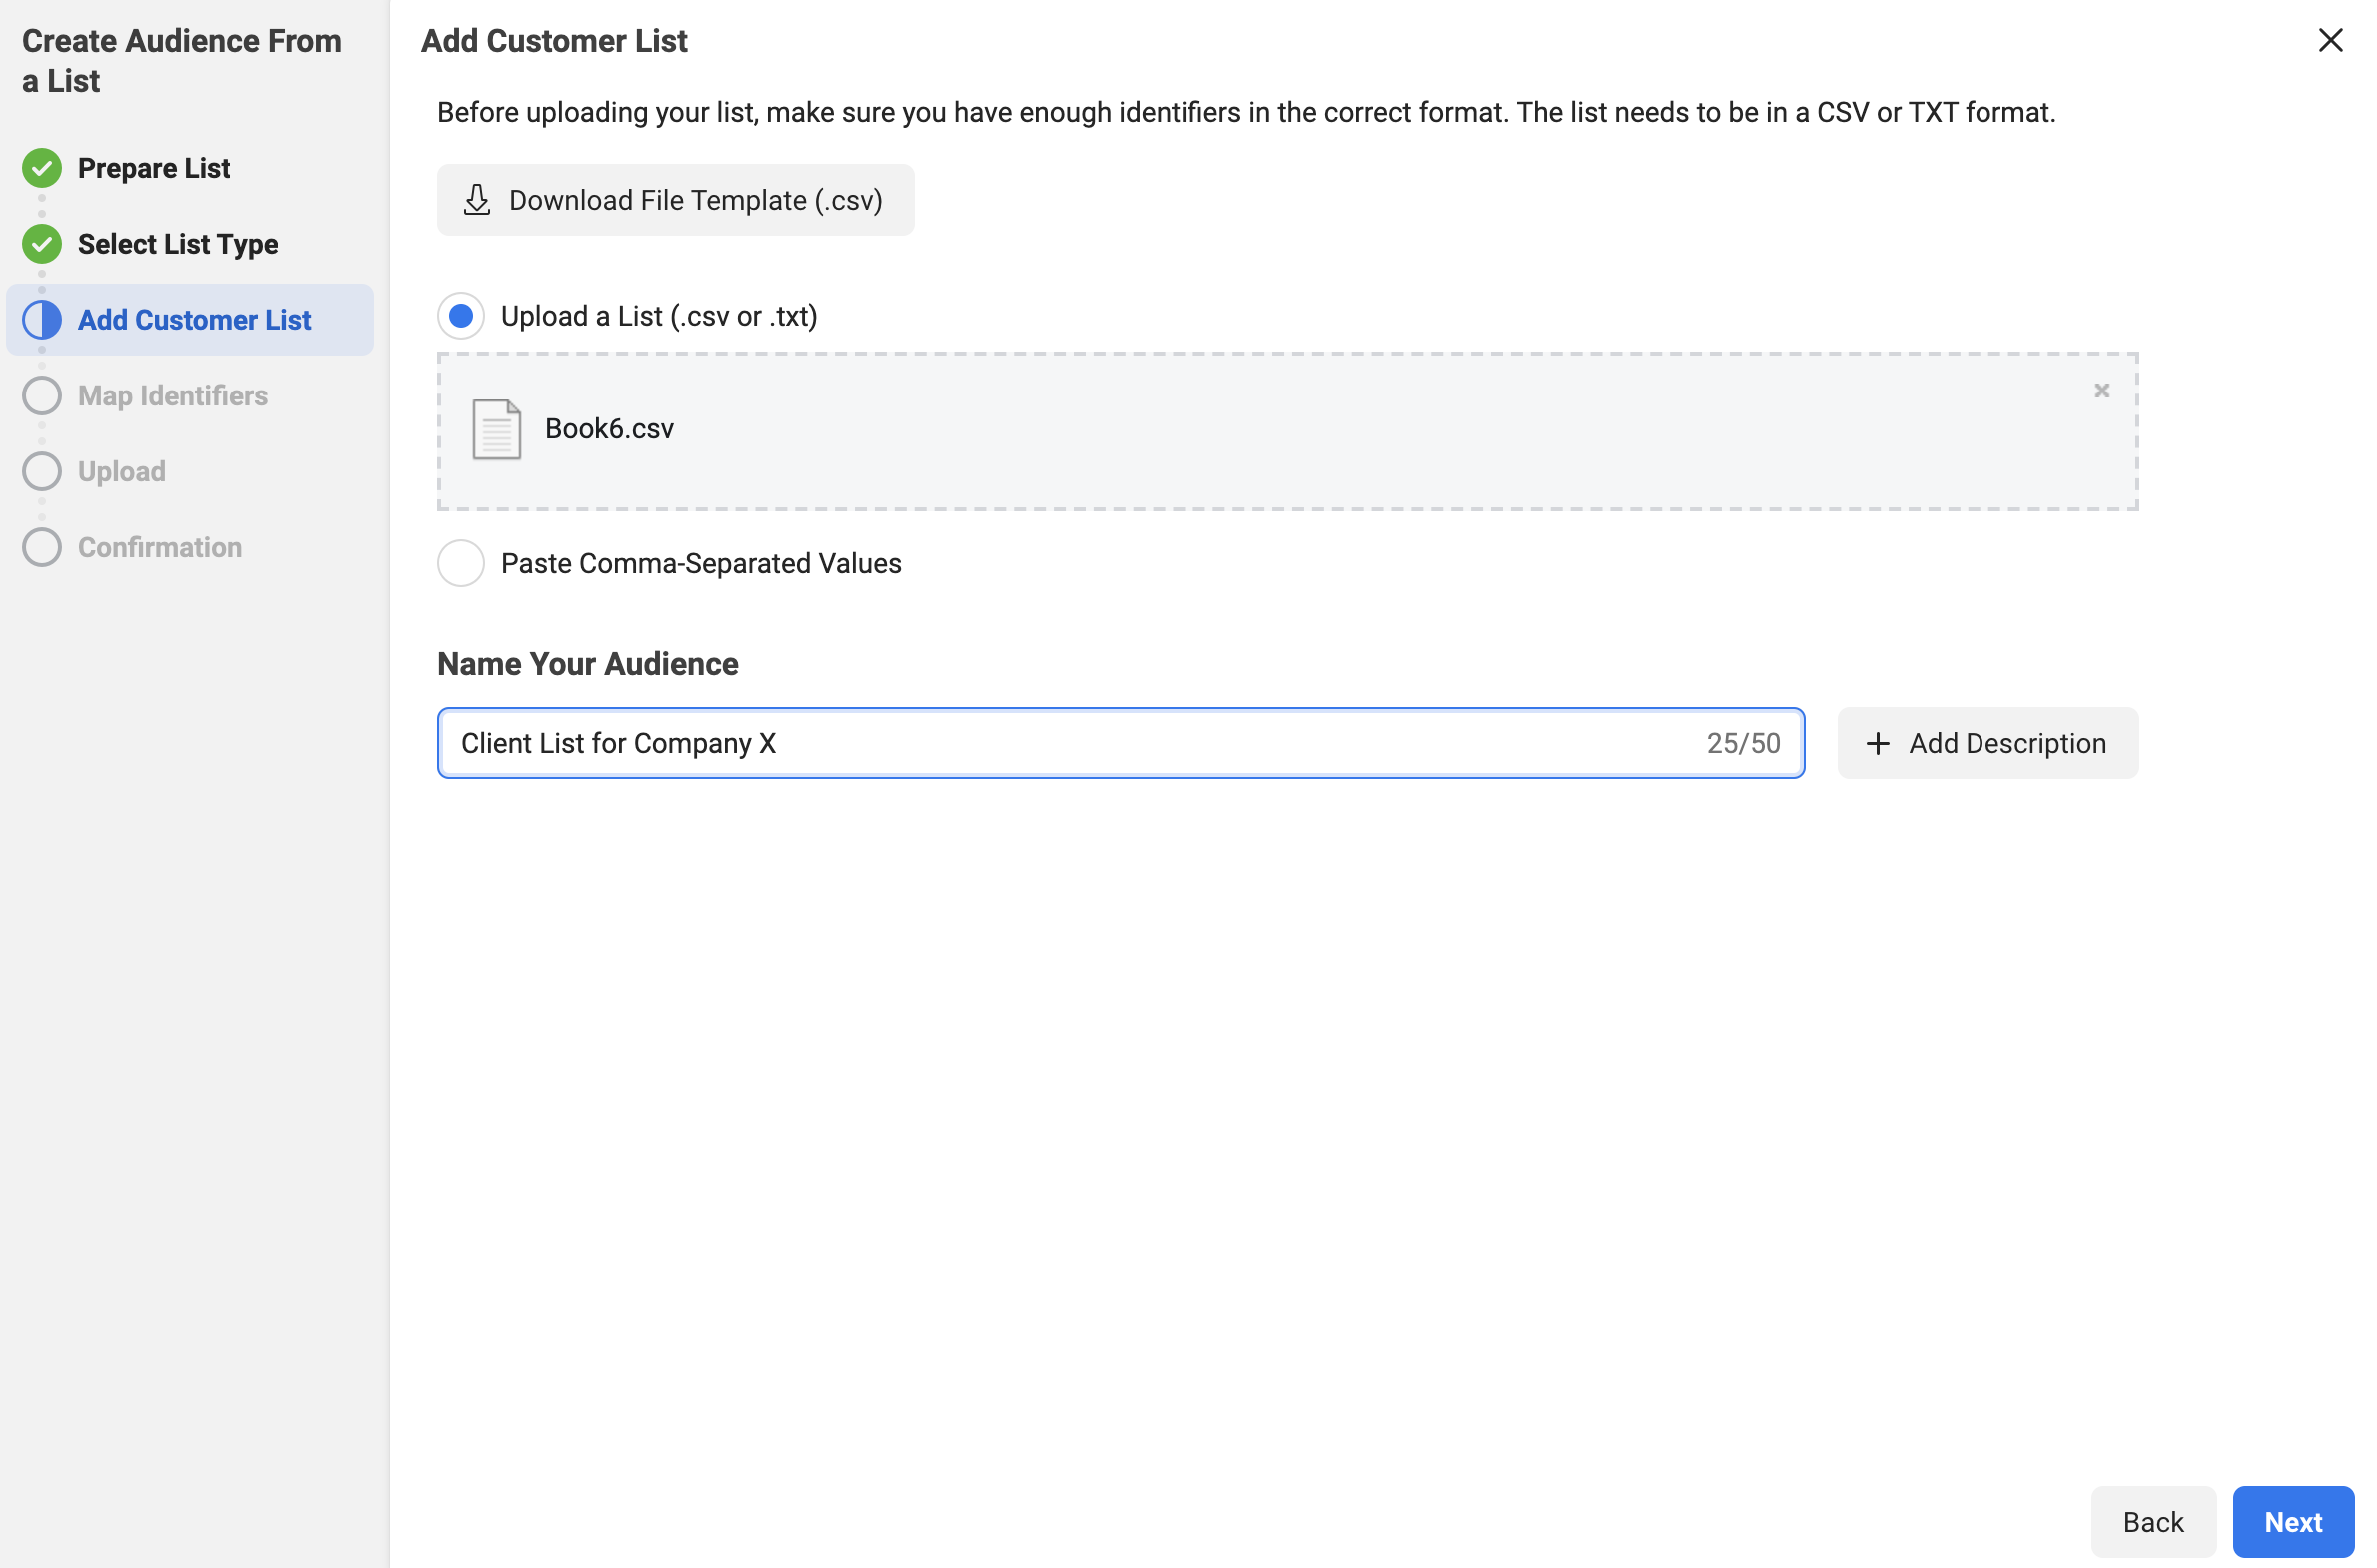
Side Note: There is a button “+ Description” that you can use as well. This gives you an additional 100 characters to describe your audience if you’d like. We would recommend using these descriptions once you start creating a lot of audiences and need more information to keep everything organized.
Click “Next” once you have completed both steps.
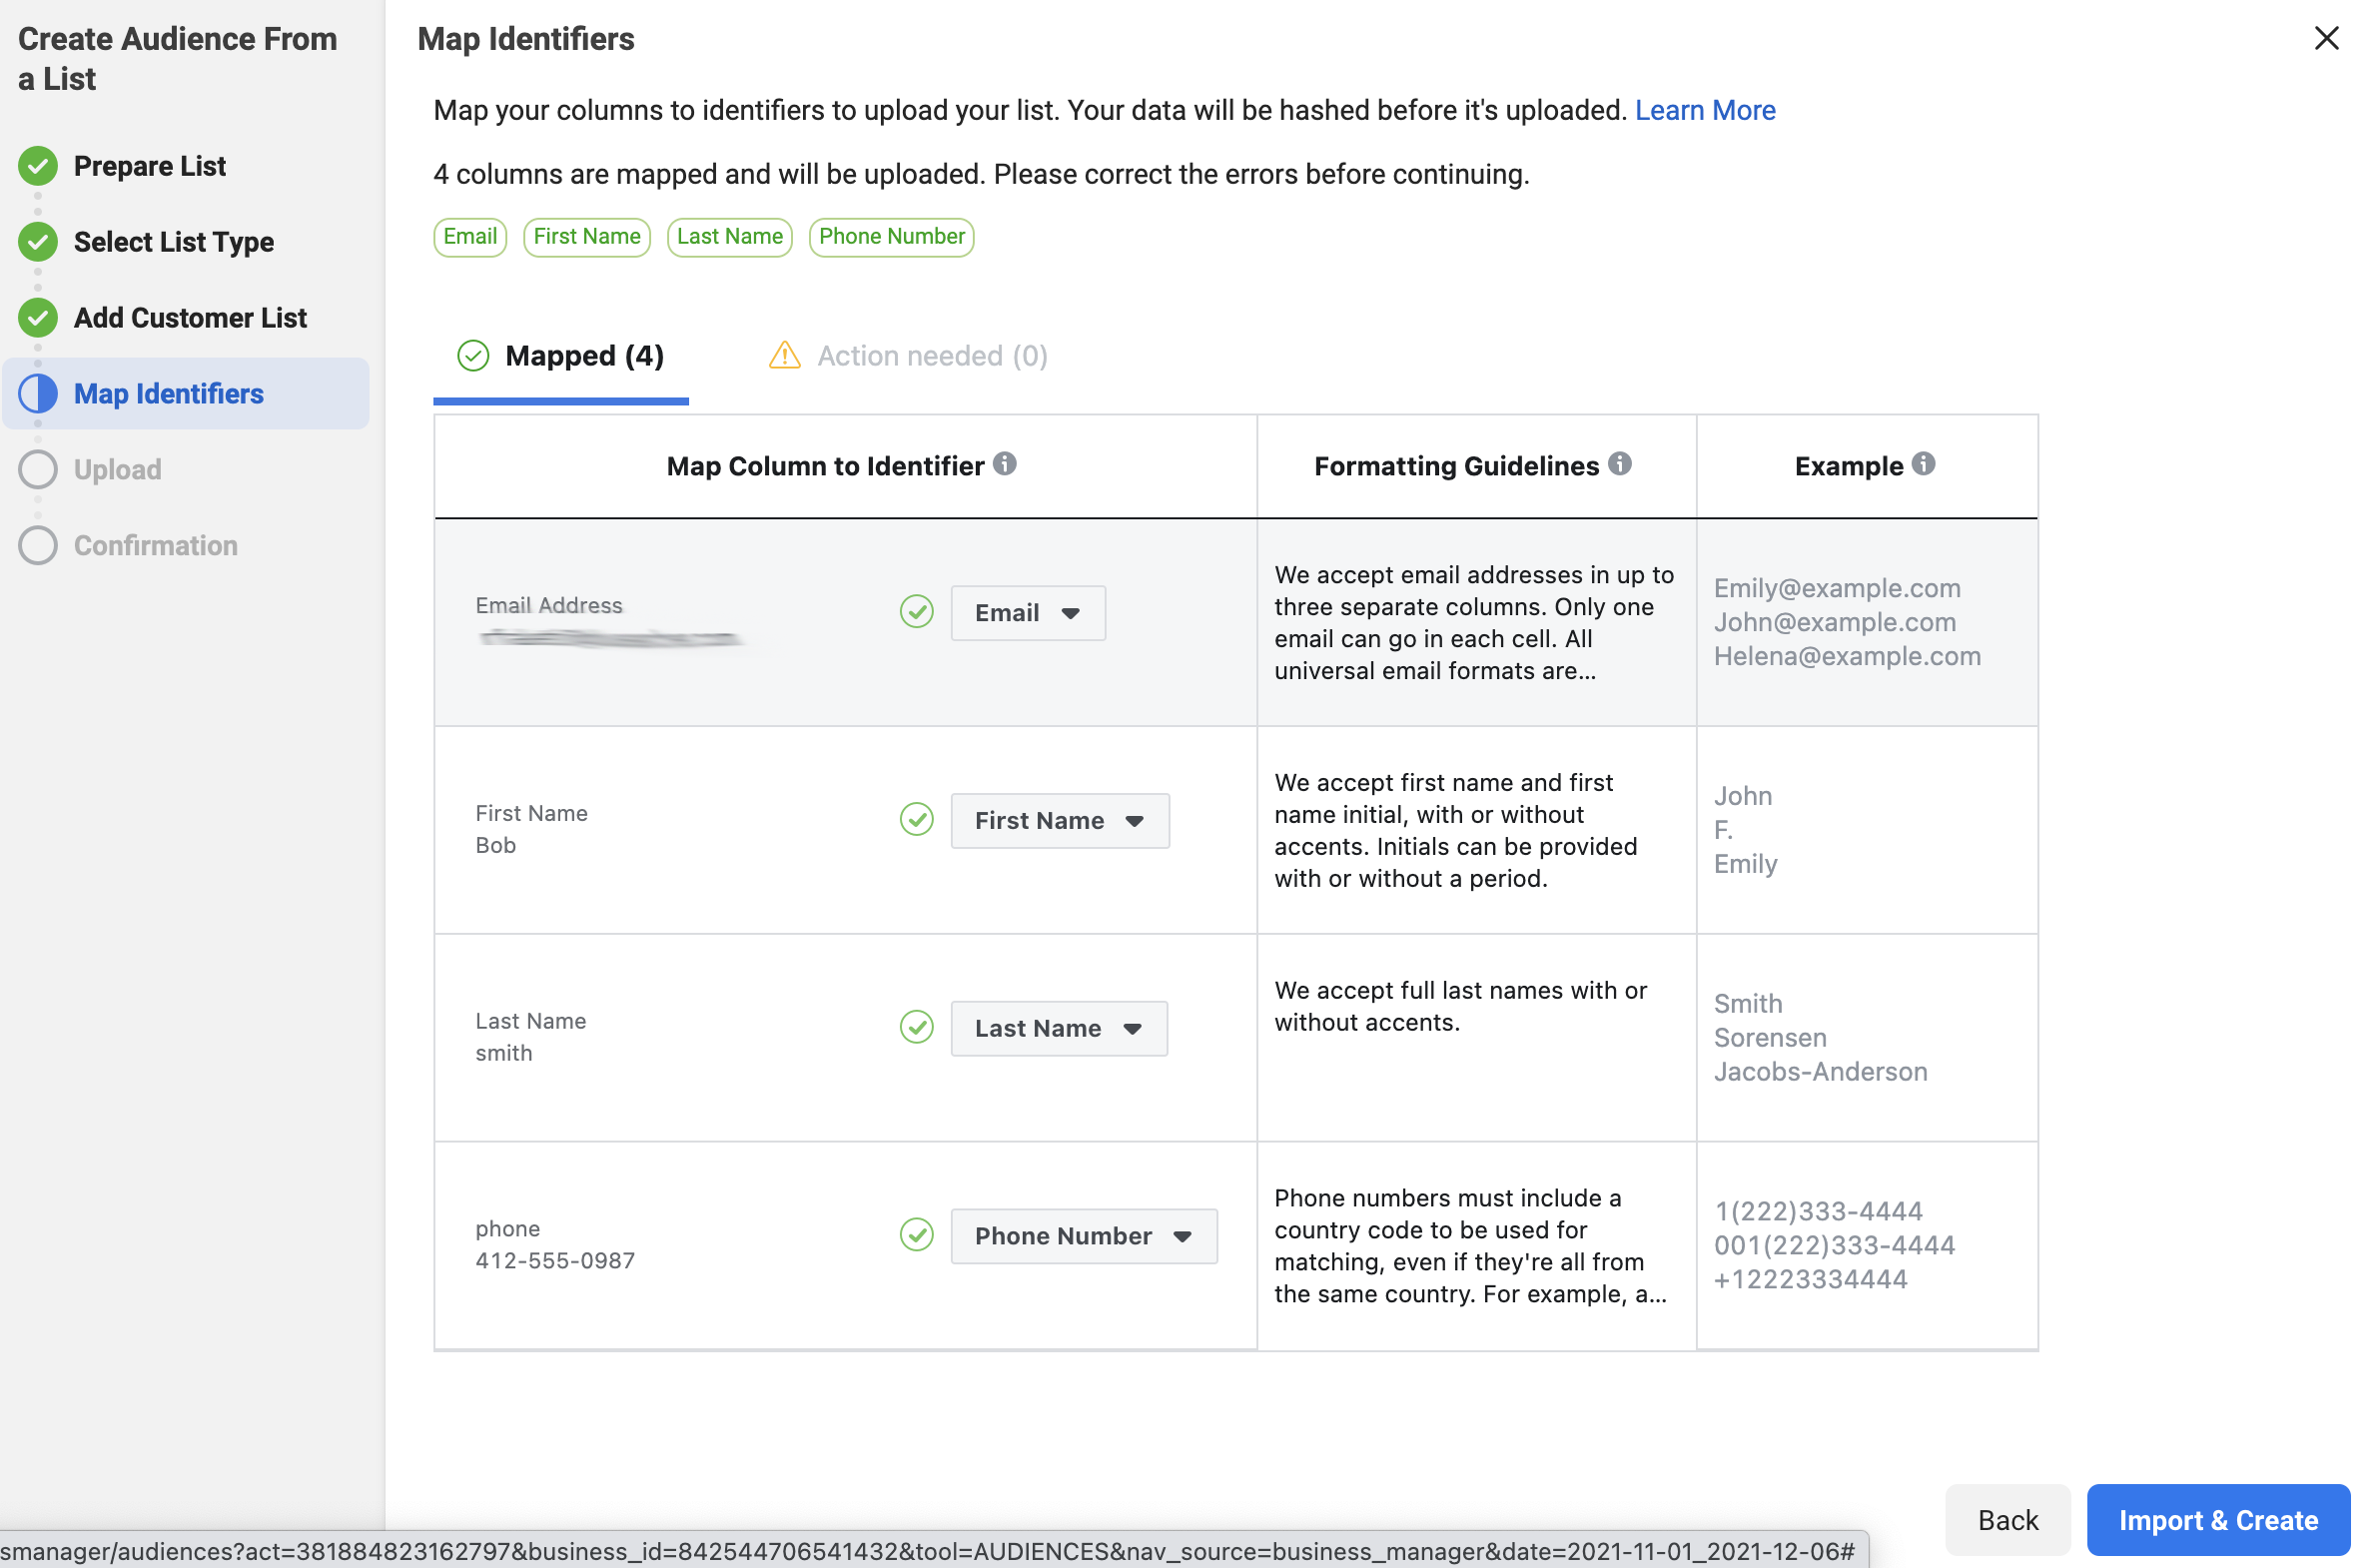
Facebook will review the data and attempt to identify the columns that you entered in the .csv file (or the pasted data). If they can identify the column, they will show the information on the “Mapped” tab. It normally can distinguish the email and phone number easily. If it can’t tell what the data is, it will place the information on the “Action Needed” tab. Then, you’ll need to go to that tab and ID the columns for Facebook.
Once the columns that you want the data from are mapped, click on the “Import and Create” button.
This creates the list and gives you confirmation, as seen below:
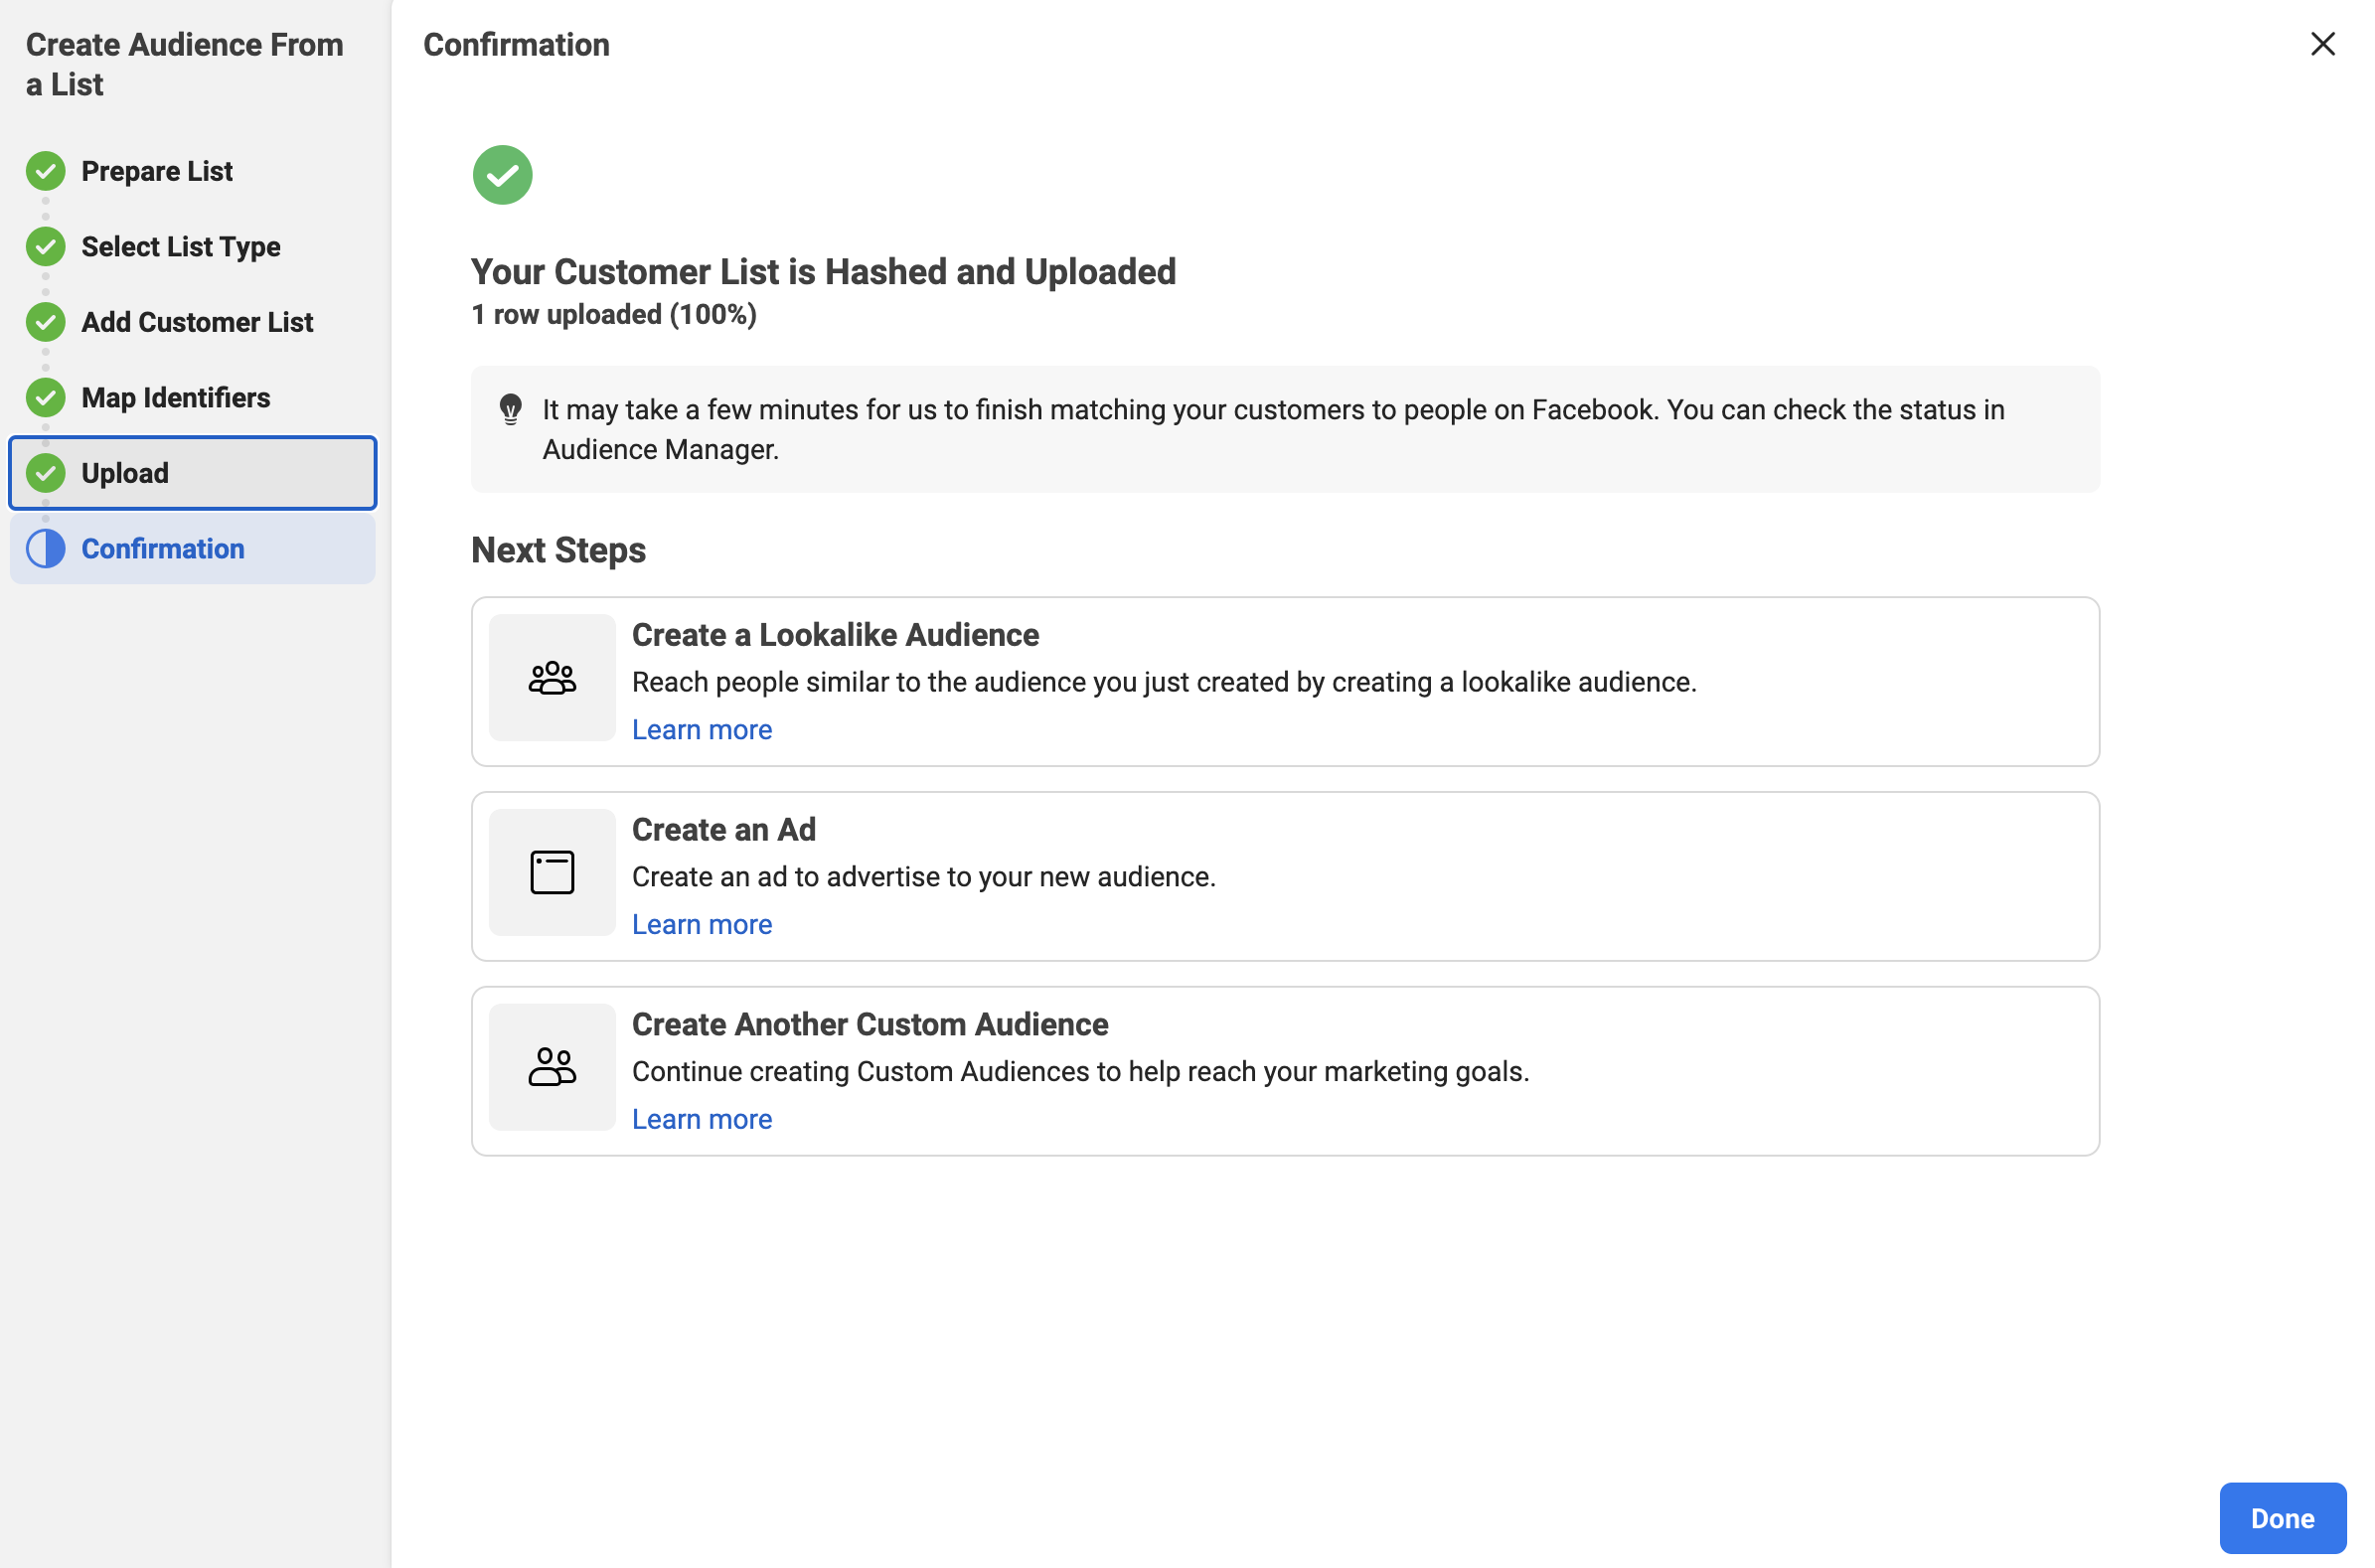
Click “Done” and it returns you to the main audience page.
You now have a custom audience of your clients to use when running Facebook Ads.
Facebook Audience Three – Your Clients “Lookalike”
You’ve now made an audience that contains your clients and an audience that contains your prospects. Wouldn’t it be great if you could find other people to advertise to who are similar to your current consumers?
You can now with a “Lookalike Audience” from Facebook.
So, what is a Lookalike Audience?
A lookalike audience uses an existing Custom Audience you select for its source audience. To create a lookalike audience, our system leverages information such as demographics, interests and behaviors from your source audience to find new people who share similar qualities. When you use a lookalike audience, your ad is delivered to that audience of people who are similar to (or “look like”) your existing customers.
When you create your lookalike audience, you can use a percent range to choose how closely you want your new audience to match your source audience. The size you choose depends on your goals. Smaller percentages more closely match your source audience, but larger percentages create a bigger, broader audience.
Now, let’s create a lookalike audience for your clients.
Step 1 – Open The Facebook Audience Tool
Go to business.facebook.com for your company. In the menu, go to “All Tools” and select the “Audiences” option.
Once you click on “Audiences”, it will open the “Audience” tool in a new tab on your browser. This will display the 2 audiences that you have created already.
Step 2 – Select the Lookalike Audience
Click the “Create Audience” button on the left to get started.
In the drop-down, select the “Lookalike Audience” option.
Step 3 – Create the Lookalike Audience
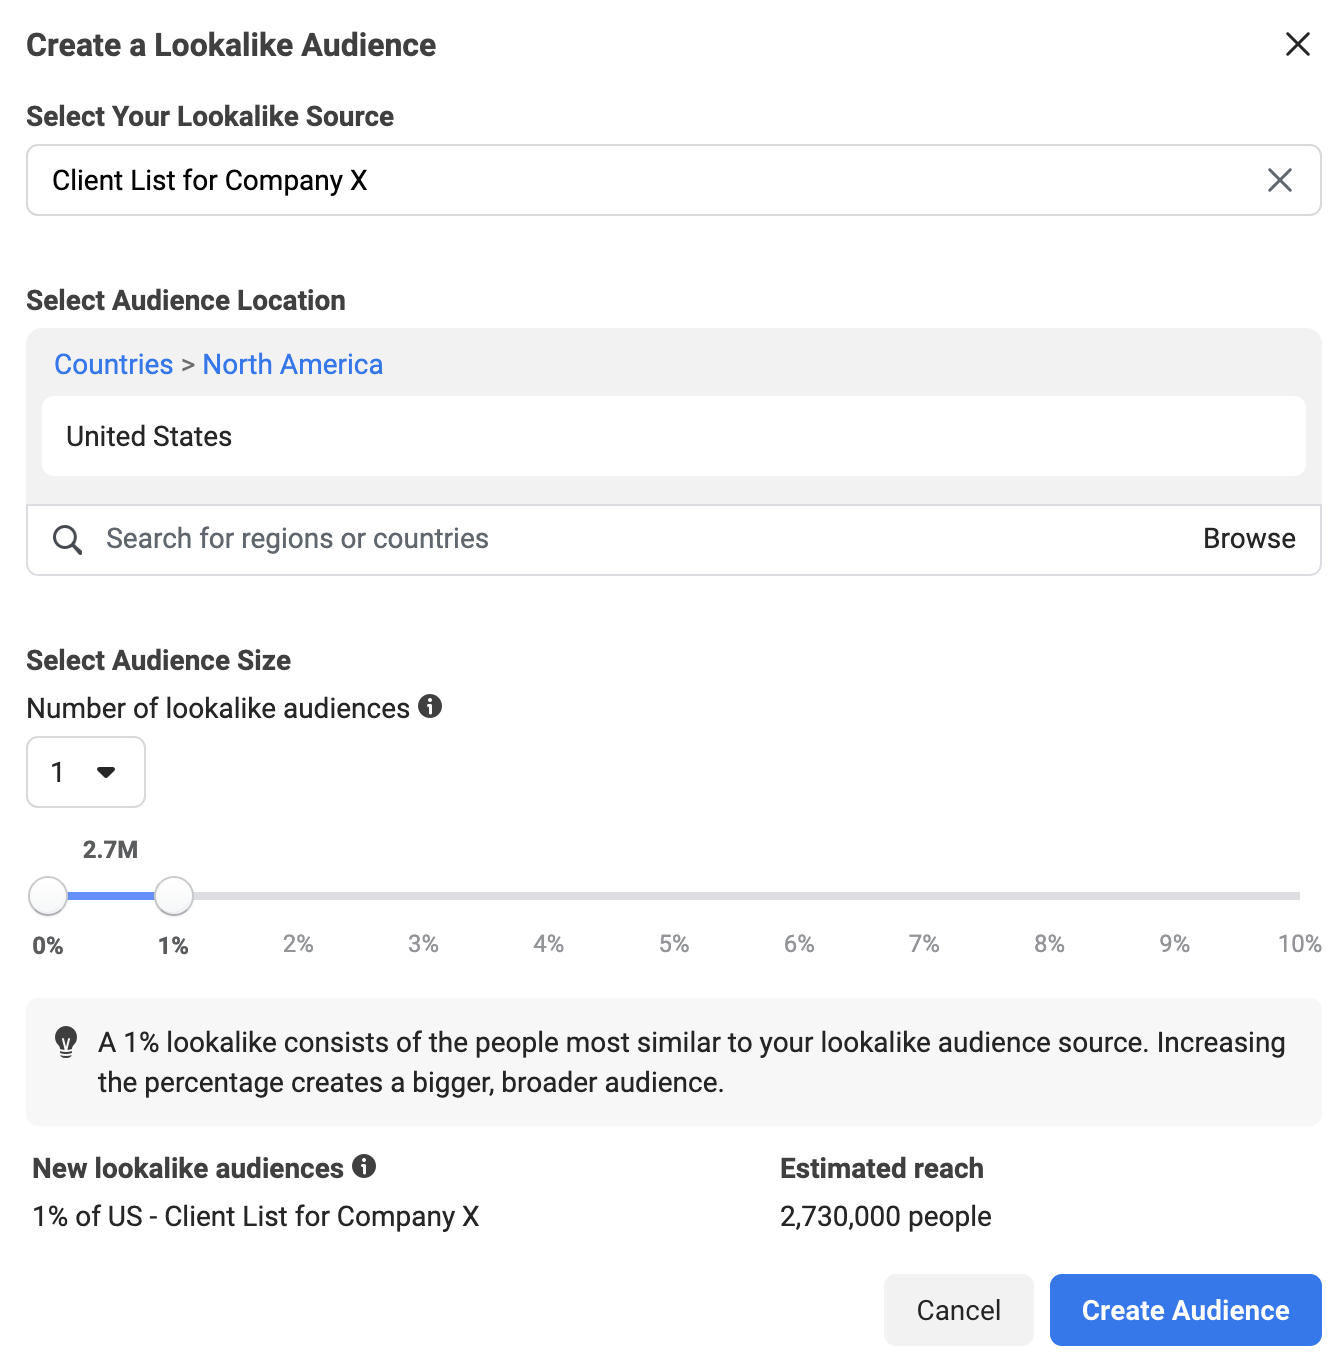
It will ask you to select your lookalike audience. This is where you will choose the “Client List for Company X” that you just created.
Then, you will need to choose a location for the audience. You will want to enter the country that you are targeting.
We recommend keeping the percentage at one, as you get a more honed-in audience that is similar to your clients.
Finally, click “Create Audience” to complete the process.
Facebook Audience Five – People That Have Engaged With Your Page
Engagement is a key factor when you look at any paid ad or organic post on Facebook. “Engaging” actions can include a like, a reaction, a comment and more. It’s basically the label for when someone takes an action with your post or ad.
It stands to reason that if someone has taken the time to engage with your content, it would make sense to put more of your paid content (with calls to action) in front of them, right?
This is where Audience Five, the people who have engaged with your page, comes in.
Let’s create this audience!
Step 1 – Open The Facebook Audience Tool
Go to business.facebook.com for your company. In the menu, go to “All Tools” and select the “Audiences” option.
Once you click on “Audiences”, it will open the “Audience” tool in a new tab on your browser. This will display the audiences that you have created already.
Step 2 – Select the Custom Audience Type
Click the “Create Audience” button on the left to get started.
In the drop-down, select the “Custom Audience” option.
Once “Custom Audience” is selected, this will open a new dialog box. This box will allow you to choose the source of the custom audience. In this case, you’ll select “Facebook Page” and click “Next”.
Step 3 – Select the Criteria
Make sure that your Facebook page is selected, as shown below.
Then, choose the option “Everyone who engaged with your Page” with a retention of 180 days. Some companies will recommend a year, but 180 days is the maximum that we recommend.
Add a descriptive name for this audience, like “People who have engaged with my page”. Facebook also gives you a “Description” field if you want to expand on the title. You may want to put the retention amount in here for reference.

Once all your fields are filled out, click on the “Create Audience” button.
Facebook will create the audience, then give you a confirmation message. Click “Done” and you’ll be returned to the main “Audience” page.
Facebook Audience Six – People That Have Been On Your Website Via The Facebook Pixel
Showing ads to people that have been on your website already is the core tenet of what marketers call “Remarketing”. This is essential for a successful marketing plan.
In fact, studies show that only 3% of buyers are ready to act at any given time. This is why remarketing is so important. It allows you to put your business in front of potential buyers multiple times so you can progress the relationship by building trust.
One way to know who has visited your website is via the Facebook Pixel. This is a tracking cookie provided by Facebook. If you don’t have your Facebook Pixel installed, follow these instructions from Facebook to successfully set it up.
Now, there are a few exceptions to this rule.
Due to a privacy debate between Apple and Facebook, the people typically not tracked are on iOS devices. They actually have to opt-in to being tracked via the app. Less than 10% of these users have done so.
The other exception is that a person could have assorted browser privacy settings on, which would disallow tracking on their computer.
Despite these exceptions, you can still have a decently sized audience based on the data from the Facebook Pixel.
Let’s create this audience!
Step 1 – Open The Facebook Audience Tool
Go to business.facebook.com for your company. In the menu, go to “All Tools” and select the “Audiences” option.
Once you click on “Audiences”, it will open the “Audience” tool in a new tab on your browser. This will display the audiences that you have created already.
Step 2 – Select the Custom Audience Type
Click the “Create Audience” button on the left to get started.
In the drop-down, select the “Custom Audience” option.
Once “Custom Audience” is selected, this will open a new dialog box. This box will allow you to choose the source of the custom audience. In this case, you’ll select “Website” and click “Next”.
Step 3 – Select the Custom Audience Pixel Criteria
You’ll be given a selection of the Pixels that you have access to. Choose the Pixel that is installed on your website.
Under “Events”, you have a few choices. You can choose people that have been on any page of your website. You can also specify exact pages or URLs that contain certain words. Another option is selecting users by time spent.
In this example, we are just going to target anyone that has visited our website before.
Again, you can select the “Retention”, which is how far back in time you want the list to remember people. We recommend anywhere between 30-180 days, depending upon what your business does. With higher-priced items and services, a longer retention may help you convince the people that take a while to research.
Obviously, we can get more detailed in the targeting by adding more criteria with the “Include More People” button, but we will cover that in future articles.
Fill in your “Audience Name” and the “Description”, then click the “Create Audience” button.
Facebook will create the audience and give you a confirmation message. Click “Done” to complete the process.
Facebook Audience Seven – People That Have Watched Specific Facebook Videos
This audience will help you pick up some of the people that you lost to the iOS security updates. Because you can’t track them with the Pixel, you need to have a way to track them on Facebook.
“Video Watches” is the perfect stat for this! Facebook tracks who watches every video that you advertise and for how long they watch.
Create a video, or set of videos, that ONLY your ideal client would watch. Make it very specific to the problems/pain points that they have, then advertise it with a goal of “Video Views” to a broad audience in your service area. We suggest running these ads at $5-$10 per day. At the end of 2 weeks, you should have an excellent set of people to retarget.
Let’s create the last audience!
Step 1 – Open The Facebook Audience Tool
Go to business.facebook.com for your company. In the menu, go to “All Tools” and select the “Audiences” option.
Once you click on “Audiences”, it will open the “Audience” tool in a new tab on your browser. This will display the audiences that you have created already.
Step 2 – Select the Custom Audience Type
Click the “Create Audience” button on the left to get started.
In the drop-down, select the “Custom Audience” option.
Once “Custom Audience” is selected, this will open a new dialog box. This box will allow you to choose the source of the custom audience. In this case, you’ll select “Video” and click “Next”.
Step 3 – Select the Custom Audience Criteria
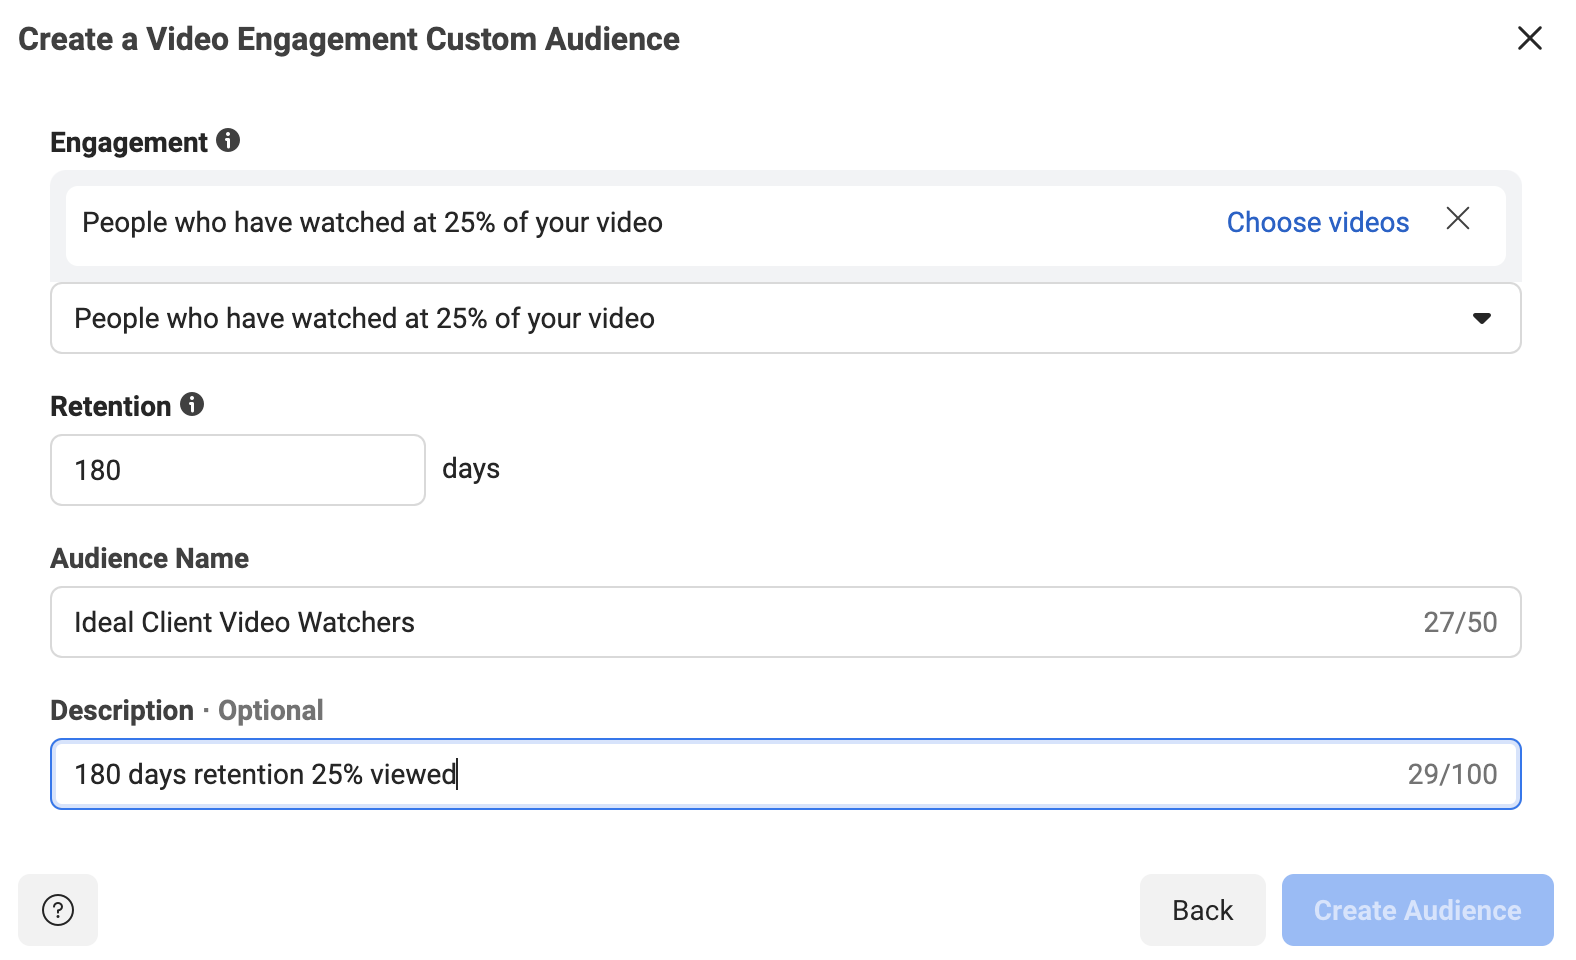
In this next step, you’ll need to choose what percentage or length of time people must spend watching your video. 25% tends to be a good metric to choose. No one is going to watch over one-fourth of a video about something that they aren’t really interested in.
So, in the dropdown, select the “People who have watched 25% of your video” option. Again, we recommend the Retention between 30-180 days.
Add the “Audience Name” and “Description” as well.
The last step is to choose the video (or set of videos) that you used to target your ideal client. Click the “Choose videos” link.
You can select videos from your Facebook page or your Facebook ads. To see all of your videos, you will need to change the “Video Source” dropdown in the upper left.
Select the videos that you used to target your ideal client. They should show in the right side-column once selected.

Once you have your videos chosen, click “Confirm”.
This takes you back to the “Create Video Engagement Custom Audience” screen, where you have filled out everything else. Click the “Create Audience” button.
Facebook will create the audience, then give you a confirmation message. Click “Done” and you’ll be returned to the main “Audience” page.
