Over 1 billion professionals are on LinkedIn, but only 2% of them post content weekly. For small law firms, this is a huge opportunity to stand out. However, If you’re like many attorneys, you know you should be posting more on LinkedIn, but you aren’t quite sure how often is enough — or what to post.
A common worry that we hear is that you might “annoy” your followers. However, unless your post goes viral, it is typically seen by less than 6% of your overall network.
You might also worry about running out of ideas or simply not having the time to keep up with it all.
When it comes to LinkedIn, here’s the thing: the more consistently you post, the more visibility and engagement your law firm will get.
This isn’t just a hunch — it’s backed by data, which we are about to show you
In this article, we’ll cover:
How often lawyers from small to mid-sized firms should post on LinkedIn for maximum engagement
The exact numbers behind why posting frequency matters
What types of content perform best for attorneys
A simple way to keep your firm visible without spending hours each week creating posts
Why LinkedIn Matters for Lawyers
LinkedIn is no longer just a place to upload your resume.
For attorneys and law firms, it’s a powerful platform for:
Attracting new clients who search for answers and help directly on LinkedIn andGoogle
Building referral relationships with other professionals
Demonstrating credibility and expertise to potential clients and colleagues
Staying top-of-mind with past clients and your local network
With over1 billion members worldwide and a professional audience that trusts the platform, LinkedIn is one of the best places for small law firms to market themselves – especially when you don’t have a huge ad budget.
However, there’s a catch: having a profile isn’t enough.
To get real results, you need to post regularly.
Let’s Get Into The Data: Why Posting More Drives More Engagement
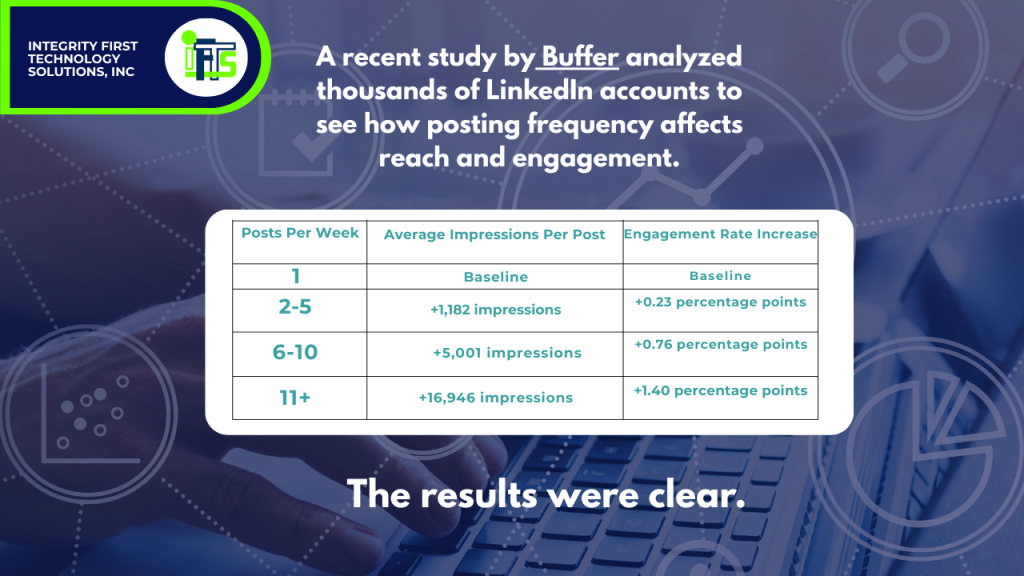
A recent study byBuffer analyzed thousands of LinkedIn accounts to see how posting frequency affects reach and engagement.
The results were clear:
Takeaway: Posting just 2-5 times per week results in a noticeable boost in visibility!
Attorneys that go beyond 6 posts per week see exponential growth — up to 3× more engagement compared to posting only once per week.
This growth happens whether you have 200 followers or 20,000. In other words, small firms benefit just as much as large firms.
For small law firms, this means that even a modest increase in posting frequency can dramatically expand your visibility — without spending more on ads!
How Often Should You Post on LinkedIn as an Attorney?
If you belong to a firm with 10 or fewer attorneys, here’s a realistic way to think about posting frequency:
Starter Plan: 2-3 posts per week Great for attorneys just getting started or testing out LinkedIn marketing. This keeps you visible without overwhelming you
Growth Plan: 5 posts per week Ideal for attorneys ready to build momentum and generate consistent engagement.
Accelerated Plan: 6-10 posts per week For attorneys with lots of stories to share or using outside help (like a marketing partner), this level maximizes reach and lead generation.
If you’re currently posting only once or twice a month, aim to start small and ramp up gradually. Consistency matters more than perfection.
What to Post on LinkedIn: Ideas Just for Attorneys
One of the biggest questions lawyers always have is: “What do I even post about?”
Here are proven content types that work well for law firms:
1. Educational Tips & FAQs
Example: “What to Do If You’re Involved in a Car Accident: 3 Quick Steps”
These establish you as a trusted expert while being genuinely helpful.
2. Myth-Busting Posts
Example: “3 Common Misconceptions About Estate Planning”
Great for engagement because they spark curiosity.
3. Behind-the-Scenes Firm Culture
Showcase your team, firm events, or community involvement to humanize your practice. Clients love to see the “human” side of the firm.
4. Case Studies or Success Stories
Share anonymized examples of how you’ve helped clients.
5. Video Clips
Short, educational videos get higher engagement and help prospects feel like they “know” you before ever meeting you.
Why Outsourcing Your LinkedIn Marketing Might Make Sense
You went to law school to practice law, not to spend hours brainstorming LinkedIn content. That’s where we come in.
At IFTS, we specialize in helping small law firms like yours stay visible online without adding to your workload.
OurVideo Content Marketing Package uses AI video technology to create an “AI twin” of you — so it’s your face and voice on the content, but we handle all the work.
Here’s what that means for your firm:
We produce engaging, on-brand videos based on your expertise.
We repurpose those videos into LinkedIn posts and other formats.
We schedule and post them at the optimal times for maximum engagement.
You stay focused on serving clients while we grow your online presence.
It’s the easiest way to maintain a 5-10 post per week schedule that drives real results — without ever having to hit “record” or write captions yourself.
Start Posting More on LinkedIn Today!
LinkedIn is one of the most powerful marketing tools available to small law firms today. The data is clear: posting more often leads to more engagement, visibility, and ultimately more clients.
Start by committing to just 2-3 posts per week and build up from there. When you’re ready to maximize growth without sacrificing billable hours, consider partnering withIFTS to handle the strategy, content creation, and posting for you. You can schedule a FREE strategy session here:https://iftsdesign.com/get-more-clients
Because the more your firm shows up on LinkedIn, the more opportunities you’ll create — and the easier it becomes to grow your practice.
When’s the last time you checked in on your law firm’s website health?
For many attorneys, the website is their firm’s first impression — a virtual office lobby where potential clients decide in seconds whether you look credible, trustworthy, and professional.
However – if your site is slow, full of broken links, or running outdated software, it silently chips away at that reputation (and your revenue stream).
Minor issues like slow load times, outdated attorney bios, or broken intake forms can add up fast. And unlike other businesses, law firms have even more at stake: client trust, confidentiality, and compliance.
One study found that nearly 40% of people will abandon a website if it takes more than 3 seconds to load.
For lawyers, that could mean losing a case worth $4,000–$10,000+ before the potential client even reads about your services.
That’s why consistent, proactive website maintenance is essential. It’s not just about keeping things from breaking — it’s about protecting your firm’s reputation and keeping your pipeline of new clients strong.
This monthly website maintenance checklist for law firms will help you stay ahead of problems, keep your site secure, and ensure your prospective clients have the smoothest experience possible.
Key Takeaways
Website maintenance directly impacts SEO, client trust, and lead generation.
Speed matters: a slow website signals unprofessionalism and costs you clients.
Security updates are non-negotiable: attorneys must safeguard sensitive data.
Regularly update attorney bios, case results, and practice pages to stay credible.
Monthly reviews of analytics reveal which practice areas generate the most leads.
Why Website Maintenance Matters for Law Firms
Think about how your clients choose an attorney.
They’re searching online for someone they can trust with their case, money, and often their future. If your site is outdated, confusing, or insecure, it sends the wrong message.
Client Perception: An old blog post from 2019 or an attorney bio with outdated bar admissions suggests the firm is out of touch.
Confidentiality & Ethics: A site without proper security updates risks exposing client inquiries or intake forms. That’s an ethics and compliance risk no firm can afford.
Search Rankings: Google rewards well-maintained sites. Neglect leads to lower visibility, especially in competitive “near me” searches.
Lead Flow: Every broken form, slow-loading page, or 404 error is a lost consultation.
Think of maintenance like legal research: the details matter, and keeping things current gives you the advantage.
The Law Firm Website Maintenance Checklist (Monthly)
Check your SSL certificate to ensure your intake forms remain secure.
Law-specific reminder: Many state bar associations emphasize cybersecurity diligence. An insecure site could expose you to ethical complaints or malpractice claims.
4. Review and Remove Unused Plugins or Integrations (if your site is in WordPress)
Audit your installed plugins.
Delete inactive or outdated ones (deactivation isn’t enough).
Double-check integrations with legal CRMs like Clio, Lawmatics, or MyCase to ensure they’re secure and functioning.
Fix broken links in blog posts, attorney bios, or practice area pages.
Update links to courts, statutes, or bar associations.
Broken links look sloppy to potential clients and signal neglect to search engines.
6. Review the Entire Website for Content Accuracy
Update attorney bios with recent bar admissions, awards, or community involvement.
Refresh practice area pages with current laws and procedures.
Remove or update old blog posts with outdated legal references.
A site with stale content undermines your authority. Clients expect you to be current — so should your website.
7. Review Your Google Stats
Use Google Analytics 4 (GA4) and Google Search Console (GSC).
Identify which practice pages get the most traffic (e.g., “Divorce Lawyer Pittsburgh” vs. “Estate Planning Lawyer Cleveland”).
Review bounce rates — are visitors leaving before they contact you?
Track conversions: form fills, calls, and chat usage.
Data shows you which areas are driving leads — and where you may need to optimize.
8. Test Your Intake Forms & Contact Paths
Fill out your “Schedule a Consultation” form like a client would.
Confirm that:
Emails are delivered to your intake team.
Auto-replies are professional and on-brand.
Phone numbers and “click to call” links work on mobile.
Nearly 70% of law firm websites fail at basic intake form follow-up. Don’t let yours be one of them.
9. Check for Accessibility & Professionalism
Review your site for ADA compliance: alt text, proper color contrast, and screen reader compatibility.
Proofread pages for typos or outdated language.
Ensure images and messaging reflect your firm’s professionalism.
Accessibility isn’t just about compliance — it’s about making your services available to every potential client.
Reviewing and Updating Your Website Checklist
Your law firm website will evolve — new attorneys join, practice areas shift, blog content grows. That means your maintenance checklist should evolve, too.
Quarterly: Add checks for accessibility, schema markup, and updated intake workflows.
Responsibility: Assign the checklist to a marketing partner or internal staff member.
Consistency ensures nothing falls through the cracks.
Want a checklist to follow for this whole process? Download it here.
Website FAQs for Law Firms
What does website maintenance include for a law firm?
Regular speed tests, backups, security updates, plugin audits, broken link fixes, content updates, analytics reviews, and intake form tests.
How often should law firms update their websites?
At least monthly, with backups and content updates more frequently depending on your activity.
Why is maintenance so important for lawyers?
Because potential clients judge you within seconds. A slow, outdated, or insecure site costs you leads and damages your credibility.
Get Started Today!
Website maintenance may not feel urgent, but neglecting it leads to real risks:
Lost clients
Lower search rankings
Security vulnerabilities
Damaged credibility
Just like a strong case requires regular preparation, your website requires consistent attention. With a clear checklist and routine process, you’ll stay ahead of problems and keep your law firm’s digital presence sharp, secure, and client ready.
Don’t forget to download our free checklist for website maintenance here
Want a polished, confident headshot for your website or LinkedIn—without a studio, getting dressed up, or perfect lighting?
In this guide, I’ll walk you through creating professional-looking AI headshots at home using the app Gio (iOS; $39.99/year), plus pro tips for natural results.
What you’ll need
A smartphone (rear camera preferred)
A plain wall or simple background
Soft, even light (a bright window works great)
Geo app installed and logged in
Optional: a helper or tripod; otherwise use the phone’s timer
You don’t need to dress up or do full hair/makeup. We’ll handle styling and polish inside the app.
Step-by-step tutorial
1) Prep your space
Stand 2–4 feet from a plain wall.
Face a window for soft, even light; avoid mixed overhead lighting.
Remove wall clutter (hooks, frames) so the background is clean.
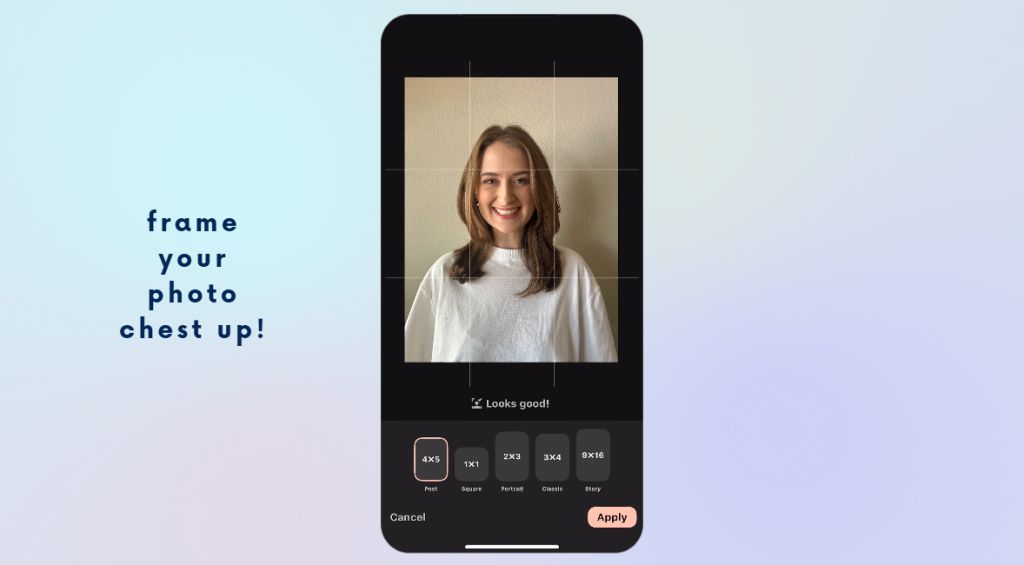
2) Frame the photo correctly
Composition: chest-up, with a bit of space above your head.
Camera at eye level, held straight (no tilt).
Keep the frame not too wide—we don’t want a full-body shot.
3) Take your base photo
Relax your shoulders; slight smile or neutral expression.
Snap several options (different angles: straight on, slight turn).
If solo, use a 10-second timer and prop the phone at eye level.
4) Import into Gio
Open Gio → click styles→ select your best chest-up photo.
5) Crop before styling
Use Geo’s crop tool to frame just below the chest to a little above your head.
Center your eyes roughly in the upper third of the frame.
6) Choose a style
Tap Styles. You’ll see categories (e.g., Office, Doctor, Realtor, etc.).
For a classic business look, try Office → Blazer or a button-up.
Some styles add clothing only (no background). That’s normal—we’ll add a backdrop next.
Turtlenecks often hide neck artifacts, which can look more natural.
7) Generate & review
Let Gio process (typically quick or 1-3 minutes max).
Check hairline, neckline, and edges of clothing. If anything looks off, try a nearby style or let it regenerate.
8) Add a professional background
Go to Backgrounds → choose an office or studio look.
Aim for believable depth of field (slight blur behind you). This instantly elevates realism.
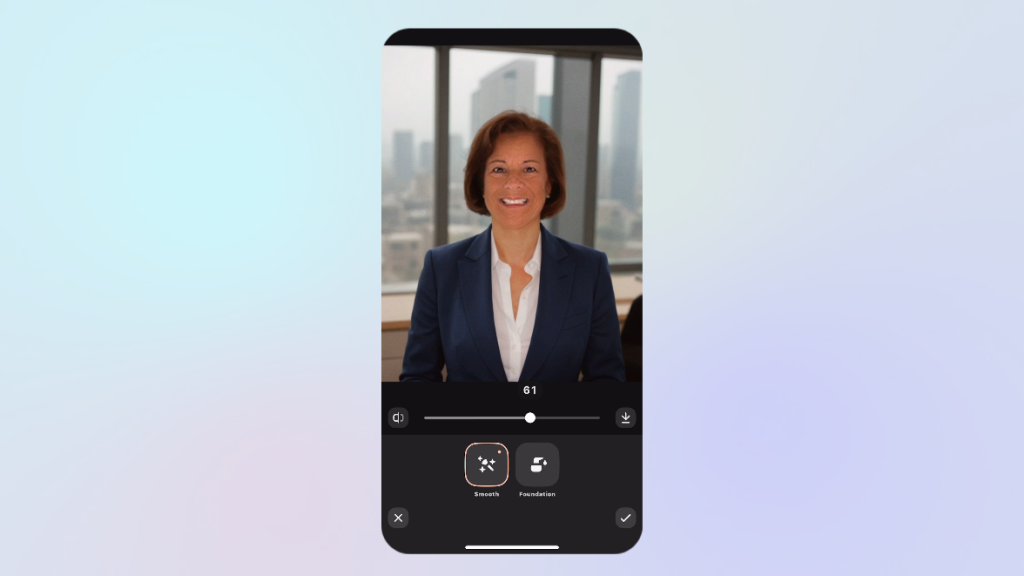
9) Retouch lightly (less is more)
Open Retouch → Skin:
Set skin smoothing ~40–50%. Enough to polish, not plastic.
Teeth/Lips:
Small amounts of teeth whitening or a slight lip lift can help; avoid extremes.
Rule of thumb: if you can see the edit, it’s probably too much.
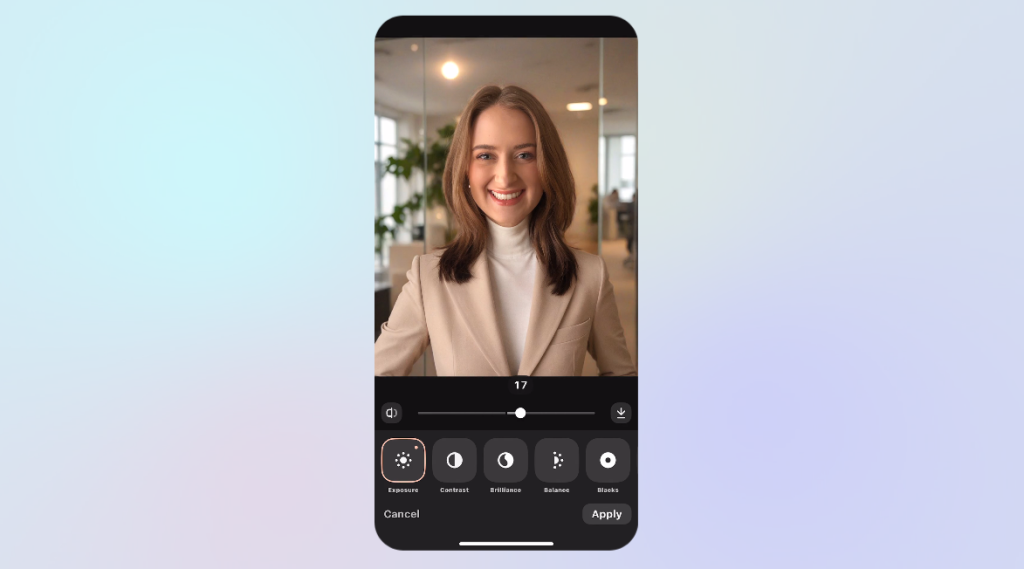
10) Match lighting & color
Use Adjustments:
Tweak brightness/contrast so your face matches the background exposure.
Slight warmth can add a healthy tone; avoid orange.
If AI clothing looks overly crisp, add a touch of blur or reduce sharpness to mimic a real photo.
11) Optional: brand-style filters
Light filters can add mood or consistency with your website/Instagram.
Keep it subtle; you’re going for timeless, not trendy.
12) Export for each platform
Save as a standard image to your camera roll.
Crop for platforms:
LinkedIn: square (1:1), face centered, shoulders visible.
Website bio: vertical (3:4 or 4:5) with a bit more breathing room.
Working with less-than-perfect photos (mature skin & low light)
If your only photo is slightly blurry, dim, or shows fine lines, you can still get a great result.
Add a clean background first—this often fixes the overall feel.
Fine lines: keep smoothing under 50% to preserve texture.
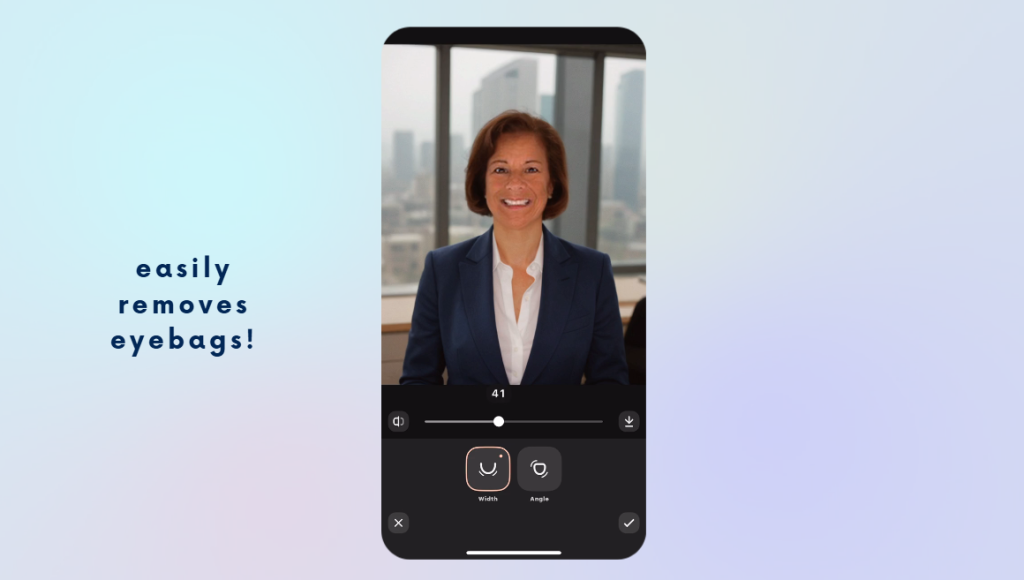
Eye bag reduction: you can push this higher than other retouches and still look natural.
Chin/angle tools: use sparingly to correct camera distortion (don’t reshape your face).
Makeup: The makeup options are minimal on Gio but offer a touch of color. I go with the natural look at about 50% and it adds light definition to eyes/lips without looking “done.”
If sharpening highlights wrinkles, back it down and rely on gentle blur + contrast balancing instead.
Quick do’s & don’ts
Do
Shoot chest-up against a plain wall with window light.
Keep edits subtle and consistent across all variations you export.
Choose backgrounds that fit your industry (law, tech, healthcare, creative).
Don’t
Over-smooth skin or over-whiten teeth.
Use busy or trendy backgrounds that will date the image.
Save only one version—export a LinkedIn crop and a website crop.
FAQs
Do I need to dress up? No. Wear anything—Gio can add a blazer, button-up, or sweater later.
What if my photo is a bit blurry? You can still get a professional result by pairing gentle retouching with a clean, well-lit background.
How many styles should I try? Test 2–4. Keep one formal (blazer), one business-casual (button-up), and one relaxed (sweater) for different uses.
Will people be able to tell it’s AI? If you keep retouching subtle and match lighting/contrast to the background, most viewers will simply see a clean, professional portrait.
Done-for-you option (fast, affordable, hands-off)
If you’d rather skip the tweaking and subscriptions, we offer a Virtual Headshot Service for $79:
3 professionally edited headshots to choose from
Custom social media graphic for LinkedIn/website
24-hour turnaround
It’s quick, effortless, and you never have to leave your office.