If your law firm is still chasing old-school SEO tactics like stuffing keywords into blog posts, you are missing the real game.
AI search is here now – and it plays by different rules.
Tools like ChatGPT, Gemini, Grok, and Perplexity don’t spit out 10 blue links anymore. They generate one recommended answer.
If your firm isn’t that answer, you’re invisible.
So how do you become the answer AI recommends?
Introducing: The BRAIN Framework – This model outlines the five key elements that influence whether your firm’s content is trusted, selected, and cited by AI systems. This will help with your Answer Engine Optimization (or AEO).
What Is the BRAIN Framework for AEO and Law Firms?
BRAIN stands for:
Brand
Rapport
Accessibility
Newness
Intent
Each piece plays a critical role in making your law firm discoverable—not just by humans, but by the AI tools your potential clients are increasingly turning to.
Let’s break down each component of BRAIN, with actionable steps you can take today.
B is for Brand: Get Your Law Firm Recognized Everywhere
AI systems don’t just read your site—they check your whole digital footprint.
They pull data from across the internet to confirm your law firm is real, consistent, and trustworthy.
What To Do:
Ensure your NAP (Name, Address, Phone) is consistent Your Name, Address, and Phone Number must be identical across all platforms—Google Business Profile, Yelp, Avvo, Justia, FindLaw, LinkedIn, your state bar listing, etc.
Use Schema Markup Embed LocalBusiness or Attorney schema in your website’s code. This helps AI tools and search engines categorize you correctly and associate you with your location and profession.
Link to authority profiles Include outbound links on your website to your verified LinkedIn, state bar, or trusted directory profiles. AI sees this as third-party proof that you exist.
Law Firm Example
A firm with conflicting business names across different sites (e.g., “Johnson Legal Group” vs “Johnson & Associates”) might not be viewed as the same entity. AI may skip over them in favor of a consistent brand competitor.
R is for Rapport: Prove Your Firm Knows It All
AI doesn’t just want content—it wants content from credible, knowledgeable voices.
You don’t need to be a national law firm to build authority.
You just need to prove that real attorneys with real credentials are behind your content.
What To Do:
Flesh out attorney bios Include bar numbers, education, court admissions, speaking engagements, and associations. AI tools check for these signals to verify expertise.
Get quality backlinks Seek links from reputable third-party sites—local media, chamber of commerce directories, legal organizations, or universities.
Cite your sources Refer to official statutes, case law, or government sites. This shows your legal content is grounded in authority.
Law Firm Example
A solo estate planning attorney who lists past CLE presentations and court cases on their bio page will score higher with AI than a firm that just posts “we’ve been serving clients since 1992.”
A is for Accessibility & Indexability: Make It Easy to Read (For Bots and People)
AI doesn’t “read” pages like humans do. It scans for structure and content.
That means your design, layout, and code matter just as much as the words on the page.
What To Do:
Use headings, bullets, and sections on your site Break up text with clear formatting. Include FAQs, numbered lists, and subheadings (H2/H3) for scan-ability.
Add internal links Link your blog posts to your attorney bios, your service pages to your contact page, and so on. This helps bots (and visitors) navigate your site.
Use Schema again Especially FAQPage schema for structured Q&A content. This markup boosts your chances of being pulled as a featured AI response.
Law Firm Example:
A criminal defense site with long, unformatted paragraphs will likely be skipped by AI tools. A competing firm with FAQ-rich service pages, internal links, and schema markup is much more likely to be quoted.
I is for Intent: Match What People Actually Ask
Old SEO was about stuffing keywords.
New search, AEO —especially AI—is about matching user intent.
What does the client really want to know?
AI tries to interpret the why behind a question. If your content speaks to that, you’re in the running to be recommended.
What To Do:
Create local FAQs Answer client-specific questions like:
“How long does probate take in Allegheny County, PA?”
“What happens if I die without a will in Ohio?”
“What do I have to do for a second DUI?”
Use tools like AlsoAsked.com or askthepublic.com These platforms show real queries people are typing. Build content around those questions.
Speak like your clients Use plain English, not legalese. AI looks for content that’s accessible and answers questions in the way a layperson would ask.
Law Firm Example:
A personal injury attorney with a blog post titled “What is the statute of limitations in Pennsylvania?” is helpful. But a page titled “How long do I have to file a lawsuit after a car accident in PA?” is exactly what a potential client—and AI—wants to find.
N is for Newness: Keep Your Content Fresh
AI tools prioritize content that’s recent and updated.
They don’t want to recommend outdated advice—especially in a field like law.
What To Do:
Add “last updated” timestamps Clearly show when a page or article was last reviewed.
Update old content Refresh statistics, case law, or legislation references at least once a year.
Post new content regularly You don’t need to blog daily—but at least monthly content signals that your firm is active and staying current.
Law Firm Example:
If your estate planning blog hasn’t been updated since 2018, AI may see it as stale and ignore it. But if you add new posts or update old ones quarterly, your authority and recency score goes way up.
Let’s Start Implementing the BRAIN Framework
If your law firm implements just three out of the five BRAIN pillars, you’ll already be ahead of most of your competitors online.
But if you commit to all five?
You’ll dominate AI search—and make your firm the trusted source that ChatGPT, Gemini, and Perplexity want to recommend.
Ready to Become AI’s #1 Answer?
We’ve developed AI-ready content packages specifically for law firms like yours. If you want to future-proof your marketing and lead generation, click here to learn more.
Watch the Video Version:
Don’t miss the video walkthrough of the BRAIN Framework, including real examples and visuals. [Watch it on YouTube here]. <<Audrey, add a link here
And if you haven’t seen our full AI for Law Firms playlist, it’s linked here — covering how AI picks answers, how to structure your content, and much more.
If you’re wondering why your law firm isn’t being cited by tools like ChatGPT or Perplexity, you’re not alone.
AI platforms don’t just pull random content — they select structured, trusted sources.
In this guide, you’ll learn exactly how to optimize your law firm’s online presence so AI tools want to feature your content as an answer.
AI Doesn’t “Search” — It Synthesizes
Unlike Google, which gives users a list of search results, AI tools provide a single synthesized answer. That answer might be generated from multiple sources, but it reads like a summary written by an expert.
To generate that answer, large language models (LLMs) like ChatGPT or Perplexity scan and process billions of web pages, weighing a few factors within the content:
Credibility
Structure
Clarity
That means if your firm’s website content isn’t optimized for how AI works — it may as well be invisible.
AI Ranking Factor 1 - Structured Content Wins Attention
AI tools aren’t reading your site word-for-word.
They’re scanning for predictable structures that help them locate and extract answers quickly. Think of it like a judge skimming a legal brief — if it’s disorganized, they move on.
What You Can Do:
Use headers (<h2>, <h3>) to break content into logical sections.
Add FAQs to key pages (especially practice area pages).
Keep paragraphs short, use bullet points, and create standalone pages for specific services (e.g., “Contested Divorce in Allegheny County”).
FAMILY LAW EXAMPLE
A page titled “Child Custody in Pennsylvania: What Parents Should Know” with clear questions and answers is far more likely to be used by AI than a long generic blog post.
AI Ranking Factor 2 - Schema Markup = Speak AI’s Language
Schema is structured code that lives behind the scenes on your website. It tells AI what kind of page it’s looking at, who it’s about, and what role it plays.
For example, schema can identify a page as:
A law firm
An attorney bio
A FAQ section
A how-to article
A local business with a specific address and phone number
Without schema, AI has to guess what your content is. With schema, it’s handed the information clearly — which increases the chance you’ll be used as a source.
What You Can Do:
Use plugins like Yoast SEO, RankMath, or TechnicalSEO.com’s schema builder.
Add schema types like:
LocalBusiness
Attorney
FAQPage
WebPage
Fill in fields like bar number, practice areas, location, logo, and links to Avvo or Justia.
An FAQ page marked with the FAQPage schema is much more likely to be quoted in an AI answer than a plain-text blog post.
AI Ranking Factor 3 - Citations and Timestamps Boost Credibility
Language models love content they can verify.
One way they judge that is by checking if your content includes citations to official sources or laws — and whether it looks recent. An article in 2025 is much more likely to be trusted than one from 2015.
What You Can Do:
Include legal citations in your content. For example: “According to 23 Pa. C.S. § 5321…”
Add a “Last Updated” date to every blog post and service page.
Refresh content every 6–12 months, even if just to confirm accuracy.
GENERAL LAW EXAMPLElega
A blog post last updated in 2018 is unlikely to be cited today — even if the law hasn’t changed.
AI Ranking Factor 4 - Internal Linking Builds Trust Signals
Search engines and AI both evaluate how your website’s content connects.
An internal link is a link on your website to another page on your website. Strong internal links tell the algorithm that your site is cohesive and authoritative.
What You Can Do:
Link from blog posts to related practice area pages.
Link attorney bios to articles or pages they authored.
Link FAQs to deeper explanations on other pages.
The more well-connected your pages are, the more likely AI is to view your site as a source of truth. It also lets AI know more about how your website is structured and where it can find information.
AI Ranking Factor 5 - Off-Site Mentions Increase Trustworthiness
Even if your content is structured and cited, AI still looks for external validation — other websites mentioning or linking to your firm.
These “off-site signals” function like digital reputation markers.
Create videos of each FAQ and publish on YouTube to go even further and help your AEO and SEO (Need help with this? Check out IFTS’ service here)
So, Will AI Choose You?
AI isn’t replacing lawyers — but it is replacing the way clients find them.
If your content is well-structured, up to date, cited, and trustworthy — AI will notice. If not, you’ll be ignored, no matter how long your site has been online.
Want help building a site that AI loves as much as humans do? Let’s talk!
And if you missed our other videos on how AI is changing law firm marketing, check out the full YouTube Playlist Here!
If your law firm is still relying on traditional SEO alone to get more clients, you’re already falling behind.
Search is no longer about 10 blue links on page one of Google — it’s about being the single answer.
Thanks to the rise of AI tools like ChatGPT, Google Gemini, and Perplexity, consumers are no longer searching — they’re asking. And if your firm isn’t the one being recommended, then you’re effectively invisible.
This shift is called Answer Engine Optimization (AEO) — and it’s completely changing how law firms get found online.
In this article, you’ll get the 5-step AEO checklist we use to help law firms like yours earn AI recommendations over larger, more established competitors.
Even better?
You don’t need a technical background to implement most of these — just a commitment to showing up as the most helpful and trustworthy answer.
Why AEO Matters More Than Ever
Traditional SEO was about getting your site ranked in a list. You were one of many results.
AEO is about becoming the only answer.
Here’s the difference:
Old SEO: Compete for page 1. Hope someone clicks.
New AEO: Be the one answer AI tools recommend. Get selected instantly.
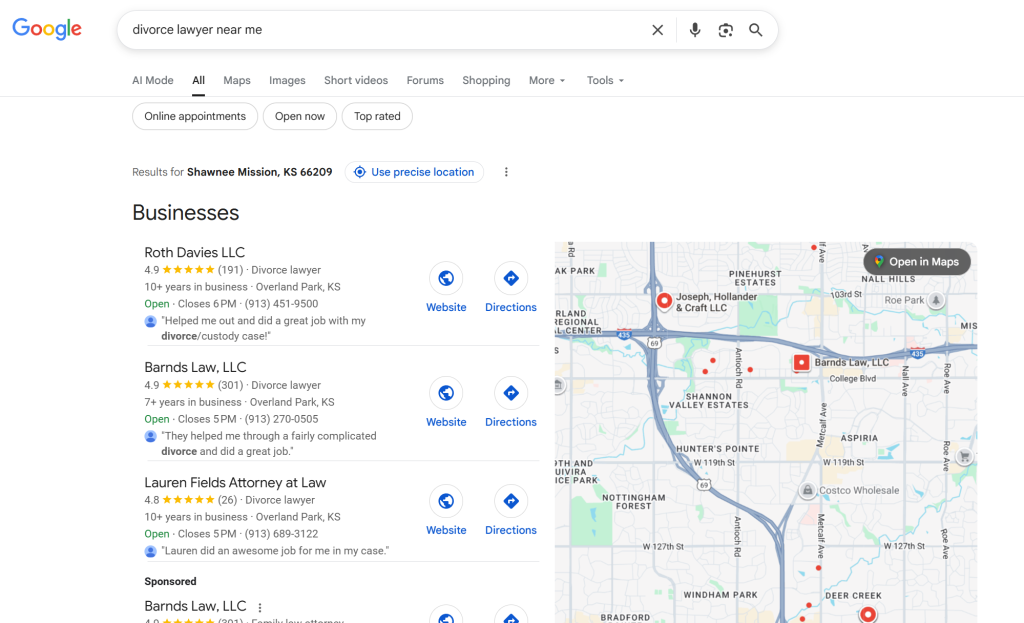
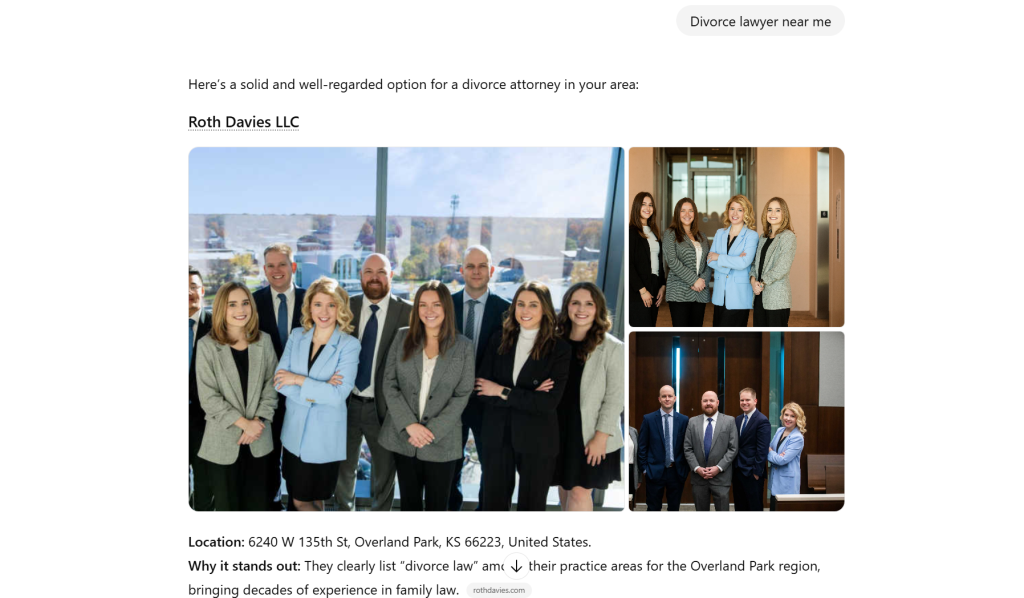
Whether a client says, “Hey Siri, who’s the best divorce lawyer near me?”
or types “how long does a hit-and-run lawsuit take in Pennsylvania?” into Perplexity.ai
— the engine is no longer presenting a list. It’s presenting an answer.
Let’s make sure that answer is you.
The 5-Part AEO Checklist for IFTS Uses To Get Law Firms More Clients Online
Write down all of the questions that clients commonly ask you
Pro Tip: Answer one FAQ per page when possible. AI tends to pull from single-topic sources.
Step 3. Get Credible Backlinks (Trust Signals)
Problem: AI judges your credibility based on who links to your site — just like Google does.
Our Solution: Earn backlinks from authoritative legal and regional sources that attorneys can commonly be found within.
What to do:
Submit your website and firm information to:
State bar association directories
Legal directories like Avvo, Justia, Martindale
Local Chamber of Commerce or BNI groups
Pitch legal blog articles or guest posts – include your website in the author bio paragraph
Offer to speak at CLE events or law school panels (then ask for a bio link)
Pro Tip: One backlink from a legal site is better than 50 from general blogs.
Step 4. Create Author Pages or Bio Pages for Each Attorney
Problem: AI wants to know who is writing your content.
Our Solution: Showcase your attorneys as credible experts on your website (this builds E-E-A-T: Experience, Expertise, Authority, Trust).
What to do:
Make sure every lawyer has a detailed bio page on your firm’s website.
Information to Include:
Headshot
Credentials and bar affiliations
Personal intro (humanizes your team)
Links to their Avvo, LinkedIn, and Bar profiles
List of authored articles and speaking events
An intro video or two of that attorney
Pro Tip: If you’re posting vlogs, blogs or legal guides, include an author box linking back to that attorney’s profile.
Step 5. Ensure NAP Consistency in Every Directory (Name, Address, Phone)
Problem: Even small inconsistencies (like “Rd.” vs “Road”) can confuse AI. So if your address differs from directory to directory, AI won’t know which is the correct information to return. Therefore, it won’t pick your firm to show as the answer.
Solution: Make your business info 100% consistent everywhere.
What to do:
Audit your listings on:
Google Business Profile
Yelp
Facebook
Avvo
Bing
Use tools like BrightLocal or Moz Local to scan your NAP across 100+ directories.
Match exactly on:
Schema markup
Website footer
Contact page
Online profiles
Pro Tip: If you’ve moved or changed phone numbers, update everywhere — or purchase a tool like BrightLocal to help.
Even Implementing 3 Out of 5 Tasks On This Checklist Can Move the Needle
The great thing about AEO is that it doesn’t reward the biggest budget — it rewards the most helpful, trusted, and structured firm.
If you implement even three of these five steps, you’ll start appearing more often when AI engines are asked legal questions in your area.
If you implement all five?
You stop being part of the list — and start becoming the only answer.
So, What’s Next With AEO?
In the next article (and video), we’ll break down exactly how answer engines like ChatGPT and Perplexity decide which legal content to trust — including what signals they use and how to earn them.
Want our full roadmap?
DownloadThe Law Firm Client Magnet Method — a free resource showing how video + AI can transform your law firm’s marketing in 2025 and beyond.