

Did you know that every day YouTube has over ONE BILLION hours of video watched, which results in billions of views?
Is your business taking advantage of having videos on YouTube? If not, today is a great day to start!
Most people think that creating a video for their business is really time consuming or that you need expensive equipment to start – Not true! All you need is your smartphone and a location that is relatively quiet with good lighting.
Choose Your Video Location Carefully
Find a room where there is a window in front of you so the natural light illuminates your face. Make sure that there is no distracting clutter in the background.
Prop up your phone so that it is pointed at you and you are centered in the frame. Another option for this is to purchase an inexpensive stand that holds your phone. Most of these stands also come with a remote control so that you can press “record” more easily.
Choose An Outfit To Film In
When choosing an outfit to film in, pick something that represents your brand. If you’re in a professional field, you can never go wrong with a suit and tie. If you’re in a service business, a polo or T-shirt with your logo makes sense.
Make sure that there aren’t any distracting patterns on what you are wearing. Patterns can appear fuzzy or out of focus on camera. Noisy jewelry is also a negative. You want your microphone to pick up what you are saying rather than your bracelet clanging off of your watch.
Following these guidelines will ensure the professionalism of your video, and it will make you look good.
Choose Your Video Topic
A lot of businesses have videos all over their website about themselves…and this is where they go wrong.
Your clients don’t really care about you, they just want to know that you are the best company to solve their problems. So, prove it!
Choose 5-10 questions that you are asked regularly, then answer them on video. Don’t use industry jargon, and speak as if you are talking to a potential client.
On an aside – A lot of people wonder if they should write scripts when filming videos like this. It really depends on you. Write a script, create an outline or conduct a practice run; do whatever makes you feel most comfortable. You want to do your best to sound natural and relaxed, so your expertise shines through.
Stumped for ideas? Go to https://answerthepublic.com/ and enter your business type or a problem that you solve. This website will give you frequently asked questions about the topic.
Edit Your Video For YouTube
This is the part of the process that most people find difficult. There are multiple ways to edit your video easily that don’t require expensive video software, like Adobe Premier Pro. If you have a Mac, you can use iMovie. There are also many apps on your phone that will allow you to edit a video you have created.
Whatever software you decide to use, make sure your sound is clear. If it allows you to add background music, choose something that is unobtrusive and appropriate for your business.
Secret Step That Most People Don’t Know About – Do Keyword Research For Your Video
Once you have your video completed, you’ll want to do a little research on keywords that go with it. Keyword research helps tell you:
- Most googled phrases about your topic
- How many times per month something is searched
- How difficult it is to rank for that keyword or phrase
- And more!
Use a tool like SEMrush or Ubersuggest for your research. Both options have free account versions.
In this example, we will use SEMrush.
Let’s say that you are a painting company, and you created a video on how to prep a house to paint.
Go to SEMrush and type in “how to prep a house for painting” to see the search statistics that go with that phrase:
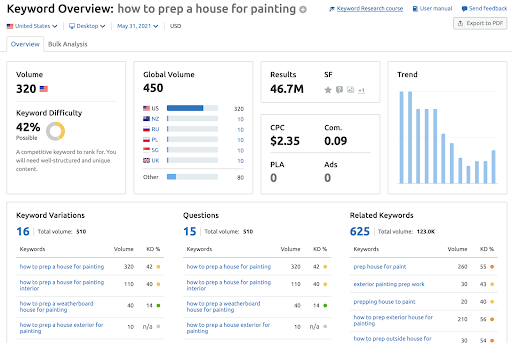
As you can see, this keyword phrase is googled 320 times per month. That means it’s a great phrase to use in the title of my video. The keyword difficulty is 42%, so it tells me that we will need well-structured and unique content to rank, which is exactly what my video is for.
The keyword research also shows me:
- Variations on the keyword that I could use in my video description
- Common questions that are googled about my keywords
- Related keywords that can act as secondary keywords that can be used in my video description on YouTube (more about this later)
When choosing a title for your video, be sure to choose a keyword phrase that is googled at least 100 times per month (rule of thumb). Be sure to also choose 1-3 other keywords or phrases that go with your video that are searched over 20 times per month.
Upload Your Video To YouTube
You’ve created your video and have your research, so you are ready to upload your video to YouTube and have clients find you!
Before you upload your video, change the name of your video file to be the title of your video, separated by hyphens.
So, in this example, I would name my video “How-to-prep-a-house-for-painting.mp4”
Then, go to your YouTube channel and hit the “Create” button. Once you upload your video, YouTube has multiple fields that you can fill in. The most important field is the “Title” field. This is where we would put “How To Prep A House For Painting In 2021”. If possible, it’s a great idea to add the year in the title to let YouTube know that this is the most up to date information available on your subject.
The next most important field is the description, which can be 5000 characters. This is where you will tell people about the video, and why they should watch it. Remember the secondary keywords that you chose? This is the place to use them.
You can’t use the same keyword phrase over and over again. This is called “Keyword Stuffing” and YouTube/Google don’t like to see it. So, you use keywords and phrases that are similar to your primary keyword (your title).
Another good rule of thumb is to place a link to a page on your website within the description. It helps you build backlinks and send people to your website if they are interested in your product or service.
YouTube will also ask if the video is made for kids (to create an age restriction if needed) as well as a few other questions that you should be able to answer easily.
Once the video has processed, the last thing that you will want to do is set the thumbnail. This is the image that YouTube will use to represent your video before it is played. Typically, we recommend creating an image that is 1280x720px and following the YouTube tips on creating an effective thumbnail: https://creatoracademy.youtube.com/page/lesson/thumbnails
BONUS – What To Do After Your Optimized Video Is Live On YouTube
Once you have your optimized video live on YouTube, don’t stop there. You took the time to create it, now promote it!
There are multiple ways to get your video out there:
- Post a link to the video on your social media
- Share the video on LinkedIn
- Send the video to your clients
- Send the video to your prospects
- Share the video with partner companies that you have
In addition to promoting your video, you can also use the content again! Upload your video to a tool like otter.ai to create a transcript of it. Use this transcript to create a blog entry on your website and link to the video. This allows you to give information about your business topics to multiple audiences, and it helps with your SEO (search engine optimization).
Start creating your content on a weekly or bi-weekly basis to see your traffic increase and your videos start to rank.
If all of this seems overwhelming and you’d like some help getting started, call IFTS today and ask about our “Beginner’s Video Package” at 412.715.6266.