fbpx

How To Film A Video On Your Smartphone And Turn it Into Two Weeks of Social Media Content

If you’re running a small business, chances are you don’t have a big budget for marketing. 

That’s why it’s important to be creative and get the most out of the resources you do have! If you’ve been following social media and internet trends in recent years, you’ve probably noticed that video is taking over and can be very effective for your small business.

One way to produce some really good content for your social media is by filming informational videos that can be turned into two weeks worth of social media content!

In this article, we are going to help you save time (and money) when it comes to producing social media content for your business. You’ll learn how to film and edit your video, and use it to create two weeks worth of eye-catching social media content!

Filming Your Video

Filming a video for social media sounds like a daunting task, but it doesn’t have to be! If you have a smartphone, you have everything you need to film a great video. We have a full article that goes into the details on how to create and optimize a video for YouTube.

Here are a few quick tips to help you get started with filming:

  1. Use natural light whenever possible. This will help your video look more professional.  It will also help you look your best!
  2. Invest in a tripod to keep your camera steady. This will also help with the professional look of your video.  Here’s an example of a great starter tripod.
  3. Plan out what you’re going to say before you start filming. This will help you stay on track and avoid rambling.  If you are worried about not sticking to your script, try a teleprompter app.

Editing your video

Editing your video doesn’t take as long as you might think.

Canva is an awesome all-in-one tool that you can use to edit your videos AND create your social posts that we will talk about in the next step. Follow these quick tips when editing your video:

  1. Start by trimming any dead space at the beginning or end of your video.
  2. Then, upload the file to canva and add in any titles or text that you want to include. We recommend adding a title slide and ending slide that includes a call to action.
  3. Finally, add some background music to your video. This will make it more engaging and entertaining to watch.

Envato Elements is a great resource to download background music for your videos.

Posting Your Video

Once you have edited your video, it’s time to post it on social media!

The first place that you should post your video is YouTube. If you don’t have a YouTube channel, follow these 3 easy steps to set up a YouTube channel!

Another great place to post your full video is on your businesses Facebook page. This is a great way to get more views and engagement on your video.  You can check out our Facebook page for inspiration and ideas.

You can also create shorter clips of your video to post on Instagram and Twitter. These social platforms are all about quick, snackable content that is easy to consume. So, make sure that your video clips are short, informative and to the point.

Turning Your Video Into Two Weeks of Content

To get the most out of the video that you created, you’ll want to turn it into multiple pieces of content for social media.

This is where Canva comes in handy again! You can use Canva to easily create images and graphics with information from your video that can be used for social media posts.

We created a list of the Top The Top 18 Social Media Post Ideas to engage your online audience and save you time.

Creating content from your video will help you get more views and engagement on your video, and also help you reach a larger audience across many platforms, while saving you time.

Here are a few ideas on how to turn your one video into two weeks worth of content:

Day 1: Publish the video on YouTube and share it on your social media channels.

Day 2: Create a blog post about the video and promote it on social media. To make things even easier, use Otter.ai to transcribe your video and post the text as a blog.

Day 3: Create an Instagram story about the video and share it on your other social channels.

Day 4: Take a fun fact or quote and turn it into text with a picture that goes with it.

Day 5: Share some behind the scenes photos or videos on Instagram from when you were filming the video.

Day 6: Share a clip from the video on Instagram and link to the full video in your bio.

Day 7: Share a reminder to check out your blog post

Days 8-9: Create a social media challenge related to the video and encourage people to participate.

Day 10: Create a list post or promote free consultations, subscriptions, newsletters, or other lead magnets.

Day 11: Share interesting facts or comparisons as an infographic.

Day 12: Share another clip from your full video.

Day 13: Combine text and a visual image using a useful fact or statistic from your video.

Day 14: Share a reminder to watch your video on YouTube and link to the full video.

Schedule Your Posts Ahead of Time

Put your social media on autopilot by scheduling your content ahead of time! This will save you hours each week and help ensure that your content is getting in front of your audience on a regular basis.

We recommend using a tool like SocialPilot to queue up your content and post it for you automatically.

What Are You Waiting For?

Filming an informational video about your small business is a great way to create content that you can use for social media. Now that you know how to film a video on your smartphone, edit it, and turn it into two weeks of content, it’s time to get started! These tips will help you save time and money while still getting great results.

So, what are you waiting for?

Get filming!

If this process still sounds too time consuming for you, contact the social media experts at IFTS and we will get the job done for you! Call us today at 412-715-6266.

How to Set Up Your YouTube Channel for Law Firms

How to create a YouTube channel

Did you know that YouTube reaches more people in the 18-49 demographic on mobile alone than any American cable TV network?

Setting up a YouTube channel for your law firm is easy and only takes a few minutes. In this article, we are going to walk you through 3 easy steps to set up your YouTube channel and explain how video marketing can benefit your law firm.

Set Up Your YouTube Channel In 3 Easy Steps

1. Sign in to YouTube

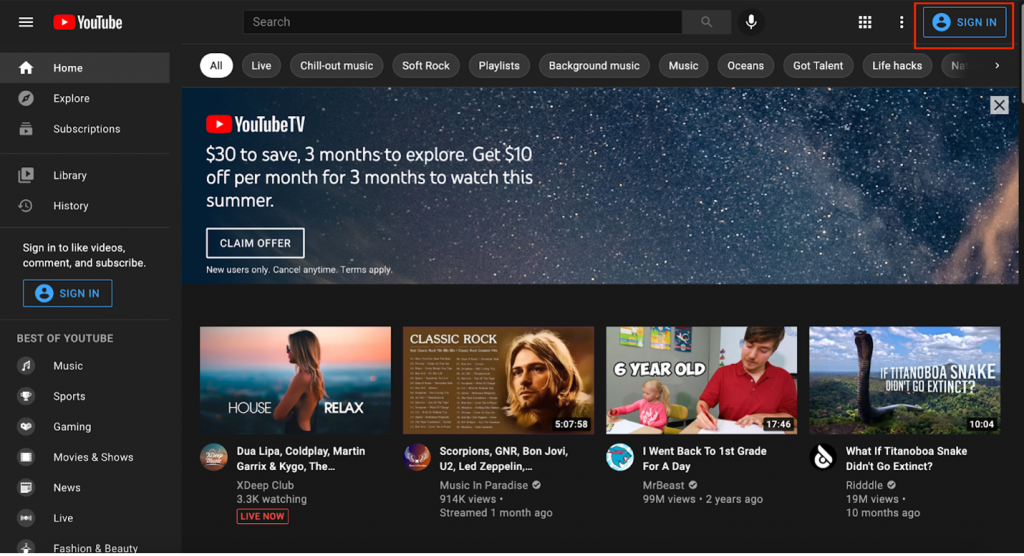
Go to YouTube.com and click the sign in button in the top right corner of the page. If you have an existing Google account, use that email and password to sign into YouTube.

Signing in to YouTube

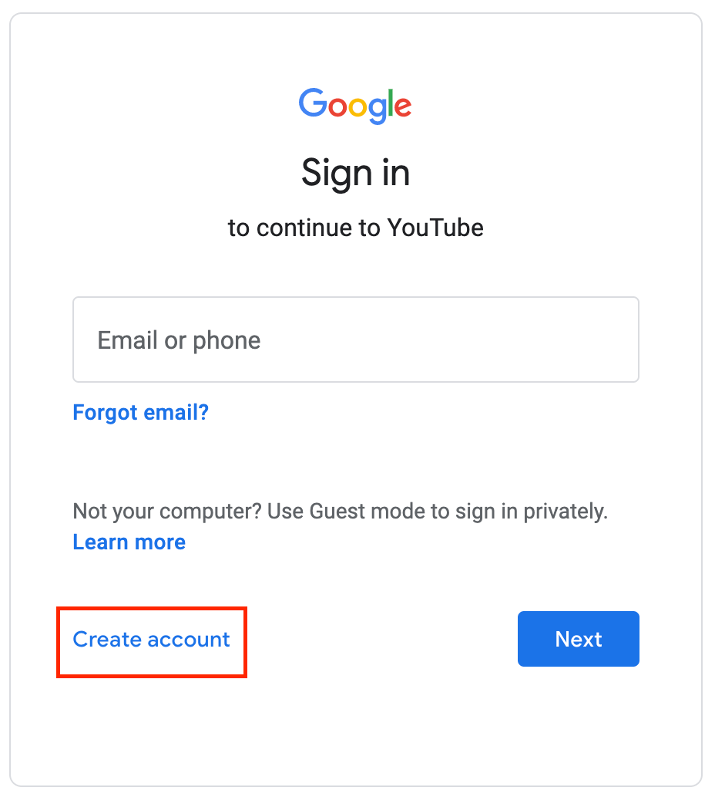
If you do not already have a Google account, you can easily create a Google account directly from YouTube by clicking ‘create account’. 

How to create a Google Account

Keep in mind that a Google account and a YouTube account are not the same thing.  This is a common misconception.

Your Google account can be used to sign into YouTube to watch and like videos or subscribe to your favorite channels. When you are signed in, you will also get personalized recommendations based on your activity.

Now, having a YouTube channel allows you to upload your own videos for your firm to have a public presence on YouTube.

2. Create Your Channel

In the top right corner of the screen, you will see your profile icon.

Click on the circle icon and select “Create a Channel”.

How to create a YouTube channel

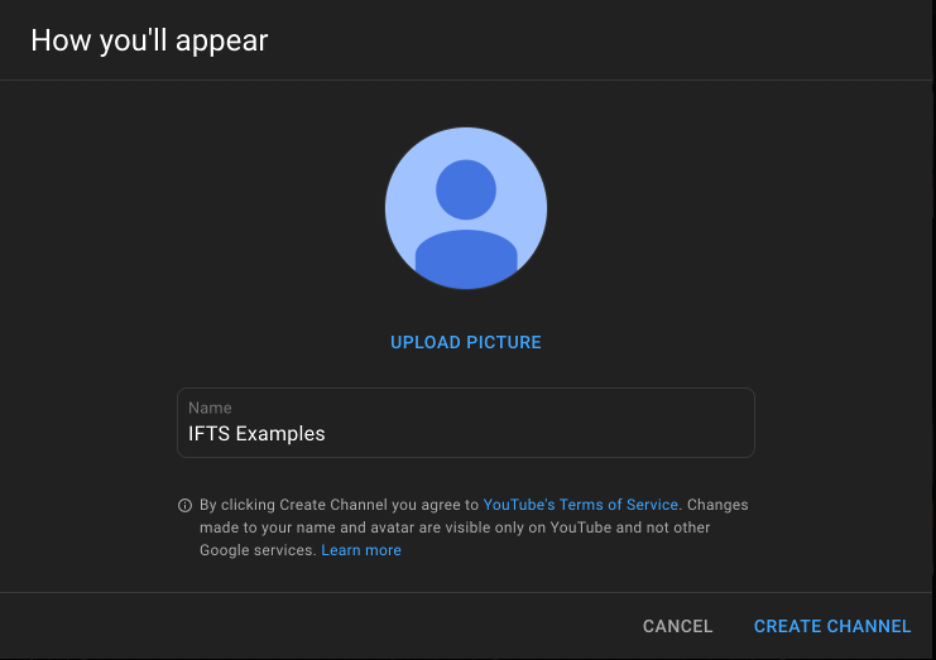
From here, you will be prompted to choose your channel name and profile picture

Choosing a YouTube channel name

3. Customize Your Channel

This step will help make your channel welcoming to visitors and help with your SEO.

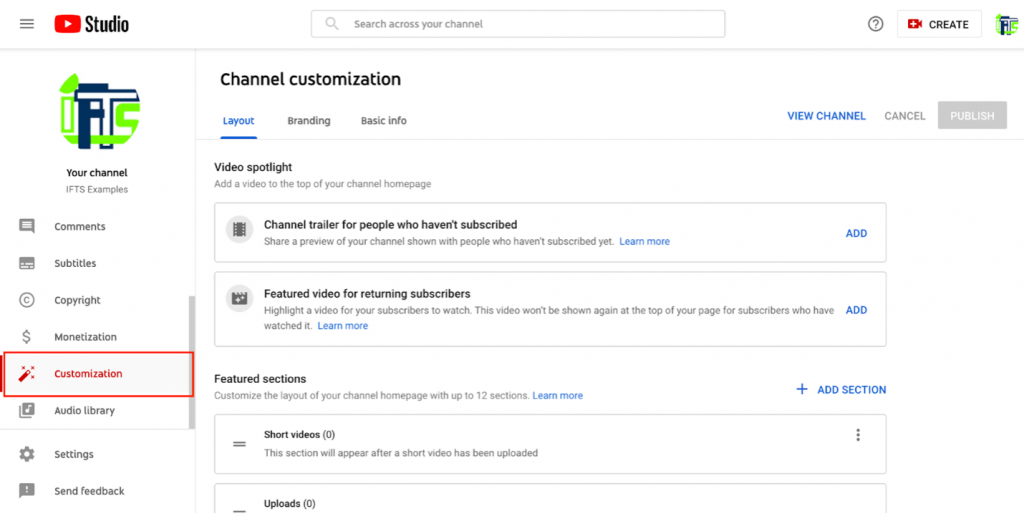
First, visit the customization tab in YouTube studio.

Customize YouTube channel

Layout Tab

Under the “layout” tab, you can select and organize what users will see when visiting your channel. A video spotlight will be the main video that someone will see when visiting your channel. For those that aren’t subscribed to your channel, you can add a channel trailer. This is nothing but a quick video that highlights what you create and what people can expect from your channel.

You can also add featured sections that will allow you to organize your content in any way you’d like for viewers to see when they arrive at your channel homepage.

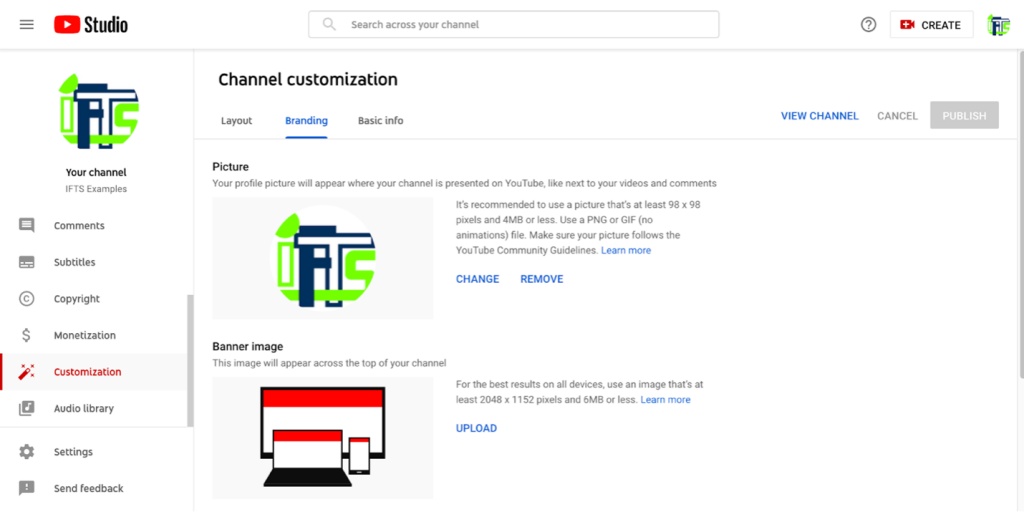
Branding Tab

branding your YouTube channel

Under the branding tab is where you can find the customizable elements such as your profile picture and banner image. 

Your profile picture is going to appear wherever your channel is represented on YouTube. Your profile picture must meet the following requirements:

  • JPG, GIF (not animated), BMP or PNG file
  • Recommended 800 X 800 px image
  • Square or round image that renders at 98 X 98 px

If you know what a Facebook cover photo is, a YouTube banner image is very similar. This is a banner that will appear at the top of the page when someone visits your YouTube channel. With this, you can show off your personality and a little more about yourself and your firm.

For the best results, your banner image must meet the following criteria:

  • Minimum dimensions of 2048 X 1152 px with an aspect ratio of 16:9
  • Safe area for text and logos at the minimum dimensions: 1235 X 338 px
  • File size: 6 MB or smaller

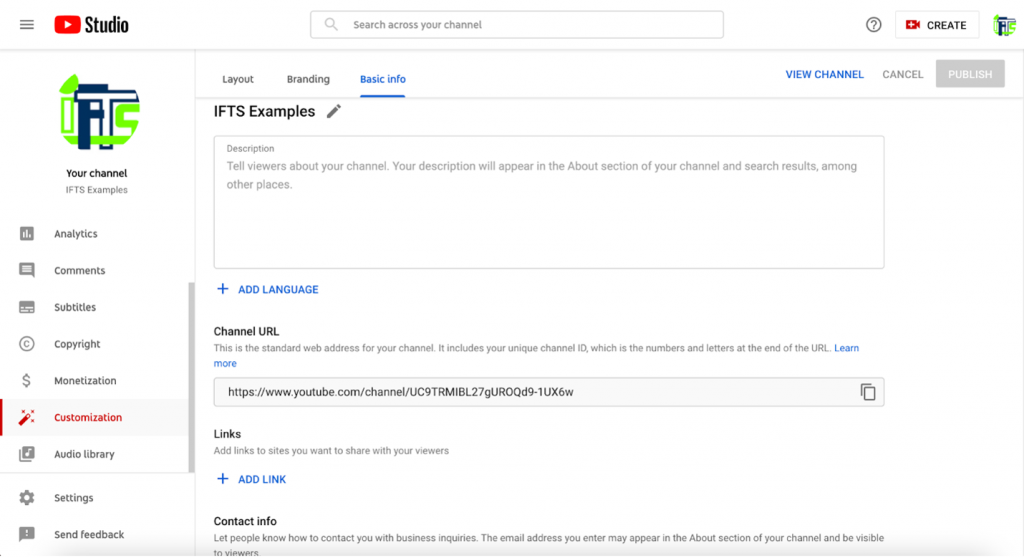
Basic Info Tab

customizing basic info on YouTube Channel

Under the basic info tab, you can make edits to your channel name & description, add translations in other languages, add links to sites that you want to share with your viewers (such as your firm’s website) and add contact information if you would like people to be able to email you with inquiries.  Make sure to link back to your firm.

After making changes to any of these tabs, always be sure to hit the “publish” button to make your edits live on your channel.

Now it’s time to create content for your YouTube channel!

Most people think that creating a video for their business is really time consuming or that you need expensive equipment to start – Not true! All you need is your smartphone and a location that is relatively quiet with good lighting.

Create and optimize your firm’s YouTube videos to get the most out of your YouTube channel. In this blog post, learn how to create your videos from choosing a location, to finding a topic and editing your video. (We even include a secret step that not many people know about.)

How Video Marketing Benefits Your Firm

Did you know that  72% of people say that they would rather learn about a new product/service by watching a video over reading text? 

Video marketing allows you to promote your firm on social channels that can increase overall engagement while educating your audience in a creative way.  In other words, it gets more eyeballs on information that you provide.

Developing a strong video marketing strategy for your firm can provide the following benefits:

1. Reach a wider audience

With a large percentage of people preferring to watch an informative video over reading text, you have an opportunity to reach even more of your target customers. Think about the benefit of someone being able to watch you explain the benefits of hiring an attorney to create a will or how a DUI firm helps people get their DUIS expunged from their records by following the proper sequence.

2. Increase revenue

Did you ever think that creating videos could put more money in the bank? Businesses that implement a video strategy increase their revenue 49% faster year-over-year than those that do not use video.  Many law firms are not yet utilizing these methods, so put yourself ahead of the competition and be a familiar face to your clients even before they meet you.

3. Increase number of shares

Social video generates 1200% more shares than text and image content combined. By creating quality video content, you have a better chance of passively raising more awareness for your firm. With YouTube users sharing 400 hours of new video every minute, your firm is set to establish a connection with users and therefore, drive leads.

4. ‘Humanize’ your firm

Let’s be real… Some of those who are looking for answers to frequently asked law questions may find it ‘boring’ or will most likely be unenthused as they search for answers that have to do with divorce or bankruptcy etc. With video marketing, you can answer these questions in a video format, letting a possible prospective client put a name to a face as you help answer their questions. This can ultimately instill a feeling of trust in that individual and you may have just scored yourself a new client!

These are just a few of the benefits of law firm video marketing.  It can’t be stressed enough that it is important for your firm to stay on top of evolving video marketing trends to remain relevant in the digital world as more and more people turn to online video for information and advice in addition to entertainment.

YouTube is not just for cat videos anymore!

Need help setting up your channel or getting started with video marketing?  Give IFTS a call at 412.715.6266 and set up a free one-hour video roadmap session.  We’ll look at what you have done so far in the video space and set up a roadmap for you to follow to get yourself in front of more clients fast!

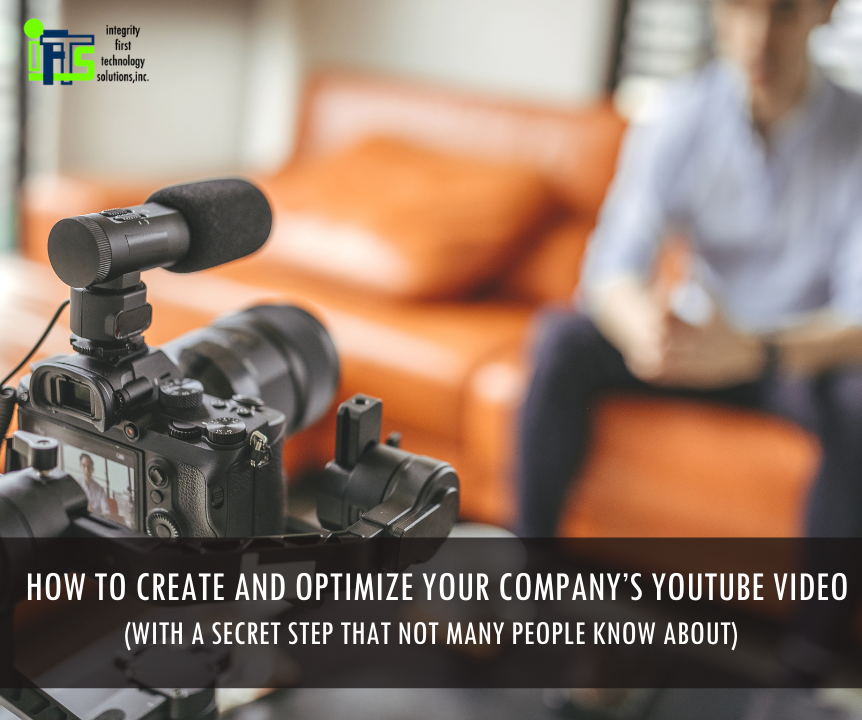
How To Create and Optimize Your Company’s YouTube Video (With A Secret Step That Not Many People Know About)

Painting FAQ videos

Did you know that every day YouTube has over ONE BILLION hours of video watched, which results in billions of views?

Is your business taking advantage of having videos on YouTube?  If not, today is a great day to start!

Most people think that creating a video for their business is really time consuming or that you need expensive equipment to start – Not true! All you need is your smartphone and a location that is relatively quiet with good lighting.

Choose Your Video Location Carefully

Find a room where there is a window in front of you so the natural light illuminates your face. Make sure that there is no distracting clutter in the background.

Prop up your phone so that it is pointed at you and you are centered in the frame. Another option for this is to purchase an inexpensive stand that holds your phone. Most of these stands also come with a remote control so that you can press “record” more easily.

Choose An Outfit To Film In

When choosing an outfit to film in, pick something that represents your brand. If you’re in a professional field, you can never go wrong with a suit and tie. If you’re in a service business, a polo or T-shirt with your logo makes sense.

Make sure that there aren’t any distracting patterns on what you are wearing. Patterns can appear fuzzy or out of focus on camera. Noisy jewelry is also a negative. You want your microphone to pick up what you are saying rather than your bracelet clanging off of your watch. 

Following these guidelines will ensure the professionalism of your video, and it will make you look good. 

Choose Your Video Topic

A lot of businesses have videos all over their website about themselves…and this is where they go wrong.

Your clients don’t really care about you, they just want to know that you are the best company to solve their problems. So, prove it!

Choose 5-10 questions that you are asked regularly, then answer them on video.  Don’t use industry jargon, and speak as if you are talking to a potential client.  

On an aside – A lot of people wonder if they should write scripts when filming videos like this.  It really depends on you.  Write a script, create an outline or conduct a practice run; do whatever makes you feel most comfortable.  You want to do your best to sound natural and relaxed, so your expertise shines through.

Stumped for ideas?  Go to https://answerthepublic.com/ and enter your business type or a problem that you solve. This website will give you frequently asked questions about the topic.

Edit Your Video For YouTube

This is the part of the process that most people find difficult. There are multiple ways to edit your video easily that don’t require expensive video software, like Adobe Premier Pro. If you have a Mac, you can use iMovie. There are also many apps on your phone that will allow you to edit a video you have created.

Whatever software you decide to use, make sure your sound is clear. If it allows you to add background music, choose something that is unobtrusive and appropriate for your business.

Secret Step That Most People Don’t Know About – Do Keyword Research For Your Video

Once you have your video completed, you’ll want to do a little research on keywords that go with it. Keyword research helps tell you:

  • Most googled phrases about your topic
  • How many times per month something is searched
  • How difficult it is to rank for that keyword or phrase
  • And more!

Use a tool like SEMrush or Ubersuggest for your research. Both options have free account versions.

In this example, we will use SEMrush.

Let’s say that you are a painting company, and you created a video on how to prep a house to paint. 

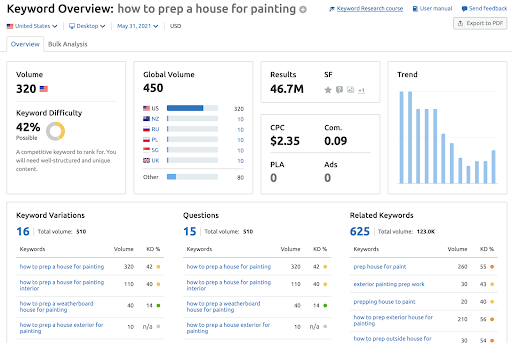
Go to SEMrush and type in “how to prep a house for painting” to see the search statistics that go with that phrase:

Painting company SEO statistics

As you can see, this keyword phrase is googled 320 times per month.  That means it’s a great phrase to use in the title of my video. The keyword difficulty is 42%, so it tells me that we will need well-structured and unique content to rank, which is exactly what my video is for.

The keyword research also shows me: 

  • Variations on the keyword that I could use in my video description
  • Common questions that are googled about my keywords
  • Related keywords that can act as secondary keywords that can be used in my video description on YouTube (more about this later)

When choosing a title for your video, be sure to choose a keyword phrase that is googled at least 100 times per month (rule of thumb).  Be sure to also choose 1-3 other keywords or phrases that go with your video that are searched over 20 times per month.

Upload Your Video To YouTube

You’ve created your video and have your research, so you are ready to upload your video to YouTube and have clients find you!

Before you upload your video, change the name of your video file to be the title of your video, separated by hyphens.  

So, in this example, I would name my video “How-to-prep-a-house-for-painting.mp4”

Then, go to your YouTube channel and hit the “Create” button.  Once you upload your video, YouTube has multiple fields that you can fill in.  The most important field is the “Title” field.  This is where we would put “How To Prep A House For Painting In 2021”.  If possible, it’s a great idea to add the year in the title to let YouTube know that this is the most up to date information available on your subject.

The next most important field is the description, which can be 5000 characters.  This is where you will tell people about the video, and why they should watch it.  Remember the secondary keywords that you chose?  This is the place to use them.  

You can’t use the same keyword phrase over and over again.  This is called “Keyword Stuffing” and YouTube/Google don’t like to see it.  So, you use keywords and phrases that are similar to your primary keyword (your title).

Another good rule of thumb is to place a link to a page on your website within the description. It helps you build backlinks and send people to your website if they are interested in your product or service.

YouTube will also ask if the video is made for kids (to create an age restriction if needed) as well as a few other questions that you should be able to answer easily.

Once the video has processed, the last thing that you will want to do is set the thumbnail.  This is the image that YouTube will use to represent your video before it is played.  Typically, we recommend creating an image that is 1280x720px and following the YouTube tips on creating an effective thumbnail: https://creatoracademy.youtube.com/page/lesson/thumbnails

BONUS – What To Do After Your Optimized Video Is Live On YouTube

Once you have your optimized video live on YouTube, don’t stop there.  You took the time to create it, now promote it!

There are multiple ways to get your video out there:

  • Post a link to the video on your social media
  • Share the video on LinkedIn
  • Send the video to your clients
  • Send the video to your prospects
  • Share the video with partner companies that you have

In addition to promoting your video, you can also use the content again!  Upload your video to a tool like otter.ai to create a transcript of it. Use this transcript to create a blog entry on your website and link to the video. This allows you to give information about your business topics to multiple audiences, and it helps with your SEO (search engine optimization).

Start creating your content on a weekly or bi-weekly basis to see your traffic increase and your videos start to rank.

If all of this seems overwhelming and you’d like some help getting started, call IFTS today and ask about our “Beginner’s Video Package” at 412.715.6266.