fbpx

Santa’s Little Helpers Unleashed: Creating Cheerful Company Christmas Cards with Canva

‘Tis the season to be jolly, and what better way to sprinkle some holiday cheer into the workplace than by creating company Christmas cards that are not only festive but also pretty fun?

In this blog post, we’re diving into the whimsical world of Canva, sharing some little nuggets of inspiration and tips on how to craft the most memorable Christmas cards for your colleagues and clients. 

Whether you’re aiming for a classic or a more modern approach, Canva’s wide range of templates and design tools will surely help you unleash your creativity and spread some laughter this holiday season. So grab a cup of hot cocoa, put on your Santa hat, and let’s get started on making the most unforgettable company Christmas cards yet!

Step 1: Rally the Team’s Christmas Spirit

Call upon your crew to unleash their inner holiday spirit! Whether they’re donning ugly sweaters, tinsel tiaras, or even elf ears, encourage them to embrace the festive madness and capture it all in a group photo.

But what If your team isn’t local, or maybe everyone is too busy to gather for a group photo, don’t worry! You can create a virtual group photo! Simply upload individual photos of your team members–we’ll show you in the next steps how to arrange and edit them in a festive layout to capture the spirit of togetherness, even from afar. This is a great way for busy teams to still feel connected and celebrate the holiday season together!

Step 2: Canva Wonderland

Enter the magical world of Canva, where the Christmas design possibilities are as vast as Santa’s toy workshop. Before we can get to the actual editing, you’ll need to choose a template, or background, that really —whether it’s a classic design or a more modern twist—and get ready to sprinkle some digital fairy dust. Consider your audience and your company’s style when selecting the backdrop for your creation.

Step 3: Elfie Upload Extravaganza

Now, it’s time to really showcase your team’s holiday spirit! Upload that group photo or the individual elfies—I mean, selfies—right into Canva and start arranging them like the cast of a Hallmark holiday rom-com. Canva’s drag-and-drop feature makes this as easy as sliding down a snow-covered hill.

But wait, how do we make the images really pop? Let’s get rid of the office background with Canva’s photo editing tools. Use the background remover and add some fun filters or overlays to give the images that extra touch of holiday magic. With Canva’s editing tools, you can transform your boring photos into a digital masterpiece that will make your card recipients really feel the holiday cheer!

Step 4: Jingle All the Way with Festive Elements

With Canva’s extensive collection of festive elements, you can take your holiday card to the next level. Whether it’s adding a touch of sparkle with twinkling lights or bringing in a line of some playful snowmen, the possibilities are endless. And of course, don’t forget to include Santa hats and elf ears for that extra dose of holiday cheer! Get ready to spread joy to all with your personalized masterpiece.

Simply select an element, drag and drop it onto your card, and resize or rotate it to fit your desired look. You can also customize the color, opacity, and position of each element to create a truly unique design. With Canva’s easy-to-use interface, you’ll have a blast experimenting with different combinations and creating a holiday card that stands out from the rest. So go ahead, have fun, and let your imagination run wild as you bring your holiday greetings to life!

Step 5: Jolly Jokes and Yuletidy Text

What’s a Christmas card without a dash of humor? Whether you’re aiming for a laugh-out-loud moment or a subtle chuckle, Canva’s text tools offer endless possibilities for adding humor to your holiday card. From playful fonts to creative text effects, you can easily transform your words into comedic masterpieces that will leave your recipients in stitches. So go ahead and craft a message that really sleighs—I mean, slays!

Not your style, or do you need something more professional? Canva’s text tools also offer a wide range of elegant and sophisticated fonts, allowing you to create a more professional and polished holiday card. You can find the perfect typography to convey your warm wishes in a classy and refined manner.

It really is a gingersnap to get your company’s holiday greeting cards customized quickly. So go ahead and let your creativity shine, whether it’s through humor or professionalism; Canva has got you covered!

5 Secret Ingredients: A Recipe for Social Media Marketing Success in 2023

In the fast-moving world of the internet, social media marketing has grown into a crucial tool for businesses to connect with their audiences. It wasn’t too long ago when these platforms were just for talking to friends and family. But things have changed a lot. In a recent survey, over 90% of marketers said that social media has greatly boosted their brand’s visibility. This means that if you’re not using social media for your business, you’re missing out on a big opportunity.

In this article, we’ll uncover the hidden treasures of social media marketing, just like a chef reveals the secret sauce that makes a dish extraordinary. 

1. Social Media and SEO: Serving Up Important Content

You might wonder what social media has to do with making your website show up on search engines.

The idea is simple: search engines know which pages on your website get visitors. When your content gets shared on social media, it sends people to your website. This tells search engines that your website is still important, and it helps your site stay high up in search results. Obviously, more individuals are exposed to your content when more individuals share it.

It’s like having a secret spice that makes your dish unforgettable. When your website consistently receives traffic from social media referrals, search engines interpret it as a signal of relevance and credibility. Consequently, they prioritize displaying your website in search results, increasing its visibility to a wider audience.

This effect can make your website’s online presence much stronger and bring in even more free traffic. 

2. Know Your Audience's Taste

Social media is a bit like a detective tool. By paying attention to the people who follow you, you can learn a lot about your target audience. Just by checking out their profiles and the other pages they like, you can figure out what they like to buy, what they enjoy doing, and which brands they prefer.

Understanding your audience’s preferences and interests allows you to tailor your content and marketing strategies to effectively engage with them. By leveraging this knowledge, you can create personalized experiences that resonate with your target audience, fostering stronger connections and increasing customer loyalty.

Ultimately, this invaluable insight enables you to stay ahead of the competition and deliver exceptional value to your customers. The more you know about your audience, the better you can make your products or services fit their tastes. 

3. Creating the Best Flavor for a Strong Brand and Relationships

People don’t visit social media to look at ads. They go there to chat and have fun. So, when you talk to your audience and make friends with them, it helps you build a strong brand and connections.

Social media is not just about keeping your old customers happy but also about finding new ones. By engaging with your audience on social media, you can be the one who brings the best dish to the party.

Showcase your brand’s personality and values, and make it easier for potential customers to connect with you. Additionally, by actively participating in conversations and sharing valuable content, you can attract new customers who may not have been aware of your business before. 

4. Stirring Up Your Message for a Second Chance

What if you could cook up a winning meal that hits the spot every time?

On social media, you can! You can choose who gets to see your ads, making sure they’re the right people. 

And here’s the fun part – if someone almost became your customer but didn’t quite make it, you can give them a second chance. It’s like having a secret cooking technique that never fails. 

By targeting specific demographics and interests, you can ensure that your message reaches the right audience, which is more likely to be interested in your products or services. Additionally, by retargeting those who have shown interest but didn’t convert, you can remind them of what they missed out on and entice them to give your business another try.

5. Affordably Appetizing

You might have thought that you needed a lot of money to do marketing on social media. But it’s not true! Making a business profile is free, and so is chatting with your fans. 

If you decide to advertise on social media, you can start small if you want. The great thing about social media is that it’s fair. Big brands might have more money for ads, but anyone can make a social media account for free and talk to their audience. Social media platforms also offer affordable advertising options, allowing you to reach a wider audience without breaking the bank. 

With targeted ads and analytics, you can ensure that your marketing efforts are reaching the right people and generating a positive return on investment. 

So don’t let budget constraints hold you back from leveraging the power of social media for your business. You can have your marketing cake and eat it, too!

In a nutshell, social media marketing is no longer just a choice for businesses; it’s a necessity. 

This smorgasbord of hidden secrets about social media marketing shows how it can boost your SEO, help you understand your audience, create strong brand connections, allow for targeting the right people, and not cost a fortune. 

If you need help with your social media journey or want professionals to assist you, feel free to contact us at IFTS! 

How to Whitelist an Email Address in Google: A Simple Guide

It is important to whitelist an email address so that important emails don’t end up in the spam or junk folder.

Gmail, Google’s email service, makes it quick and simple to put an email address on a whitelist. By adding an email address to the whitelist, you can ensure that all emails from that address will be delivered to your inbox.

Be aware, whitelisting an email address in Gmail does not guarantee that all emails from that address will be delivered to your inbox. Gmail’s spam filter is constantly evolving and may still mark some emails as spam. However, whitelisting an email address can significantly increase the chances of receiving those important emails.

Understanding Whitelisting

Whitelisting is a way of allowing emails from certain senders to get through spam filters and reach your mailbox directly. This is useful if you want to make sure that emails from individuals you know and trust always reach you, even if they contain potentially spam-like information.

When you whitelist an email address, you are telling your email provider that you trust that sender and want to receive their emails. This is really important for businesses that rely on email for communication with clients or customers, as important emails can sometimes be miss marked as spam and never reach their intended recipient.

Just remember, whitelisting doesn’t stop spam. Even if you have whitelisted some senders, hackers and scammers can still send emails through. It can, however, be a good approach to prevent unintentional rejection of those important client emails.

You can whitelist an email address in Google by adding the sender’s email address to your Contacts list or by creating a filter that allows their emails to bypass the spam filter. By doing so, you can relax knowing that emails from that source always arrive in your mailbox, even if they include potentially spam-like content.

Accessing Your Google Account Settings

To whitelist an email address in Google, you need to access your Google account settings. Here’s how:

  1. Open your web browser and go to Google.
  2. Click on the “Sign in” button located at the top-right corner of the page.
  3. Enter your Google account email address and password, then click on the “Sign in” button.

Once you are signed in, click on the “Google apps” button located at the top-right corner of the page.

From the drop-down menu, click on the “Gmail” icon.

You are now in your Gmail account inbox and ready to start whitelisting emails.

Creating a New Contact

The fastest way to whitelist an email address in Gmail is by simply adding the sender to your contact list. 

To do this, go to your inbox and hover over an email from the person whose email address you wish to add to your whitelist. When a person + icon appears in the top-right corner of the new tab, click and select “Add [sender] to Contacts.” This will add the sender’s email address to your contacts list and allow you to receive emails from them.

Navigating to the Filters and Blocked Addresses Tab

The other way to prevent emails from being sent to spam is to go to the Filters and Blocked Addresses tab in your Gmail settings following these quick steps:

  1. In your Gmail inbox, click on the gear icon located at the top-right corner of the page.
  2. From the drop-down menu, click on “Settings” and select “See All Settings”.
  3. Click on the “Filters and Blocked Addresses” tab, which is located near the top of the page.

You will now see your Gmail account settings page, where you can whitelist an email address through filters.

Overall, navigating to the Filters and Blocked Addresses tab in Google is a straightforward process that can help users better manage their email. Now, you are ready to create a new filter.

Creating a New Filter

Instead of just creating a new contact, you can create a new filter for keeping essential emails. By following these simple steps, users can ensure that important messages are never missed or marked as spam.

Entering the Desired Email Address

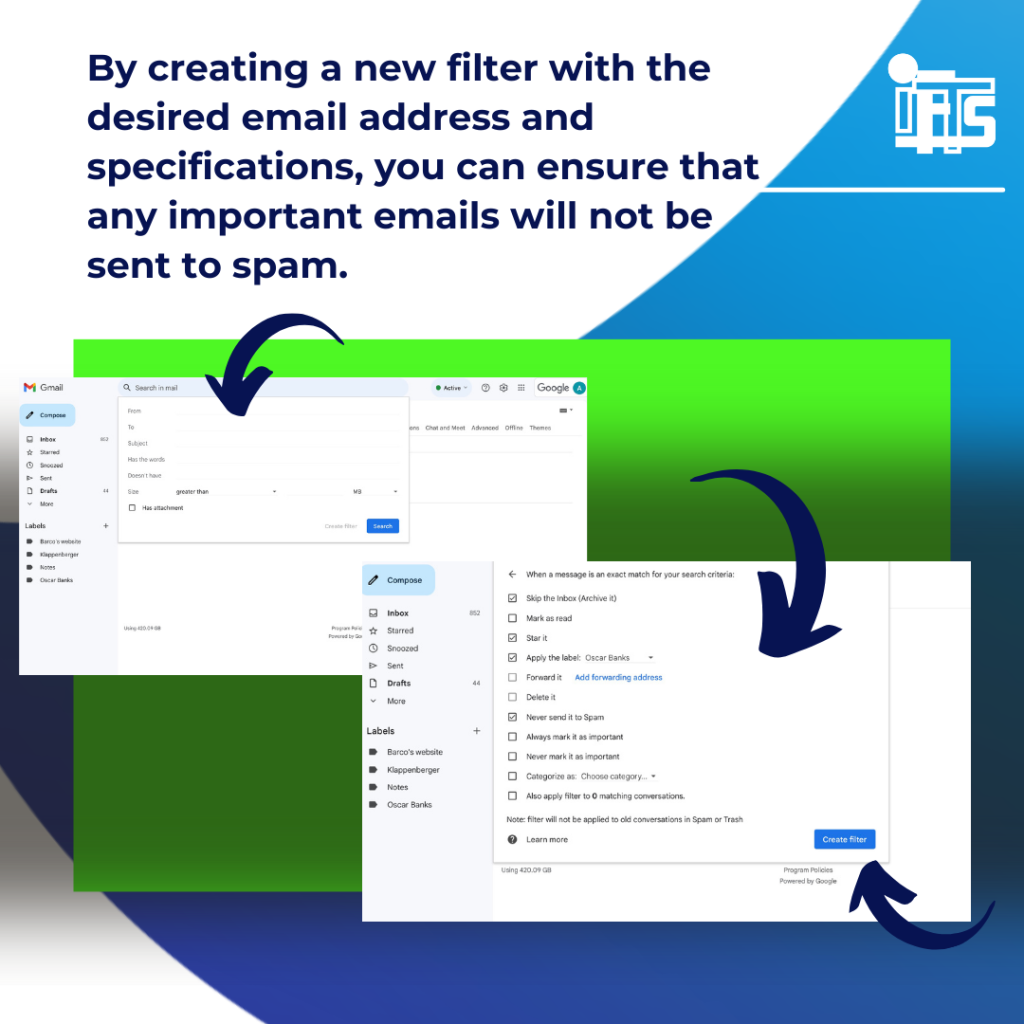
Now that you are in the “Filters and Blocked Addresses” tab, click on the “Create a new filter” tab.

In the “From” field, enter the email address that you want to whitelist. If you want to whitelist multiple email addresses, separate them with a comma, and continue to add to your list.

Selecting the Right Criteria

Once you have entered the desired email address, you can select the guidelines for the filter. You can choose to apply the filter to all incoming emails, or you can specify certain criteria such as keywords, subject lines, or attachment types.

For example, if you only want to whitelist emails from a certain sender with a specific subject line, you can enter those standards in the appropriate fields. You can also choose what action to take with the emails that meet the filter criteria, such as marking them as important or archiving them.

By creating a new filter with the desired email address and specifications, you can ensure that any important emails will not be sent to spam.

Choosing the Never Send to Spam Option

Now that you’ve created a new filter with the email address and criteria, you can also simply check the box “Never send it to Spam” without needing to select any other parameters.

Saving the Filter

After selecting the “Never send it to Spam ” option, or other criteria, click on the “Create filter” button to save the filter. This will ensure that all future emails from the whitelisted email address are delivered to the inbox.

We hope you have a better understanding of how whitelisting an email address in Google is an easy process that can help increase the likelihood that important emails from important clients are not missed. 

Again, we want to point out that whitelisting an email address does not guarantee that all emails from that address will be delivered to the inbox, but it is a great step to take.

Need more help?

Let us handle the important marketing details so you can focus on running a successful painting company! Email si@iftsdesign.com to find out more!