fbpx

Boost Your Business Part 2: Easy Steps to Get More Google Reviews with a Custom Business Card

In today’s digital age, online reviews play a crucial role in shaping the reputation and success of businesses. Positive Google reviews not only build credibility but also attract more customers to your doorstep. So, how can you make it easier for your satisfied customers to leave glowing reviews? The answer lies in a simple yet powerful strategy: custom business cards. 

In our previous blog post, we showed you how to get a shareable Google Business review link and how to turn that link into a QR code using Bitly. 

Now, we’re going to show you how to leverage the power of Canva to create custom business cards with your Google review link that drives even more Google reviews to your business.

Why Google Reviews Matter

Before we dive into the tutorial, let’s briefly discuss why Google reviews are so important for businesses. 

  1. Credibility: Positive reviews from satisfied customers build trust and credibility in the eyes of potential customers.
  2. Visibility: Higher review ratings and greater numbers of reviews can improve your business’s visibility in Google search results.
  3. Customer Acquisition: A strong reputation with positive reviews can significantly influence a customer’s decision to choose your business over competitors.

Now that we understand the importance of Google reviews, let’s get started with the tutorial!

Sharing Made Easy With a Custom Review Card

These cards not only serve as a reminder for customers to leave feedback but also make it incredibly convenient for them to do so. By incorporating a QR code linked directly to your Google review page, you’re simplifying the process for your customers, ultimately increasing the likelihood of them leaving a positive review.

Let’s explore how you can create and utilize these custom review cards to further enhance your online reputation and attract more customers to your business.

Step 1: Designing Your Custom Business Card in Canva

Canva is a user-friendly design platform that offers a wide range of templates for various purposes, including business cards. Here’s how to create your custom business card:

  1. Open Canva: Sign in to your Canva account or create one if you haven’t already.
  2. Select a Business Card Template: Browse through Canva’s selection of business card templates and choose one that fits your style and branding.
  3. Customize Your Design: Add your logo, contact information, and any other branding elements to personalize your business card.
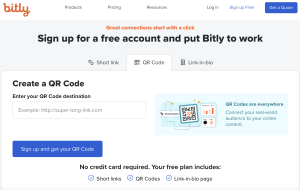
  4. Adding the Bitly QR Code: Now, it’s time to generate a Bitly QR code linked to your Google review page. Head over to Bitly and follow the instructions to create a QR code linked directly to your Google review page, or watch our tutorial here.
  5. Incorporate the QR Code: Once you have your QR code, add it to your business card design in Canva. Ensure that it’s placed prominently and is easily scannable.

Step 2: Printing and Distribution

  1. Printing: You can print your business cards at home if you have the necessary equipment, or use a professional printing service for a high-quality finish.

2. Strategic Distribution: Make sure to leave your custom business cards at your checkout counter, include them in packaging, or hand them out during events or networking opportunities. The key is to make them readily available to your customers.

Ready, Set, Go Get Those Reviews!

By following these simple steps, you can create custom business cards that not only represent your brand but also serve as powerful tools for boosting your Google reviews. Remember, the more accessible and user-friendly you make the review process for your customers, the more likely they are to leave positive feedback.

So, what are you waiting for? Start designing your custom business cards today and watch as your Google reviews soar, bringing in more customers and growing your business’s reputation.

If you found this tutorial helpful, don’t forget to share it with others who might benefit from it. 

Stay tuned to our blog for more tips and tricks to help you succeed in the digital world.

Happy designing and here’s to more glowing Google reviews for your business!

Boosting Your House Painting Business Revenue: Four Proven Ways to Improve Google Ads Results

Are you a house painting business owner who wants to save money on Google Ads and get more customers? 

We’ve got four simple tips to help you do just that. 

In this blog post, we’ll show you how to make Google Ads work better for your painting business, and it’s not as hard as you might think.

Tip 1 - Make a Special Page For Your Google Ads (Your Landing Page)

To get better results with Google Ads, you need a special page on your website, called a landing page, just for the people who click on your ads. This page should make it easy for them to contact you. 

Be sure that you include your phone number in the upper-right hand side and have a form that they can fill out.  You may also want to consider having a way to directly schedule the appointment, like a calendar or a chat function for the people that cannot wait to get started.

Don’t worry about making it show up on Google.  It doesn’t have to be optimized for SEO (search engine optimization) because you are sending paid traffic to it. 

Instead, make it all about getting people to contact you or leave the page. 

This simple change can make a big difference.

Tip 2 – Make Sure That Your Ads and Page Match (Ad Congruity)

If your ad talks about a specific service or benefit, make sure the page it leads to talks about the same thing. If your ad is about painting a room, the page should be too. If it’s about fixing a ceiling, the page should be all about that. This way, people won’t get confused, and more of them will contact you.

You will also want to use similar fonts, colors and images.

This technique is called “ad congruity” and it helps potential clients make the connection from your ad to your landing page in their mind.  The more they can look alike, the better. 

If your website hasn’t been updated in a while, this article will help!

Tip 3 - Focus on What People Want (Focus on the Client’s What’s In It For Me?)

Instead of talking about what you do, focus on what people want. 

People who need painting services want their homes to look great. So, tell them how your painting services will make their homes look amazing. Talk about the results and benefits they’ll get. This will get more people interested in what you offer.

People always want to know, “What’s in it for me?”

So, answer them in a way that will elevate their status, but will highlight what you can do.  It’s a win-win for everyone.

Tip 4 - Show You're Trustworthy

People like to see that others have been happy with your services. In fact, 46% of consumers feel that online business reviews are as trustworthy as personal recommendations from friends or family according to BrightLocal.

Add reviews from past customers to your landing page. These can be written reviews and even short videos where your happy customers talk about their experience. You can even use widgets to embed the latest reviews from Google into your Website if you are using WordPress.

By making it easy to see what people are saying, it helps people trust you and decide to contact you.

Sometimes, people don’t leave reviews because they don’t know what to write.  To make it easy to leave a review, send your client some variation of the following email:

“Mrs. Smith – 

We hope that you found our service to be extraordinary.  If that is the case, we would love for you to leave us a review.

To help you get started (and avoid writer’s block), we have found that the most impactful reviews answer these questions:

  • What work did we do for you and where are you located?
  • Was it done well?
  • Why did you pick our company?
  • What was the best thing about working with our company?
  • Would you recommend us to family and friends?

Please click here and it will take you directly to our Google Review Page: [Link]

Thank you for choosing us and we really appreciate you taking the time to leave a review.” 

We recommend asking for a review after your final walkthrough, which is when your client should be the happiest.

By asking these questions, you help guide them to use the words and phrases that will make your reviews relevant to most searchers looking for companies like yours. In addition, they will leave reviews that look non-spammy and well thought out.

Where To Go From Here

Improving your Google Ads results is doable, even if you’re running a house painting business by yourself. 

By following these simple steps, you can save money on advertising and get more customers. Just make a special landing page, match your ads to it, focus on what people want, and show that you’re trustworthy. These changes can help your business grow. 

If you need more help, feel free to reach out to IFTS. Good luck with your house painting business!

How to Whitelist an Email Address in Google: A Simple Guide

It is important to whitelist an email address so that important emails don’t end up in the spam or junk folder.

Gmail, Google’s email service, makes it quick and simple to put an email address on a whitelist. By adding an email address to the whitelist, you can ensure that all emails from that address will be delivered to your inbox.

Be aware, whitelisting an email address in Gmail does not guarantee that all emails from that address will be delivered to your inbox. Gmail’s spam filter is constantly evolving and may still mark some emails as spam. However, whitelisting an email address can significantly increase the chances of receiving those important emails.

Understanding Whitelisting

Whitelisting is a way of allowing emails from certain senders to get through spam filters and reach your mailbox directly. This is useful if you want to make sure that emails from individuals you know and trust always reach you, even if they contain potentially spam-like information.

When you whitelist an email address, you are telling your email provider that you trust that sender and want to receive their emails. This is really important for businesses that rely on email for communication with clients or customers, as important emails can sometimes be miss marked as spam and never reach their intended recipient.

Just remember, whitelisting doesn’t stop spam. Even if you have whitelisted some senders, hackers and scammers can still send emails through. It can, however, be a good approach to prevent unintentional rejection of those important client emails.

You can whitelist an email address in Google by adding the sender’s email address to your Contacts list or by creating a filter that allows their emails to bypass the spam filter. By doing so, you can relax knowing that emails from that source always arrive in your mailbox, even if they include potentially spam-like content.

Accessing Your Google Account Settings

To whitelist an email address in Google, you need to access your Google account settings. Here’s how:

  1. Open your web browser and go to Google.
  2. Click on the “Sign in” button located at the top-right corner of the page.
  3. Enter your Google account email address and password, then click on the “Sign in” button.

Once you are signed in, click on the “Google apps” button located at the top-right corner of the page.

From the drop-down menu, click on the “Gmail” icon.

You are now in your Gmail account inbox and ready to start whitelisting emails.

Creating a New Contact

The fastest way to whitelist an email address in Gmail is by simply adding the sender to your contact list. 

To do this, go to your inbox and hover over an email from the person whose email address you wish to add to your whitelist. When a person + icon appears in the top-right corner of the new tab, click and select “Add [sender] to Contacts.” This will add the sender’s email address to your contacts list and allow you to receive emails from them.

Navigating to the Filters and Blocked Addresses Tab

The other way to prevent emails from being sent to spam is to go to the Filters and Blocked Addresses tab in your Gmail settings following these quick steps:

  1. In your Gmail inbox, click on the gear icon located at the top-right corner of the page.
  2. From the drop-down menu, click on “Settings” and select “See All Settings”.
  3. Click on the “Filters and Blocked Addresses” tab, which is located near the top of the page.

You will now see your Gmail account settings page, where you can whitelist an email address through filters.

Overall, navigating to the Filters and Blocked Addresses tab in Google is a straightforward process that can help users better manage their email. Now, you are ready to create a new filter.

Creating a New Filter

Instead of just creating a new contact, you can create a new filter for keeping essential emails. By following these simple steps, users can ensure that important messages are never missed or marked as spam.

Entering the Desired Email Address

Now that you are in the “Filters and Blocked Addresses” tab, click on the “Create a new filter” tab.

In the “From” field, enter the email address that you want to whitelist. If you want to whitelist multiple email addresses, separate them with a comma, and continue to add to your list.

Selecting the Right Criteria

Once you have entered the desired email address, you can select the guidelines for the filter. You can choose to apply the filter to all incoming emails, or you can specify certain criteria such as keywords, subject lines, or attachment types.

For example, if you only want to whitelist emails from a certain sender with a specific subject line, you can enter those standards in the appropriate fields. You can also choose what action to take with the emails that meet the filter criteria, such as marking them as important or archiving them.

By creating a new filter with the desired email address and specifications, you can ensure that any important emails will not be sent to spam.

Choosing the Never Send to Spam Option

Now that you’ve created a new filter with the email address and criteria, you can also simply check the box “Never send it to Spam” without needing to select any other parameters.

Saving the Filter

After selecting the “Never send it to Spam ” option, or other criteria, click on the “Create filter” button to save the filter. This will ensure that all future emails from the whitelisted email address are delivered to the inbox.

We hope you have a better understanding of how whitelisting an email address in Google is an easy process that can help increase the likelihood that important emails from important clients are not missed. 

Again, we want to point out that whitelisting an email address does not guarantee that all emails from that address will be delivered to the inbox, but it is a great step to take.

Need more help?

Let us handle the important marketing details so you can focus on running a successful painting company! Email si@iftsdesign.com to find out more!