fbpx

5 Secret Ingredients: A Recipe for Social Media Marketing Success in 2023

In the fast-moving world of the internet, social media marketing has grown into a crucial tool for businesses to connect with their audiences. It wasn’t too long ago when these platforms were just for talking to friends and family. But things have changed a lot. In a recent survey, over 90% of marketers said that social media has greatly boosted their brand’s visibility. This means that if you’re not using social media for your business, you’re missing out on a big opportunity.

In this article, we’ll uncover the hidden treasures of social media marketing, just like a chef reveals the secret sauce that makes a dish extraordinary. 

1. Social Media and SEO: Serving Up Important Content

You might wonder what social media has to do with making your website show up on search engines.

The idea is simple: search engines know which pages on your website get visitors. When your content gets shared on social media, it sends people to your website. This tells search engines that your website is still important, and it helps your site stay high up in search results. Obviously, more individuals are exposed to your content when more individuals share it.

It’s like having a secret spice that makes your dish unforgettable. When your website consistently receives traffic from social media referrals, search engines interpret it as a signal of relevance and credibility. Consequently, they prioritize displaying your website in search results, increasing its visibility to a wider audience.

This effect can make your website’s online presence much stronger and bring in even more free traffic. 

2. Know Your Audience's Taste

Social media is a bit like a detective tool. By paying attention to the people who follow you, you can learn a lot about your target audience. Just by checking out their profiles and the other pages they like, you can figure out what they like to buy, what they enjoy doing, and which brands they prefer.

Understanding your audience’s preferences and interests allows you to tailor your content and marketing strategies to effectively engage with them. By leveraging this knowledge, you can create personalized experiences that resonate with your target audience, fostering stronger connections and increasing customer loyalty.

Ultimately, this invaluable insight enables you to stay ahead of the competition and deliver exceptional value to your customers. The more you know about your audience, the better you can make your products or services fit their tastes. 

3. Creating the Best Flavor for a Strong Brand and Relationships

People don’t visit social media to look at ads. They go there to chat and have fun. So, when you talk to your audience and make friends with them, it helps you build a strong brand and connections.

Social media is not just about keeping your old customers happy but also about finding new ones. By engaging with your audience on social media, you can be the one who brings the best dish to the party.

Showcase your brand’s personality and values, and make it easier for potential customers to connect with you. Additionally, by actively participating in conversations and sharing valuable content, you can attract new customers who may not have been aware of your business before. 

4. Stirring Up Your Message for a Second Chance

What if you could cook up a winning meal that hits the spot every time?

On social media, you can! You can choose who gets to see your ads, making sure they’re the right people. 

And here’s the fun part – if someone almost became your customer but didn’t quite make it, you can give them a second chance. It’s like having a secret cooking technique that never fails. 

By targeting specific demographics and interests, you can ensure that your message reaches the right audience, which is more likely to be interested in your products or services. Additionally, by retargeting those who have shown interest but didn’t convert, you can remind them of what they missed out on and entice them to give your business another try.

5. Affordably Appetizing

You might have thought that you needed a lot of money to do marketing on social media. But it’s not true! Making a business profile is free, and so is chatting with your fans. 

If you decide to advertise on social media, you can start small if you want. The great thing about social media is that it’s fair. Big brands might have more money for ads, but anyone can make a social media account for free and talk to their audience. Social media platforms also offer affordable advertising options, allowing you to reach a wider audience without breaking the bank. 

With targeted ads and analytics, you can ensure that your marketing efforts are reaching the right people and generating a positive return on investment. 

So don’t let budget constraints hold you back from leveraging the power of social media for your business. You can have your marketing cake and eat it, too!

In a nutshell, social media marketing is no longer just a choice for businesses; it’s a necessity. 

This smorgasbord of hidden secrets about social media marketing shows how it can boost your SEO, help you understand your audience, create strong brand connections, allow for targeting the right people, and not cost a fortune. 

If you need help with your social media journey or want professionals to assist you, feel free to contact us at IFTS! 

How to Connect Your Google Calendar to GoHighLevel

Benefits of Calendar Integration

If you use GoHighLevel to manage a small painting business, it can help you optimize operations by allowing you to use a single platform rather than multiple apps and platforms. This makes it simple for consumers to learn about you, fill out forms, schedule appointments, and conduct research on your company.

Integrating your Google Calendar with GoHighLevel gives you a lot of benefits that can help you make better use of your time and make you more productive overall.

First, it saves time by getting rid of the need to physically cross-check or update multiple calendars. Second, it makes sure that your work and personal plans are in sync, which keeps them from overlapping or clashing. Third, you can easily plan meetings, set reminders, and add events, which makes you more productive. Lastly, it lets you get updates across all platforms in real time, so you always know if your plan changes.

Connecting Your Google Calendar to GoHighLevel

This can help you streamline your scheduling and ensure that you never miss an important event or meeting. Here’s a step-by-step guide on how to do it:

Step 1: Log into Your GoHighLevel Account

The first step is to log into your GoHighLevel account. If you don’t yet have an account, you can sign up on the GoHighLevel website.

Step 2: Navigate to the Calendar

Once you’re logged in, navigate to the “Calendar” section in your GoHighLevel account.

You’ll see a tab at the top of the page labeled “Calendar Settings” that you can select.

Step 3: Click on 'Integrations'

Find and click on the “Integrations” button located on the left hand side menu of your screen.

Step 4: Google Authorization

To add your email account, you’ll be asked to provide your Google account credentials and to give GoHighLevel access to your Google Calendar. Log in to your Google account and click “allow” to provide the necessary authorization.

Step 5: Sync Your Calendars

After allowing your Google Account to integrate with GoHighLevel, you will then select the “My Profile” tab located in the menu on the left side of the screen. All of your general account information will appear, and you will be able to scroll down to the section labeled “Calendar Configuration” and click the “edit” button.

You will then be able to select your Google Calendar account to sync with your GoHighLevel account. Hit save, and you are all done!

You Are Now Synced!

After following these simple steps, your Google Calendar will be in sync with GoHighLevel. 

Troubleshooting Common Issues

Occasionally, you might encounter issues when connecting your Google Calendar to GoHighLevel. Here are a few troubleshooting tips:

  1. Missing Events: If your events aren’t showing up in GoHighLevel, check to see if they’re marked as ‘busy’ in Google Calendar. Only ‘busy’ events are visible in GoHighLevel.
  2. Duplicate Events: If you’re seeing duplicate events, make sure you haven’t connected the same calendar more than once. Go to the GoHighLevel settings and verify the connected calendars.
  3. Not Receiving Updates: If you’re not receiving updates about changes to your schedule, ensure that your notification settings are correct in both Google Calendar and GoHighLevel.

Remember, if problems persist, don’t hesitate to reach out to GoHighLevel support for further assistance.

Additional Support Options for Calendar Syncing

Beyond the provided troubleshooting steps, there are other avenues for support should issues persist with your calendar syncing. 

  1. GoHighLevel Community Forum: This is a great place to connect with other GoHighLevel users. You can post your queries and get input from individuals who have encountered similar issues. Access the forum here.
  2. GoHighLevel Webinars: These webinars often address common issues, including troubleshooting syncing problems. Keep an eye on the schedule to catch relevant sessions. Find the upcoming webinars here.
  3. Google Support: Google offers comprehensive support for Google Calendar. You can find articles, guides, and community forums to get help. Visit Google’s Help Center here.
  4. Contact Support: If you’re still facing issues after exploring these resources, consider reaching out to GoHighLevel’s customer service directly via email or phone call. They can provide personalized assistance to resolve your problem. Contact details can be found here.

Remember, the goal is to ensure your calendar syncs seamlessly, enhancing your productivity and scheduling efficiency. Don’t hesitate to seek help if you encounter any issues.

​Maximizing Your Calendar Integration

To truly make the most of your Google Calendar and GoHighLevel integration, here are some effective tips:

  1. Check for Conflicts: When syncing your Google Calendar in the profile screen, you can also set up your calendar to check for conflicts.
  2. Utilize Color-Coding: Use different colors for different types of events or tasks. This helps in identifying and prioritizing tasks at a glance. 
  3. Set Reminders: Make good use of the reminder feature. Set reminders for important meetings, deadlines, or tasks.
  4. Use Description Fields: When creating an event, use description fields to note down key points about the meeting or task. This will serve as a quick reference later.
  5. Share Your Calendar: If you’re working with a team, share your calendar with them. This will not only keep everyone informed but also help avoid scheduling conflicts.

Leverage Third-Party Integrations: GoHighLevel integrates with numerous third-party applications. Leverage these integrations to maximize efficiency.

That's it!

You have successfully connected your Google Calendar to GoHighLevel. All of the events in your calendar will now be synced and you’ll never miss another important meeting or event again. 

GoHighLevel also offers a wide range of features that make managing your calendar even easier, such as the ability to view and add events to multiple calendars at the same time, create reminders for upcoming events, and access event details quickly.

Now that you have connected your Google Calendar to GoHighLevel, why not take advantage of some other features?

You can create and schedule tasks directly from your calendar, as well as set reminders for yourself to stay on top of your to-do list. You can also integrate with third-party applications, such as Slack and Zoom, to help streamline communication among teams. 

Remember, efficient use of integrated calendars can significantly boost your productivity and streamline your workflow, saving you valuable time and effort.

With GoHighLevel’s calendar integration features, you’ll have everything you need to stay organized and on top of your daily tasks! Try it out today! We hope you enjoy the convenience of syncing your Google Calendar with GoHighLevel! 

Let us know if you need help with getting your calendar synced with GoHighLevel by contacting si@iftsdesign.com!

How to Whitelist an Email Address in Google: A Simple Guide

It is important to whitelist an email address so that important emails don’t end up in the spam or junk folder.

Gmail, Google’s email service, makes it quick and simple to put an email address on a whitelist. By adding an email address to the whitelist, you can ensure that all emails from that address will be delivered to your inbox.

Be aware, whitelisting an email address in Gmail does not guarantee that all emails from that address will be delivered to your inbox. Gmail’s spam filter is constantly evolving and may still mark some emails as spam. However, whitelisting an email address can significantly increase the chances of receiving those important emails.

Understanding Whitelisting

Whitelisting is a way of allowing emails from certain senders to get through spam filters and reach your mailbox directly. This is useful if you want to make sure that emails from individuals you know and trust always reach you, even if they contain potentially spam-like information.

When you whitelist an email address, you are telling your email provider that you trust that sender and want to receive their emails. This is really important for businesses that rely on email for communication with clients or customers, as important emails can sometimes be miss marked as spam and never reach their intended recipient.

Just remember, whitelisting doesn’t stop spam. Even if you have whitelisted some senders, hackers and scammers can still send emails through. It can, however, be a good approach to prevent unintentional rejection of those important client emails.

You can whitelist an email address in Google by adding the sender’s email address to your Contacts list or by creating a filter that allows their emails to bypass the spam filter. By doing so, you can relax knowing that emails from that source always arrive in your mailbox, even if they include potentially spam-like content.

Accessing Your Google Account Settings

To whitelist an email address in Google, you need to access your Google account settings. Here’s how:

  1. Open your web browser and go to Google.
  2. Click on the “Sign in” button located at the top-right corner of the page.
  3. Enter your Google account email address and password, then click on the “Sign in” button.

Once you are signed in, click on the “Google apps” button located at the top-right corner of the page.

From the drop-down menu, click on the “Gmail” icon.

You are now in your Gmail account inbox and ready to start whitelisting emails.

Creating a New Contact

The fastest way to whitelist an email address in Gmail is by simply adding the sender to your contact list. 

To do this, go to your inbox and hover over an email from the person whose email address you wish to add to your whitelist. When a person + icon appears in the top-right corner of the new tab, click and select “Add [sender] to Contacts.” This will add the sender’s email address to your contacts list and allow you to receive emails from them.

Navigating to the Filters and Blocked Addresses Tab

The other way to prevent emails from being sent to spam is to go to the Filters and Blocked Addresses tab in your Gmail settings following these quick steps:

  1. In your Gmail inbox, click on the gear icon located at the top-right corner of the page.
  2. From the drop-down menu, click on “Settings” and select “See All Settings”.
  3. Click on the “Filters and Blocked Addresses” tab, which is located near the top of the page.

You will now see your Gmail account settings page, where you can whitelist an email address through filters.

Overall, navigating to the Filters and Blocked Addresses tab in Google is a straightforward process that can help users better manage their email. Now, you are ready to create a new filter.

Creating a New Filter

Instead of just creating a new contact, you can create a new filter for keeping essential emails. By following these simple steps, users can ensure that important messages are never missed or marked as spam.

Entering the Desired Email Address

Now that you are in the “Filters and Blocked Addresses” tab, click on the “Create a new filter” tab.

In the “From” field, enter the email address that you want to whitelist. If you want to whitelist multiple email addresses, separate them with a comma, and continue to add to your list.

Selecting the Right Criteria

Once you have entered the desired email address, you can select the guidelines for the filter. You can choose to apply the filter to all incoming emails, or you can specify certain criteria such as keywords, subject lines, or attachment types.

For example, if you only want to whitelist emails from a certain sender with a specific subject line, you can enter those standards in the appropriate fields. You can also choose what action to take with the emails that meet the filter criteria, such as marking them as important or archiving them.

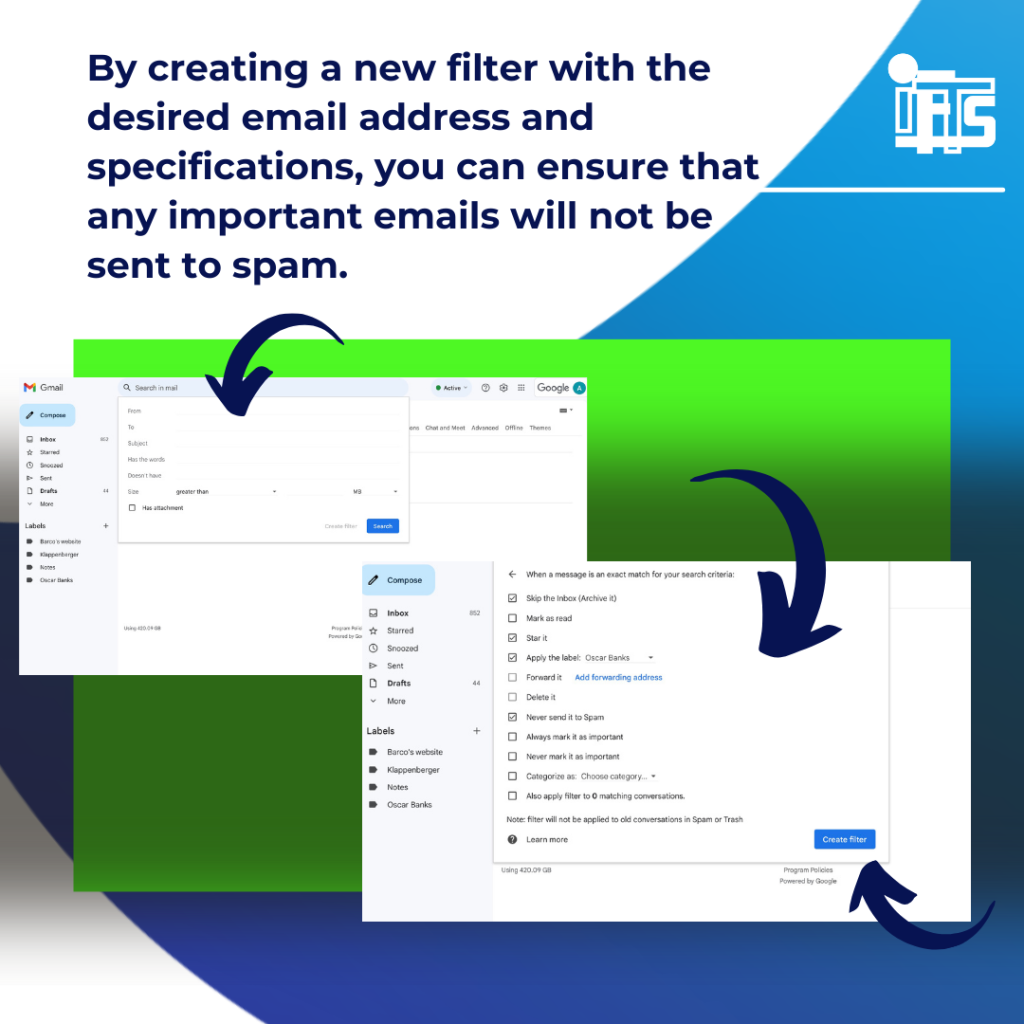
By creating a new filter with the desired email address and specifications, you can ensure that any important emails will not be sent to spam.

Choosing the Never Send to Spam Option

Now that you’ve created a new filter with the email address and criteria, you can also simply check the box “Never send it to Spam” without needing to select any other parameters.

Saving the Filter

After selecting the “Never send it to Spam ” option, or other criteria, click on the “Create filter” button to save the filter. This will ensure that all future emails from the whitelisted email address are delivered to the inbox.

We hope you have a better understanding of how whitelisting an email address in Google is an easy process that can help increase the likelihood that important emails from important clients are not missed. 

Again, we want to point out that whitelisting an email address does not guarantee that all emails from that address will be delivered to the inbox, but it is a great step to take.

Need more help?

Let us handle the important marketing details so you can focus on running a successful painting company! Email si@iftsdesign.com to find out more!